

I have recently been working with some low-resolution bitmap fonts for a few projects, which needed to be re-sized for different uses.
I’ll share here a few tricks that I use to get the detail out of each letter as a vector, so that it can be rendered at a higher resolution.
Example
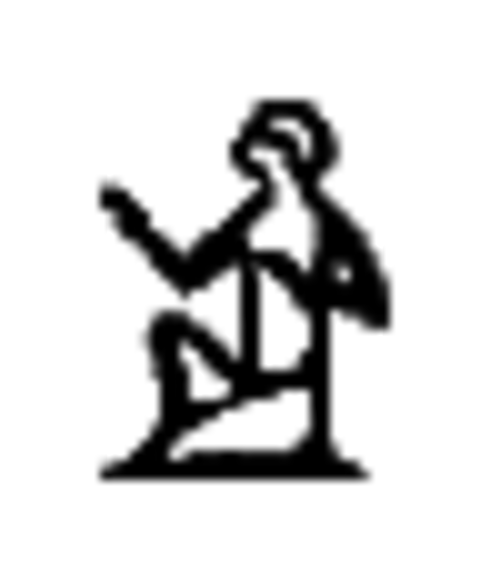
A good example might be this picture of a hieroglyph from the WikiHiero MediaWiki extension, which is 28 pixels wide:
![]()

Scaled up, it looks like this:

So small images become very pixellated when you resize them. The good news is that even from a small image, there is quite a lot of detail which we can use. If we’re smart about it, the glyph can be rendered like this:

You can still see some artifacts because of the low resolution of the input, but it’s clearly an improvement.
You will need
- ImageMagick for raster operations.
- potrace to trace the image.
- Inkscape to produce a high-quality raster.
Steps
Prepare
The tracing program will convert the image to pure black & white as its first step. These transformations make sure that the detail is preserved for tracing.
- Padding by 10px on every side to reduce distortion around the edges.
- Scaling by 10x with interpolation
- Convert transparency to white
convert hiero_A1.png -bordercolor white -border 10x10 \
    -resize 1000% -flatten hiero_A1.pnm
The 29×38 grey+alpha input becomes a blurry 490 x 580 greymap surrounded by whitespace.
This preparation is important, because a large blurry graymap will retain a lot more detail than the original image when a threshold is applied to convert it pure black and white:

Trace
The potrace program will threshold and trace the input image. Here, we will produce an SVG so that we can make it transparent.
The k value affects the threshold operation. It can be increased for a bolder, darker glyph, or reduced for a finer one.
potrace hiero_A1.pnm -k 0.30 --svg
This gives you an SVG with padding:

If you only want a vector, then you can stop here. The next steps will reproduce a smaller PNG with transparency and the correct padding.
I couldn’t find a reliable way to programmatically crop the image back to its original padding as an SVG, but in my case I needed to convert it back to a bitmap anyway, so I cropped it later.
Render
Use Inkscape to convert the SVG back to a large PNG. The output size here is twice as large as the file we traced, just to leave plenty of pixels to work with.
inkscape -z -e hiero_A1_big.png hiero_A1.svg -w 980
Like the SVG, there is still a lot of whitespace here. The image is now a PNG with a transparent background, and unlike the file we traced, the edges of the curves are now anti-aliased.

Crop
Everything is 20x its original size, to get the image, we need to drop 200px of padding from the left and top, then read 580×760 pixels (20 times the 29×38 start).
convert hiero_A1_big.png -crop 580x760+200+200 hiero_A1_cropped.png
This produces a 580×760 image in the same aspect ratio as the original input file.

Scale down
In my case, I only needed to double the resolution of the input file, so I scaled this file down from there.
hiero_A1_cropped.png -resize 58x76 hiero_A1_outp1.png

Success!
As a script
I got these steps from a script that I wrote for doubling the size of a PNG image so that it can be re-used on newer displays.
Usage:
./tracepng.sh foo.png
Where tracepng.sh is:
#!/bin/bash
# A script to upscale small bitmaps in PNG format.
# Pad, upscale, trace, render, crop then downscale.
if [ $# != 1 ]; then
  echo "Usage $0 input.png"
  exit
fi
set -exu
# Names of all the files we will produce
INP_FILE=$1
SVG_FILE="${INP_FILE%.*}.svg"
PNM_FILE="${INP_FILE%.*}.pnm"
LARGE_FILE="${INP_FILE%.*}_big.png"
LARGE_FILE_CROPPED="${INP_FILE%.*}_cropped.png"
OUTP_FILE="${INP_FILE%.*}_outp1.png"
COMPARISON_FILE="${INP_FILE%.*}_outp2.png"

# Width originally
# https://stackoverflow.com/questions/4670013/fast-way-to-get-image-dimensions-not-filesize
IMG_WIDTH=$(identify -format "%w" "$INP_FILE")
IMG_HEIGHT=$(identify -format "%h" "$INP_FILE")
TARGET_WIDTH=$((IMG_WIDTH * 2))
TARGET_HEIGHT=$((IMG_HEIGHT * 2))

# Make huge raster w/ border (whitespace is your friend for black/white interpolation and tracing), then convert to SVG
convert ${INP_FILE} -bordercolor white -border 10x10 -resize 1000% -flatten ${PNM_FILE}

# https://en.wikipedia.org/wiki/Potrace
potrace ${PNM_FILE} -k 0.30 --svg > ${SVG_FILE}

# Target width for intermediate file
EXPANDED_WIDTH=$(((IMG_WIDTH + 20) * 20))
EXPANDED_HEIGHT=$(((IMG_HEIGHT + 20) * 20))
INNER_WIDTH=$((IMG_WIDTH * 20))
INNER_HEIGHT=$((IMG_HEIGHT * 20))
# https://stackoverflow.com/questions/9853325/how-to-convert-a-svg-to-a-png-with-image-magick
inkscape -z -e ${LARGE_FILE} ${SVG_FILE} -w ${EXPANDED_WIDTH}

# Cut new edges off
# http://www.imagemagick.org/Usage/crop/
convert ${LARGE_FILE} -crop ${INNER_WIDTH}x${INNER_HEIGHT}+200+200 ${LARGE_FILE_CROPPED}
convert ${LARGE_FILE_CROPPED} -resize ${TARGET_WIDTH}x${TARGET_HEIGHT} ${OUTP_FILE}
Acknowledgment
The images here are from WikiHiero, and can be remixed under the GNU General Public License 2.0.