How to print red/black on an impact receipt printer

I recently deployed an Epson TM-U220 impact receipt printer. These printers work by striking a ribbon onto the paper, like a type-writer. One of the up-sides to using these intead of a thermal printer is the ability to install a red/black ribbon in place of the default (black) one:

2015-10-colour-receipt-printing-1

2015-10-colour-receipt-printing-2

I connected up my printer using a USB-parallel cable, so my previous posts (Linux, Windows) apply for the connector setup.

Using the escpos-php driver on GitHub, a line of red text is printed like this:

<?php
/*
 * Example of two-color printing, tested on an epson TM-U220 with two-color ribbon installed.
 */
require __DIR__ . '/autoload.php';
use Mike42\Escpos\Printer;
use Mike42\Escpos\PrintConnectors\FilePrintConnector;
$connector = new FilePrintConnector("php://stdout");
$printer = new Printer($connector);

try {
    $printer = new Escpos($connector);
    $printer -> text("Hello World!\n");
    $printer -> setColor(Printer::COLOR_2);
    $printer -> text("Red?!\n");
    $printer -> setColor(Printer::COLOR_1);
    $printer -> text("Default color again?!\n");
    $printer -> cut();
} finally {
    /* Always close the printer! */
    $printer -> close();
}

With this result:

2015-10-colour-receipt-printing-3

How to connect a USB receipt printer up on Mac OS X

This post will show you how to set up a USB receipt printer on Max OS X. These steps were written on Yosemite, but should work on 10.6 onwards (ie, also Snow Leopard through to El Capitan).

This is another post in a series, which has so far covered direct USB printing on Windows and Linux. The printer tested here is this Epson TM-T20:

2015-03-printer-back
2015-03-printer-top

CUPS is the printing system that’s used on Mac, but most users would be more familiar with the system print dialog:

2015-11-mac-usb-epson-12

In our case, we need to set up the printer via the CUPS web interface. This is accessed via a web browser at this address:

http://localhost:631

At first, you will get knocked back:

2015-11-mac-usb-epson-0

To fix this up, open up Applications → Utilities → Terminal and type in:

cupsctl WebInterface=yes

You can then reload the browser and click through to Administration:

2015-11-mac-usb-epson-1

Click Add Printer and log in:

2015-11-mac-usb-epson-2

2015-11-mac-usb-epson-3

Select the USB printer from the list, and optionally share it:

2015-11-mac-usb-epson-4

2015-11-mac-usb-epson-5

Click Select Another Make/Manufacturer, and select Raw → Raw Queue:

2015-11-mac-usb-epson-6

2015-11-mac-usb-epson-7

2015-11-mac-usb-epson-8

Use the defaults for the other options:

2015-11-mac-usb-epson-9

Test print

Type some junk into a file called foo.txt and attempt to print it, using the CUPS printer name:

nano foo.txt
lpr -o raw -H localhost -P EPSON_TM-T20 foo.txt

The prints will be delayed for a few moments, as CUPS spools the jobs.

Disable CUPS web

Once you’re done, for security reasons you should reset this option from before, to disable the web interface to CUPS:

cupsctl WebInterface=no

How to set up sudo on Debian GNU/Linux

If you just installed Debian, you might notice that one Linux staple, sudo is not installed by default. Here is the quick way to add it, and set yourself up as an administrative user.

1. Install sudo, using the su command to elevate privileges.

bob$ su
Password: 
root# apt-get install sudo

2. Make yourself an administrator. The default /etc/sudoers file contains this line:

# Allow members of group sudo to execute any command
%sudo	ALL=(ALL:ALL) ALL

So simply add your account (‘bob‘ in this example) to the sudo group:

root# usermod -a -G sudo bob

3. Log out and back in again, in order to apply changes to your group membership.

bob$ groups
bob cdrom floppy sudo audio dip video plugdev netdev lpadmin scanner bluetooth
bob$ sudo echo test
[sudo] password for bob: 
test

Fix merge conflicts in git with Meld

When you’re writing code collaboratively, there’s plenty of situations when you need to combine two sets of changes.

This could happen, for example, if Bob and yourself both fix different bugs by making edits to the same file.

foo

This post assumes that your source code is tracked in git.

First up, install meld. The Meld homepage has instructions for other platforms, but on Debian/Ubuntu, it’s just:

sudo apt-get install meld

Now tell git to use it as a tool:

git config --global merge.tool meld

Once you have a merge conflict, you can then fire up Meld like this:

git mergetool

For each file, you will get a 3-way diff. Click the arrows on the sides to move the code you want into the middle:

2015-10-meld

Once you’ve saved the file and closed Meld, you will be prompted on the command-line. You just tell it whether you’ve successfully merged the file, until it stops giving you new files to merge.

After this, commit the changes:

git commit

Done!

Simpler usage

If you don’t use git, you can simply call Meld from the command-line as well. This shows you differences between files in a similar window, and lets you move blocks of code around as well:

meld foo.c bar.c

Continuous testing in PHP with Eclipse

If you already write test cases over your code, then continuous testing is a simple idea: Get fast feedback on your code by running your project’s unit tests very frequently. From PHP, the de facto standard testing tool is PHPUnit, so running tests usually involves typing phpunit into a terminal.

This post will show you how to set up a project with the Eclipse MakeGood plugin, which is a continuous test runner for the Eclipse IDE. When it is enabled, the plugin runs a set of tests every time you save a file.

This is best used on projects which are:

  • Small — so you tests run in a reasonable timeframe.
  • Complex — reasonably high risk of introducing defects.
  • Well-tested — so your unit tests are reasonably likely to identify defects.

Set up your machine

Your machine needs Eclipse PDT, MakeGood and composer.

Eclipse PDT

If you’ve found this post via Google, then you probably already run Eclipse and PHP. If not, fetch the “Eclipse for PHP developers” distribution from here

You need to pick up the XDebug extension to really make use of this setup. On Debian-based distributions, this is achieved via:

sudo apt-get install php5-xdebug

If you don’t use Eclipse yet, then check whether languages or tools you’ve used before have plugins in the Eclipse Marketplace. There’s a good chance that Eclipse will do the whole lot.

MakeGood

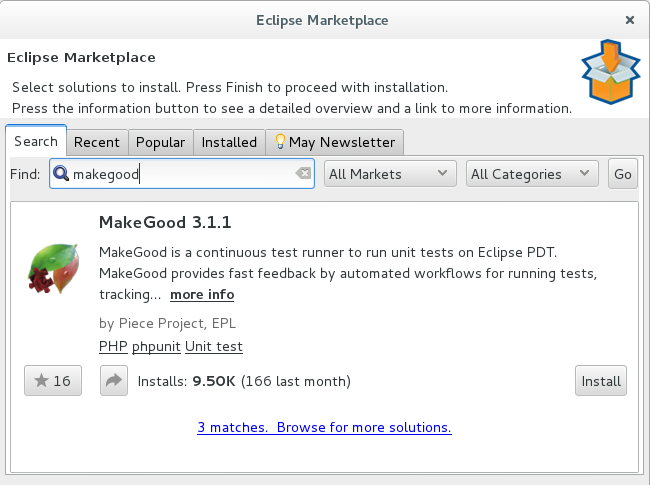
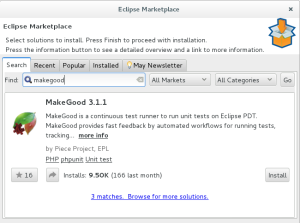
MakeGood is simply an Eclipse plugin, so you can fetch it from the Eclipse Marketplace.

Navigate to Help → Eclipse Marketplace and search for “makegood”:

2015-06-eclipse-makegood-01

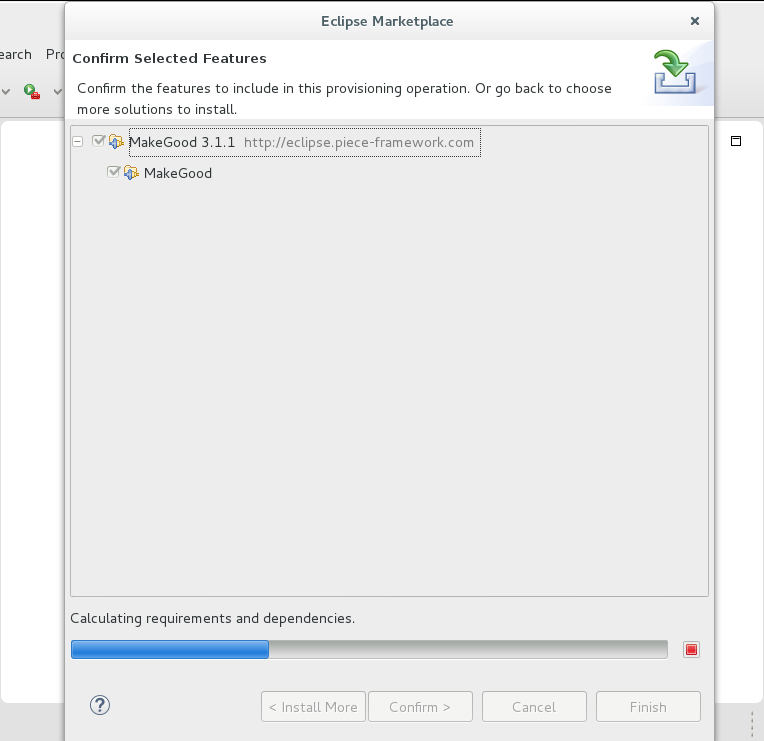
Wait for the info to be fetched:

Check all the boxes, and then click Confirm:

2015-06-eclipse-makegood-03

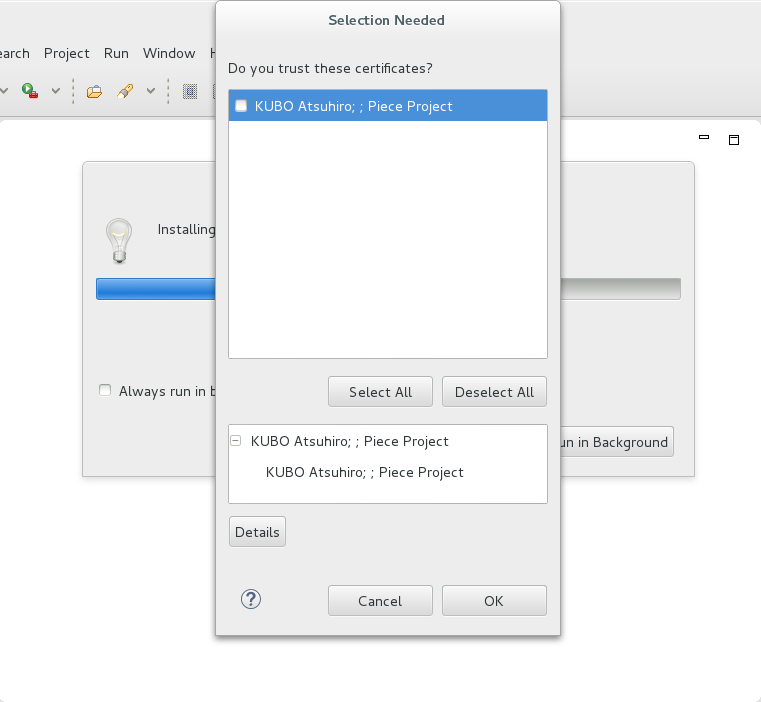
Accept the terms, and wait for the install:

2015-06-eclipse-makegood-02

At one point, you will be prompted to accept a developer’s certificate, which you need to do before continuing:

2015-06-eclipse-makegood-04

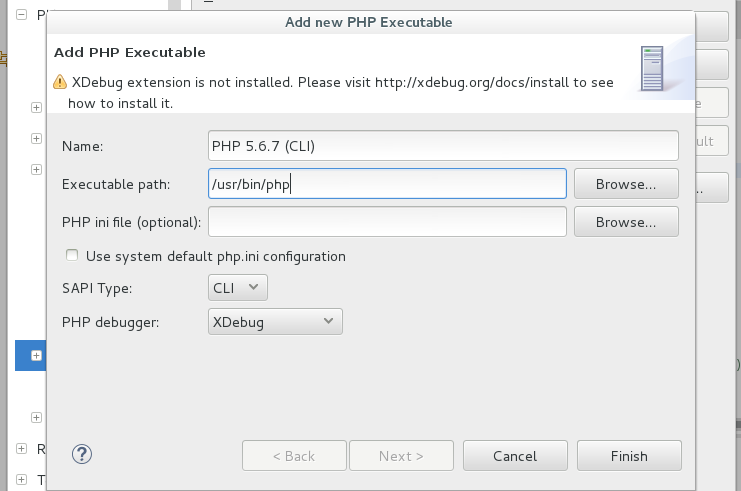
This feature will not work unless you have a PHP binary set up. You need to configure this under Window → Preferences → PHP → PHP executables.:

2015-07-eclipse-add-php-executable

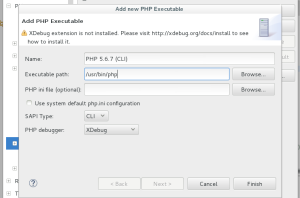
This is system dependent: Windows users will find a file somewhere called php-cli.exe, while Linux users might find it at /usr/bin/php.

After this, MakeGood is installed. It is configured per-project, so we’ll get to that after the next section.

Composer

Composer is a dependency manager which is widely used in the PHP world.

You can get it from https://getcomposer.org/download/

Rather than use the install process which is suggested there, you can simply download the phar, make it executable, and place it somewhere like /usr/bin:

wget https://getcomposer.org/composer.phar
chmod +x composer.phar
sudo mv composer.phar /usr/bin/composer
composer --version

By using composer to load PHPUnit, MakeGood becomes much easier to configure.

Project setup

To start, make a new PHP project by clicking File → New → PHP Project. Name it something like “Example”.

We are using composer here because it provides an easy way to make sure MakeGood can see the PHPUnit code. So let’s set a few things up:

First, add a composer.json file which adds a recent version of PHPUnit as a require-dev dependency. Right-click Example project, and navigate to New → File, naming it composer.json:

{
    "require-dev": {
        "phpunit/phpunit": "4.5.*"
    }
}

Note that with the way that MakeGood constructs its command-line, newer versions of PHPUnit do not appear to work correctly at the time of writing.

Next up, install the new dependency with the help of Composer:

$ composer install
Loading composer repositories with package information
Installing dependencies (including require-dev)
  - Installing sebastian/version (1.0.6)
  - Installing sebastian/global-state (1.0.0)
  - Installing sebastian/recursion-context (1.0.1)
  - Installing sebastian/exporter (1.2.1)
  - Installing sebastian/environment (1.3.2)
  - Installing sebastian/diff (1.3.0)
  - Installing sebastian/comparator (1.2.0)
  - Installing symfony/yaml (v2.7.3)
  - Installing doctrine/instantiator (1.0.5)
  - Installing phpdocumentor/reflection-docblock (2.0.4)
  - Installing phpspec/prophecy (v1.4.1)
  - Installing phpunit/php-text-template (1.2.1)
  - Installing phpunit/phpunit-mock-objects (2.3.6)
  - Installing phpunit/php-timer (1.0.7)
  - Installing phpunit/php-token-stream (1.4.3)
  - Installing phpunit/php-file-iterator (1.3.4)
  - Installing phpunit/php-code-coverage (2.2.2)
  - Installing phpunit/phpunit (4.5.1)

sebastian/global-state suggests installing ext-uopz (*)
phpdocumentor/reflection-docblock suggests installing dflydev/markdown (~1.0)
phpdocumentor/reflection-docblock suggests installing erusev/parsedown (~1.0)
phpunit/phpunit suggests installing phpunit/php-invoker (~1.1)
Writing lock file
Generating autoload files

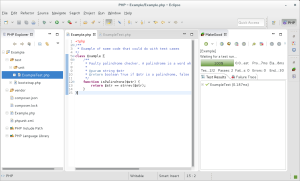
Set up an Example.php class with a bit of code:

<?php
/**
 * Example of some code that could do with test cases
 */
class Example {
	/**
	 * Faulty palindrome checker. A palindrome is a word which is the same when read orward and backward.
	 * 
	 * @param string $str
	 * @return boolean True if $str is a palindrome, false if it is not.
	 */
	function isPalindrone($str) {
		$halfLen = (int)(strlen($str) / 2);
		for($i = 0; $i < $halfLen; $i++) {
			// Compare characters from the front and back of the string, and move toward the middle.
			$c1 = substr($str, $i, 1);
			$c2 = substr($str, (2 * $halfLen - 1) - $i, 1);
			if($c1 != $c2) {
				return false;
			}
		}		
		return true;
	}

}

Set up a test/unit folder and create a ExampleTest class with a useful test case in it, like so:

<?php
class ExampleTest extends PHPUnit_Framework_TestCase {
	public function testIsPalindrome() {
		$e = new Example();
		$this -> assertTrue($e -> isPalindrone(""));
		$this -> assertTrue($e -> isPalindrone("a"));
		$this -> assertTrue($e -> isPalindrone("ABBA"));
		$this -> assertFalse($e -> isPalindrone("test"));
	}
}

The unit tests go in their own folder, in case you decide to add more extensive (slower) tests later. MakeGood should only be configured to run fast tests!

Now add a test/bootstrap.php for test cases to load classes (NB: At scale, you would have composer autoload your classes, and use that as your PHPUnit class loader).

<?php
require_once 'vendor/autoload.php';
require_once 'Example.php';

Optionally, also add a phpunit.xml file in your project root to configure PHPUnit with, so that you can run it on the command-line:

<phpunit
         xmlns:xsi="http://www.w3.org/2001/XMLSchema-instance"
         xsi:noNamespaceSchemaLocation="http://schema.phpunit.de/4.5/phpunit.xsd"
         bootstrap="test/bootstrap.php">
</phpunit>

If all goes to plan, your project should look something like this:

- Continuous testing example
  |- (.. code ..)
  |- Example.php
  |- test/
  |  |- (.. other types of tests ..) 
  |  |- unit/
  |  | |- ExampleTest.php
  |  |- bootstrap.php
  |- vendor
  |  |- (.. dependencies ..)
  |  |- autoload.php
  |- composer.json
  |- phpunit.xml

And more to the point, you should be able to use PHPUnit on the command-line to run the test case. It will look something like this:

Example$ php vendor/bin/phpunit test/unit/
PHPUnit 4.7.7 by Sebastian Bergmann and contributors.

.

Time: 71 ms, Memory: 4.50Mb

OK (1 test, 4 assertions)

Configure MakeGood

Now that the project is coming along nicely, it’s time to configure MakeGood to run the test automatically from within Eclipse.

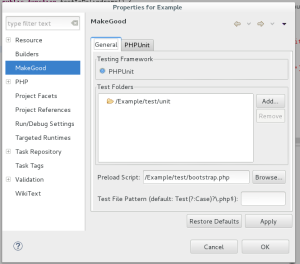
Go to Project → Properties → MakeGood, and add the path to your unit tests, along with a link to the bootstrap.php. This bootstrap file will let MakeGood load the classes to test, along with PHPUnit itself.

2015-06-makegood-demo1

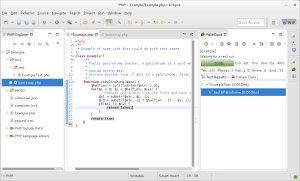
Now fire up the MakeGood view. If it doesn’t come up automatically, then open it via Window → Show View → Other. Clicking the “play” button should kick off all available tests, adn if your project structure is correct, then everything will work at this point:

2015-06-makegood-demo2

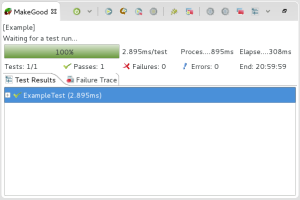
Once you save a file, a small box will appear in the bottom-right to indicate whether the tests worked.

2015-06-makegood-demo3

As you introduce changes and save them, MakeGood will flag whether the tests are passing by changing the colour of the icon.

In this case, it is green. From the small delay that is caused when running the tests, you can see why it’s important to keep unit tests fast if you use this tool.

A test-driven bugfix cycle

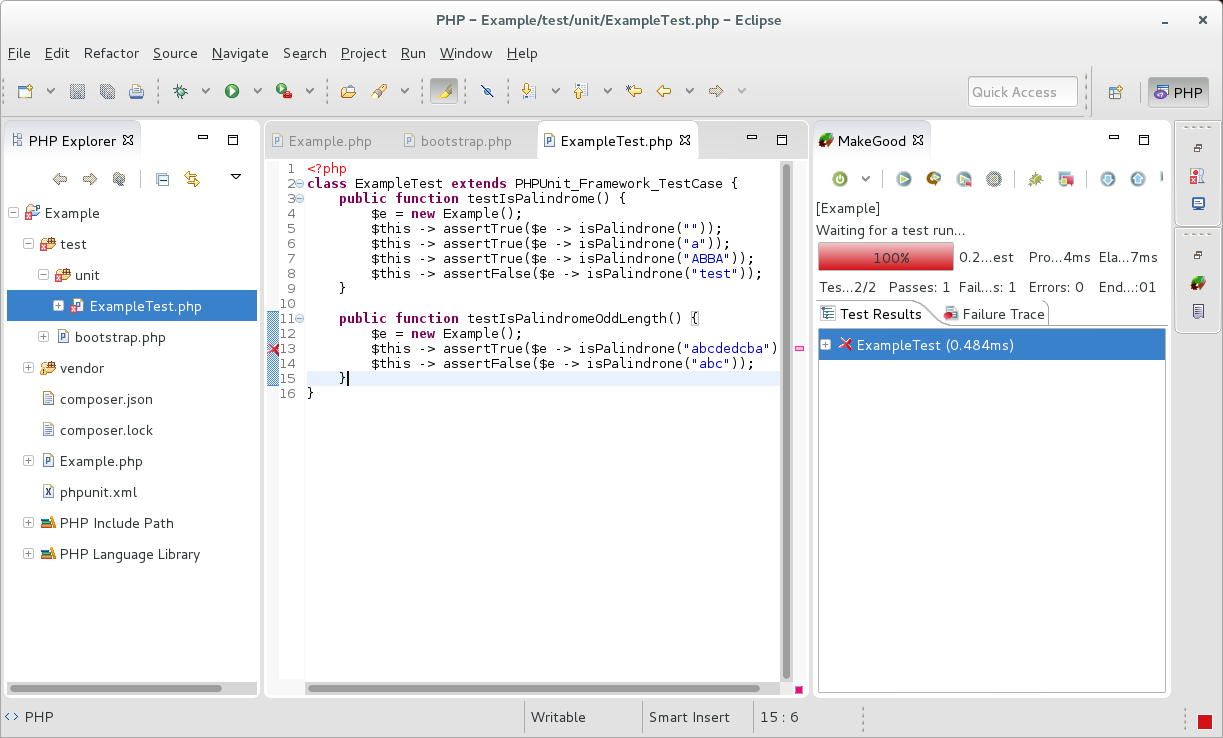
Of course, Linus’ Law suggests that any code will probably have more bugs. So, say somebody reports that the palindrome “abcdedcba” is causing incorrect results. In test-driven development, you would expose this as a test case over the isPalindrome() function:

<php
...	
	public function testIsPalindromeOddLength() {
		$e = new Example();
		$this -> assertTrue($e -> isPalindrone("abcdedcba"));
		$this -> assertFalse($e -> isPalindrone("abc"));
	}
...

As soon as this is submitted, things start to turn red in MakeGood. In response to the broken test, you can then tweak the code.

2015-06-makegood-demo4

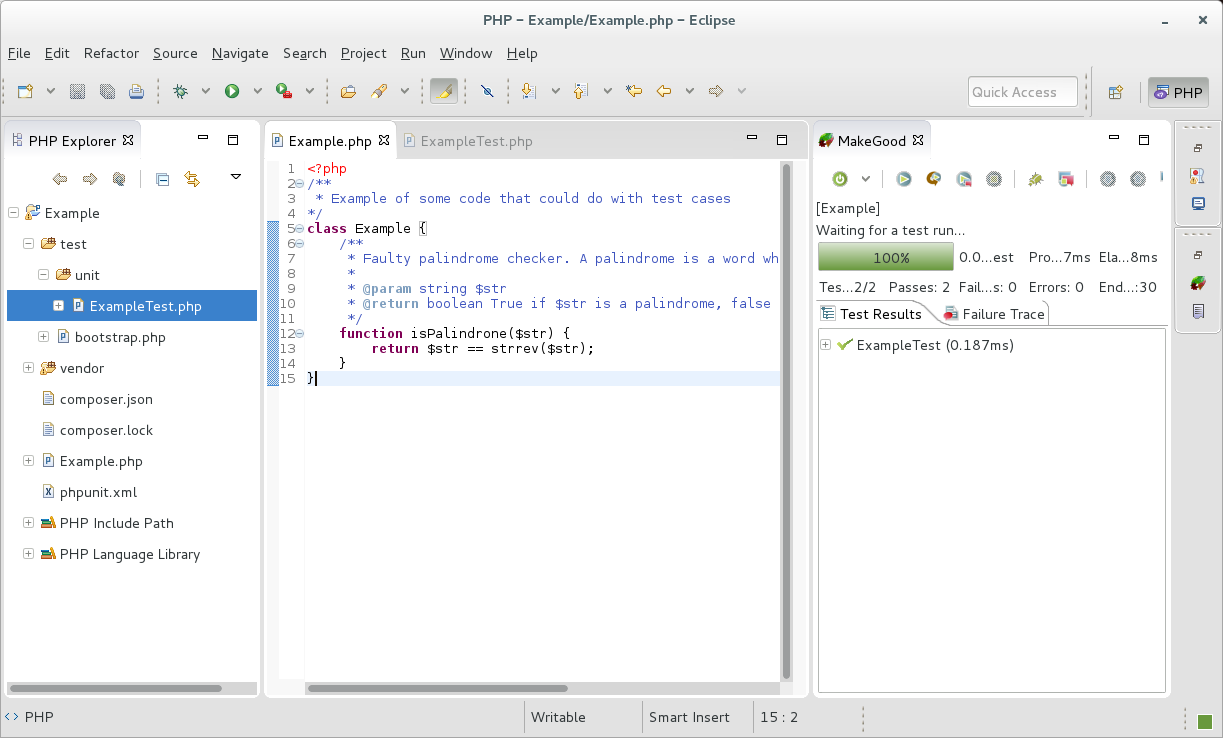
You would then do the smallest amount of programming needed to pass all the tests. A palindrome checker which does not contain intentional bugs is as simple as this one-liner:

<php
//...
	function isPalindrone($str) {
		return $str == strrev($str);
	}
//...

This change causes MakeGood to report that the unit tests are all passing.

2015-06-makegood-demo5

Summary

A continuous test runner adds faster feedback for tedious but well-tested code. If you have to write anything in PHP which does some real computer work, then I suggest setting up MakeGood so that you can make changes to tricky code, and have a good idea of whether it’s producing sane outputs.

As this post has touched on before, slow tests should not run each time you save the code. This is why we worked in a Unit test folder. Slower integration or functional tests can still be run via the command-line in this model. An example of a project which uses this setup is escpos-php, which is a heavily test-driven PHP driver for thermal line printers.

It’s time to migrate away from Outlook Express

Outlook Express is obsolete, so you need to migrate if you’re still using it. This post is a quick guide to saving your local data so that you can jump ship.

If you are keen on desktop-based email, then there are only two real contenders for a replacement mail client:

  • Mozilla Thunderbird (suggested).
  • Windows Mail.

So where is all my data?

The script below is a Windows bat script for backing up an Outlook Express setup. Just fill in the Identity variable and run it from anywhere to produce a folder containing the Outlook saved emails and contacts.

You can find your identity string as a folder name in your profile path, under Local Settings\Application Data\Identities\. The profile path for a user called bob would usually be in a folder like C:\Documents and Settings\bob or C:\Users\bob.

These files can be read by both of the suggested replacements, so a good transition might be:

  1. Make a backup.
  2. Install an alternative & set it up.
  3. Try to import as much as you can.
  4. Once you’re happy, uninstall Outlook Express, or at least delete the shortcuts to it.
@echo off
ECHO -------------------------------------------------------------------------------
SET BACKUPDIR="%username% - Outlook Backup"
SET IDENTITY={AAAAAAAA-AAAA-AAAA-AAAA-AAAAAAAAAAAA}
ECHO Backing up outlook files to: %backupdir%
ECHO --------------------------------------------------------------------------------

ECHO - Clearing backup location... (1 of 3) 
DEL /F /S /Q %backupdir% > NUL 2>&1
MKDIR %backupdir% 2> NUL
ECHO - - Done

ECHO - Copying emails... (2 of 3) 
MKDIR %backupdir%\Emails 2> NUL
XCOPY /E /H /C /R /Y "%userprofile%\Local Settings\Application Data\Identities\%IDENTITY%\Microsoft\Outlook Express" %backupdir%\Emails > NUL
ECHO - - Done

ECHO - Copying address book... (3 of 3)
MKDIR %backupdir%\AddressBook 2> NUL
XCOPY /E /H /C /R /Y "%appdata%\Microsoft\Address Book" %backupdir%\AddressBook > NUL
ECHO - - Done

ECHO - Completed 3 of 3 tasks.
ECHO -------------------------------------------------------------------------------
ECHO The backup is complete.
ECHO Please copy %BACKUPDIR% to external storage.
ECHO --------------------------------------------------------------------------------
PAUSE

Raspberry Pi KA Lite wireless deployment

Previous post in this series: How to install KA Lite on the Raspberry Pi

If you got to the end of the previous post, you would have a working install of the open source KA Lite system on the Raspberrry Pi.

This post will show you how to deploy this KA Lite setup without relying on any existing network infrastructure:

dia

To share the setup without an existing network, we will configure the wireless adapter to provide its own network for computers to connect to. If you have an existing wireless network, you can skip this post.

Before you begin

This post is intended for the widely-used “WiPi” USB WiFi adapter, so you’ll need one of those.

I used the same Tenda USB WiFi adapter as previous setups, which has a Ralink chip from the same series:

USB WiFi Adapter

Set it up

See the official guide for these steps in compact form. These steps are the same, but expanded with extra output from my install.

Clone the raspberry pi scripts repo:

$ git clone https://github.com/learningequality/ka-lite-pi-scripts.git
Cloning into 'ka-lite-pi-scripts'...
remote: Counting objects: 66, done.
remote: Total 66 (delta 0), reused 0 (delta 0), pack-reused 66
Unpacking objects: 100% (66/66), done.

Open it up and run ./configure.sh as the root user. This requires Internet access, and will install and configure a few packages:

$ cd ka-lite-pi-scripts/
$ ls
README.md     configure_network_interfaces.py  use_wipi.sh
conf          redirect_port80_to_port8008.py
configure.sh  use_edimax.sh
$ sudo ./configure.sh
Get:1 http://mirrordirector.raspbian.org wheezy Release.gpg [490 B] 
Hit http://raspberrypi.collabora.com wheezy Release.gpg                        
Hit http://archive.raspberrypi.org wheezy Release.gpg
Get:2 http://mirrordirector.raspbian.org wheezy Release [14.4 kB]
Hit http://raspberrypi.collabora.com wheezy Release                      
Hit http://archive.raspberrypi.org wheezy Release                        
Hit http://raspberrypi.collabora.com wheezy/rpi armhf Packages           
Get:3 http://archive.raspberrypi.org wheezy/main armhf Packages [129 kB]       
Get:4 http://mirrordirector.raspbian.org wheezy/main armhf Packages [6903 kB]  
Ign http://raspberrypi.collabora.com wheezy/rpi Translation-en                 
Ign http://archive.raspberrypi.org wheezy/main Translation-en                
Get:5 http://mirrordirector.raspbian.org wheezy/contrib armhf Packages [23.6 kB]
Get:6 http://mirrordirector.raspbian.org wheezy/non-free armhf Packages [49.3 kB]
Get:7 http://mirrordirector.raspbian.org wheezy/rpi armhf Packages [592 B]     
Ign http://mirrordirector.raspbian.org wheezy/contrib Translation-en           
Ign http://mirrordirector.raspbian.org wheezy/main Translation-en              
Ign http://mirrordirector.raspbian.org wheezy/non-free Translation-en          
Ign http://mirrordirector.raspbian.org wheezy/rpi Translation-en
Fetched 6992 kB in 35s (198 kB/s)             
Reading package lists... Done
Building dependency tree       
Reading state information... Done
The following packages will be upgraded:
  cups-bsd cups-client cups-common fuse libcups2 libcupsimage2 libfuse2 raspi-config
8 upgraded, 0 newly installed, 0 to remove and 0 not upgraded.
Need to get 1708 kB of archives.
After this operation, 306 kB disk space will be freed.
Get:1 http://archive.raspberrypi.org/debian/ wheezy/main raspi-config all 20150131-4 [13.2 kB]
Get:2 http://mirrordirector.raspbian.org/raspbian/ wheezy/main libcupsimage2 armhf 1.5.3-5+deb7u6 [132 kB]
Get:3 http://mirrordirector.raspbian.org/raspbian/ wheezy/main cups-common all 1.5.3-5+deb7u6 [904 kB]
Get:4 http://mirrordirector.raspbian.org/raspbian/ wheezy/main cups-bsd armhf 1.5.3-5+deb7u6 [44.2 kB]
Get:5 http://mirrordirector.raspbian.org/raspbian/ wheezy/main cups-client armhf 1.5.3-5+deb7u6 [174 kB]
Get:6 http://mirrordirector.raspbian.org/raspbian/ wheezy/main libcups2 armhf 1.5.3-5+deb7u6 [238 kB]
Get:7 http://mirrordirector.raspbian.org/raspbian/ wheezy/main fuse armhf 2.9.0-2+deb7u2 [70.8 kB]
Get:8 http://mirrordirector.raspbian.org/raspbian/ wheezy/main libfuse2 armhf 2.9.0-2+deb7u2 [132 kB]
Fetched 1708 kB in 3s (447 kB/s)
Preconfiguring packages ...
(Reading database ... 83674 files and directories currently installed.)
Preparing to replace libcupsimage2:armhf 1.5.3-5+deb7u5 (using .../libcupsimage2_1.5.3-5+deb7u6_armhf.deb) ...
Unpacking replacement libcupsimage2:armhf ...
Preparing to replace cups-common 1.5.3-5+deb7u5 (using .../cups-common_1.5.3-5+deb7u6_all.deb) ...
Unpacking replacement cups-common ...
Preparing to replace cups-bsd 1.5.3-5+deb7u5 (using .../cups-bsd_1.5.3-5+deb7u6_armhf.deb) ...
locale: Cannot set LC_ALL to default locale: No such file or directory
Unpacking replacement cups-bsd ...
Preparing to replace cups-client 1.5.3-5+deb7u5 (using .../cups-client_1.5.3-5+deb7u6_armhf.deb) ...
Unpacking replacement cups-client ...
Preparing to replace libcups2:armhf 1.5.3-5+deb7u5 (using .../libcups2_1.5.3-5+deb7u6_armhf.deb) ...
Unpacking replacement libcups2:armhf ...
Preparing to replace fuse 2.9.0-2+deb7u1 (using .../fuse_2.9.0-2+deb7u2_armhf.deb) ...
Unpacking replacement fuse ...
Preparing to replace libfuse2:armhf 2.9.0-2+deb7u1 (using .../libfuse2_2.9.0-2+deb7u2_armhf.deb) ...
Unpacking replacement libfuse2:armhf ...
Preparing to replace raspi-config 20150131-3 (using .../raspi-config_20150131-4_all.deb) ...
Unpacking replacement raspi-config ...
Processing triggers for man-db ...
Processing triggers for initramfs-tools ...
Setting up libcups2:armhf (1.5.3-5+deb7u6) ...
Setting up libcupsimage2:armhf (1.5.3-5+deb7u6) ...
Setting up cups-common (1.5.3-5+deb7u6) ...
Setting up cups-client (1.5.3-5+deb7u6) ...
Setting up cups-bsd (1.5.3-5+deb7u6) ...
Setting up libfuse2:armhf (2.9.0-2+deb7u2) ...
Setting up fuse (2.9.0-2+deb7u2) ...
udev active, skipping device node creation.
update-initramfs: deferring update (trigger activated)
Setting up raspi-config (20150131-4) ...
update-rc.d: warning: default start runlevel arguments (2 3 4 5) do not match raspi-config Default-Start values (S)
update-rc.d: warning: default stop runlevel arguments (0 1 6) do not match raspi-config Default-Stop values (none)
Processing triggers for initramfs-tools ...
Reading package lists... Done
Building dependency tree       
Reading state information... Done
The following extra packages will be installed:
  dnsmasq-base libnetfilter-conntrack3
The following NEW packages will be installed:
  dnsmasq dnsmasq-base hostapd libnetfilter-conntrack3
0 upgraded, 4 newly installed, 0 to remove and 0 not upgraded.
Need to get 822 kB of archives.
After this operation, 1653 kB of additional disk space will be used.
Get:1 http://mirrordirector.raspbian.org/raspbian/ wheezy/main libnetfilter-conntrack3 armhf 1.0.1-1 [32.2 kB]
Get:2 http://mirrordirector.raspbian.org/raspbian/ wheezy/main dnsmasq-base armhf 2.62-3+deb7u3 [356 kB]
Get:3 http://mirrordirector.raspbian.org/raspbian/ wheezy/main dnsmasq all 2.62-3+deb7u3 [16.3 kB]
Get:4 http://mirrordirector.raspbian.org/raspbian/ wheezy/main hostapd armhf 1:1.0-3+deb7u2 [418 kB]
Fetched 822 kB in 4s (168 kB/s)  
Selecting previously unselected package libnetfilter-conntrack3:armhf.
(Reading database ... 83674 files and directories currently installed.)
Unpacking libnetfilter-conntrack3:armhf (from .../libnetfilter-conntrack3_1.0.1-1_armhf.deb) ...
Selecting previously unselected package dnsmasq-base.
Unpacking dnsmasq-base (from .../dnsmasq-base_2.62-3+deb7u3_armhf.deb) ...
Selecting previously unselected package dnsmasq.
Unpacking dnsmasq (from .../dnsmasq_2.62-3+deb7u3_all.deb) ...
Selecting previously unselected package hostapd.
Unpacking hostapd (from .../hostapd_1%3a1.0-3+deb7u2_armhf.deb) ...
Processing triggers for man-db ...
Setting up libnetfilter-conntrack3:armhf (1.0.1-1) ...
Setting up dnsmasq-base (2.62-3+deb7u3) ...
Setting up dnsmasq (2.62-3+deb7u3) ...
[ ok ] Starting DNS forwarder and DHCP server: dnsmasq.
Setting up hostapd (1:1.0-3+deb7u2) ...
[ ok ] Starting advanced IEEE 802.11 management: hostapd.
[ ok ] Starting DNS forwarder and DHCP server: dnsmasq[....] (already running).
update-rc.d: using dependency based boot sequencing

Next, run run the ./use_wipi.sh script:

$ ./use_wipi.sh 
[ ok ] Stopping advanced IEEE 802.11 management: hostapd.
[ ok ] Starting advanced IEEE 802.11 management: hostapd.

And then the ./configure_network_interfaces.py script as root:

sudo python ./configure_network_interfaces.py

After this ran, the /etc/network/interfaces file looked like:

$ sudo nano /etc/network/interfaces
auto lo
iface lo inet loopback

auto eth0
#allow-hotplug eth0
iface eth0 inet manual

auto wlan0
#allow-hotplug wlan0
wpa-conf /etc/wpa_supplicant/wpa_supplicant.conf

auto wlan1
#allow-hotplug wlan1
iface wlan1 inet manual
wpa-conf /etc/wpa_supplicant/wpa_supplicant.conf

iface wlan0 inet static
  address 1.1.1.1
  netmask 255.255.255.0
  pre-up sudo iptables -t nat -A PREROUTING -i wlan0 -p tcp -j DNAT --to-destination 1.1.1.1
  pre-up sudo python /home/pi/ka-lite/ka-lite-pi-scripts/redirect_port80_to_port8008.py &

And I modified /etc/default/ifplugd to only include eth0, so that the pi does not attempt to join any wireless networks itself:

$ sudo nano /etc/default/ifplugd
INTERFACES="eth0"
HOTPLUG_INTERFACES="eth0"
ARGS="-q -f -u0 -d10 -w -I"
SUSPEND_ACTION="stop"

And then reboot:

$ sudo reboot

Broadcast message from root@raspberrypi (pts/0) (Thu Jun 11 11:05:46 2015):

The system is going down for reboot NOW!

See if its all working

Disregard the old addresses once you’ve done the above steps, and run ifconfig to find out about addresses after rebooting.

The pi broadcasts a passwordless wireless network called “kalite”, and all DNS lookups point to 1.1.1.1.

This means in a web browser, you can just load a URL like:

http://kalite

Platforms

On a laptop in range, the network appeared once the pi booted:

2015-06-kalite01-wifi

The network connected without a password:

2015-06-kalite01-wifi-02

And the connection info for the client computer is being checked in the background:

2015-06-kalite01-wifi-03

Once the computer gets a lease from DHCP, the URL loads, and the interface works as expected:

2015-06-kalite01-wifi-04

Tested on Android, the player and navigation worked in a similar way:

2015-06-kalite-droid

KA Lite’s media player doesn’t seem to require anything other than a web browser. Either Chrome or Firefox seem to be suitable choices.

Debug zone

Some useful commands for debugging are shown below.

List USB devices, for debugging the wireless adapter:

lsusb

List recent errors, for debugging the same thing:

dmesg

Restart networking, run when changing configuration:

service networking restart
Note on dnsmasq

Because of the way dnsmasq hijacks lookups to provide the wireless network, the Raspberry pi cannot access the Internet over Ethernet (eg, to download content) while dnsmasq is running:

sudo service dnsmasq stop

You can access the web interface at http://1.1.1.1/ while this service is disabled.

And then start it again when done using the Internet, so that the user-friendly computer name works again:

sudo service dnsmasq start

How to create an animated GIF from a series of images

Sometimes, you end up with a folder full of images, which you want to animate. With the open source ImageMagick tool, this is easy on the command line:

animate *.png

This will show you all of the PNG files in the folder in quick succession, like a flip book.

ImageMagick works on just about any OS. For Linux users, the package is generally imagemagick or ImageMagick:

sudo apt-get install imagemagick
yum install ImageMagick

But this blog post is about animated GIFs, so lets make one of those. This is a compact way to combine images (here and here for examples in context), gives you a re-usable at-a-glance illustration of something that changes over time.

Example from an older post:

2015-04-tetris

The steps to make a good conversion command are:

  1. Check that alphabetically, your images are in order. If not, rename them:
    echo *
  2. Convert them to a GIF a few times, and find the delay that suits you (hundredths of a second between frames)
    convert -delay 80 *.png animated.gif
  3. Choose an output size (width x height):
    convert -resize 415x -delay 80 *.png animated.gif
  4. Compress with -Layers Optimize for a smaller file:
    convert -resize 415x -delay 80 *.png -layers Optimize animated.gif

Notes

  • Generated thumbnails usually take the first frame only, which is why we ask Imagemagick to resize it (WordPress users: Choose “Full Size”).
  • To pause at the start of the loop for a moment, just copy the first image a few times.

How to install KA Lite on the Raspberry Pi

KA Lite is an open source, web-based learning package. Today I’ll run through a simple setup which will allow a Raspberry Pi to provide a wireless learning resource server for a classroom, without the Internet.

dia

The Raspberry Pi 2 is a surprisingly powerful single-board computer. You can use it for anything which a computer can do, in a relatively cheap circuit board the size of a credit card:

2015-06-rpi-2b

This setup takes around two hours.

Materials

You will need:

  • Raspberry Pi (The Raspberry Pi 2 Model B was used here), with micro SD card, mouse, keyboard, monitor with HDMI.
  • A good Micro USB power supply – Many Android phone chargers will be suitable.
  • A computer which can write to micro SD cards. If your computer has an SD card slot, get an SD-to-Micro-SD adapter for it.
  • A wired network with Internet for the setup
  • A USB wireless network adapter such as WiPi for deployment.
  • Any WiFi-enabled device for testing.

Install Raspbian

Raspbian is an operating system for the Pi, and is the perfect choice for embedded server setups like this. You need to write the image to the Micro SD card.

  1. Obtain the image from https://www.raspberrypi.org/downloads/
  2. This is zipped, so extract it to get the real image file.
  3. Write the disk image to the SD card:
    • Windows: Fetch a copy of “Win32 Disk Imager” to write this file to the SD card.
    • Linux or Mac: Use dd (found in the terminal) to write to the card — guide available here
  4. Boot the Pi, with mouse, keyboard, HDMI, and wired network. If it doesn’t work, remove any cable converters (use HDMI direct to monitor), and if it still doesn’t work, then the SD card was not correctly imaged.
  5. Expand root filesystem, set your password, and enable “boot to desktop”.
  6. After reboot, you should have a desktop. Click the black terminal icon to get to work.

Install some things

From the terminal, run these commands:

sudo apt-get update
sudo apt-get dist-upgrade
sudo apt-get install chromium python-m2crypto

This checks for new software (update), upgrades anything necessary (dist-upgrade), and then installs two packages:

  • python-m2crypto — this will help speed up KA Lite a bit by helping out with encryption.
  • chromium — this is Google Chrome’s open source cousin, and it’s worth installing so that you can Google things as you go, and test things locally.

If everything goes to plan, you should now be able to find Chrome on the menu and navigate the web.

2015-06-kalite-rpi-chrome

Install KA Lite

These steps are a shortened version of the official guide

Once Raspbian is running, these commands will download & install KA Lite:

git clone https://github.com/learningequality/ka-lite.git
cd ka-lite/
./setup_unix.sh

The download is 150MB, so allow a few minutes. The installer then prompts for a few questions, like:

  • “Do you wish to download the assessment package now?” — Say yes, it fetches another 500MB.
  • “Do you wish to set the KA Lite server to run in the background automatically when you start this computer?” — say “y”.

At the end, you will be given a command to start the server, which you should type in as well:

/home/pi/ka-lite/bin/kalite start

Once it starts (it will take a while!), it will give you two web addresses. One of them is local to the computer (127.x), and the other will work from other computers on the network. Write both of them down!

The install & start-up together will look like a this:

2015-06-03-kalite-install

Test it out locally

Open up Chromium, and navigate to one of the addresses that the installer suggested.

2015-06-03-kalite-1

Log in, using the details provided during the installation.

2015-06-03-kalite-2

Click on “Manage”, then “Videos”

2015-06-03-kalite-3

KA Lite will prompt for registration, which lets you download content. Use the “One click registration” on the left, then wait for it to connect.

2015-06-03-kalite-4
2015-06-03-kalite-5

Use the Videos section to fetch something. Here we fetch something from the ancient art & culture section:

2015-06-03-kalite-6

Wait a few minutes before moving to the next section: The video downloads in the background.

Access over the network

From some other device which is on the same network, enter the web address that was given at the end of the installer (ignore the address which starts with 127.x — it wont work between two computers):

http://(IP address):8008/

From the browser, let’s test it out. Click over to Learn, and navigate to the video you just downloaded. It should display, so we can learn about those Egyptian artifacts:

2015-06-03-kalite-7

This setup would be complete if you want to run on a wired network – you can simply bookmark this address on each computer which needs to use it, and manage it through the web.

Next post in this series: Raspberry Pi KA Lite wireless deployment

Howto: QR Codes on receipts with escpos-php

ESC/POS is a binary protocol for speaking to receipt printers. It contains a command for printing QR Codes on compatible printers. The PHP library escpos-php is used for generating these commands in PHP. This post will show you how to use it to generate QR codes on your receipt printer.

For printers which don’t support this command, a second option is available: sending the QR code as an image.

Getting started

First up, you need your receipt printer to be working with escpos-php. Here are some resources about how to go about that:

Option 1: Direct printing

This method sends QR codes directly. From the documentation, the syntax for this command is:

qrCode($content, $ec, $size, $model)

Print the given data as a QR code on the printer.

  • string $content: The content of the code. Numeric data will be more efficiently compacted.
  • int $ec Error-correction level to use. One of Printer::QR_ECLEVEL_L (default), Printer::QR_ECLEVEL_M, Printer::QR_ECLEVEL_Q or Printer::QR_ECLEVEL_H. Higher error correction results in a less compact code.
  • int $size: Pixel size to use. Must be 1-16 (default 3)
  • int $model: QR code model to use. Must be one of Printer::QR_MODEL_1, Printer::QR_MODEL_2 (default) or Printer::QR_MICRO (not supported by all printers).

The below code snippets are directly from the QR code printing demo, showing how the output changes with the options given.

Simple example

This is the simplest use, with all default options. QR codes can be aligned in the same way as text or images on the page:

2015-04-escposqr-01-demo
// Most simple example
title($printer, "QR code demo\n");
$testStr = "Testing 123";
$printer -> qrCode($testStr);
$printer -> text("Most simple example\n");
$printer -> feed();

// Demo that alignment is the same as text
$printer -> setJustification(Printer::JUSTIFY_CENTER);
$printer -> qrCode($testStr);
$printer -> text("Same example, centred\n");
$printer -> setJustification();
$printer -> feed();

Data encoding

This is a demonstration of saving different types of data in a code. Numeric data is packed more efficiently than text. Binary data can also be stored.

2015-04-escposqr-02-dataencoding
// Demo of numeric data being packed more densly
title($printer, "Data encoding\n");
$test = array(
	"Numeric"      => "0123456789012345678901234567890123456789",
	"Alphanumeric" => "abcdefghijklmnopqrstuvwxyzabcdefghijklmn",
	"Binary"       => str_repeat("\0", 40));
foreach($test as $type => $data) {
	$printer -> qrCode($data);
	$printer -> text("$type\n");
	$printer -> feed();
}

Error correction levels

QR codes support fout levels of error correction. More error correction results in larger, but more durable codes:

2015-04-escposqr-03-errorcorrection
// Demo of error correction
title($printer, "Error correction\n");
$ec = array(
	Printer::QR_ECLEVEL_L => "L",
	Printer::QR_ECLEVEL_M => "M",
	Printer::QR_ECLEVEL_Q => "Q",
	Printer::QR_ECLEVEL_H => "H");
foreach($ec as $level => $name) {
	$printer -> qrCode($testStr, $level);
	$printer -> text("Error correction $name\n");
	$printer -> feed();
}

Code size

The defauly codes are quite small. Each pixel can be blown up, up to 16x, using the size option:

2015-04-escposqr-04-pizelsize
// Change size
title($printer, "Pixel size\n");
$sizes = array(
	1 => "(minimum)",
	2 => "",
	3 => "(default)",
	4 => "",
	5 => "",
	10 => "",
	16 => "(maximum)");
foreach($sizes as $size => $label) {
	$printer -> qrCode($testStr, Printer::QR_ECLEVEL_L, $size);
	$printer -> text("Pixel size $size $label\n");
	$printer -> feed();
}

QR models

QR models have different appearances, storage parameters and physical sizes. The default (Model 2) is most common. The printer used here does not support micro QR codes, and used Model 2 as a fallback.

2015-04-escposqr-05-qrmodel
// Change model
title($printer, "QR model\n");
$models = array(
	Printer::QR_MODEL_1 => "QR Model 1",
	Printer::QR_MODEL_2 => "QR Model 2 (default)",
	Printer::QR_MICRO => "Micro QR code\n(not supported on all printers)");
foreach($models as $model => $name) {
	$printer -> qrCode($testStr, Printer::QR_ECLEVEL_L, 3, $model);
	$printer -> text("$name\n");
	$printer -> feed();
}

Note

To run the snippets, you need to initialise the printer, and define a title() function to print headings, like so:

<?php
/* Demonstration of available options on the qrCode() command */
require __DIR__ . '/autoload.php';
use Mike42\Escpos\Printer;
use Mike42\Escpos\PrintConnectors\FilePrintConnector;
$connector = new FilePrintConnector("/dev/usb/lp0");
$printer = new Printer($connector);

// ....

// Cut & close
$printer -> cut();
$printer -> close();

function title(Escpos $printer, $str) {
	$printer -> selectPrintMode(Printer::MODE_DOUBLE_HEIGHT | Printer::MODE_DOUBLE_WIDTH);
	$printer -> text($str);
	$printer -> selectPrintMode();
}

Option 2: Printing codes as images

Not all printers can generate QR codes natively. The work-around is to generate a QR code as an image on the computer, and then send that image to the printer. This is slightly slower, so if you print a lot of codes, you should consider upgrading your printer.

First up, fetch a copy of phpqrcode and generate some codes. I wont attempt to document the whole library here, but in short, it supports most of the same features as the native QR command. To generate a code, you simply use QRcode::png:

require_once("phpqrcode/qrlib.php");
QRcode::png("testing123", "test.png", 'L', 10, 0);

To print a PNG image, use the bitImage() command (the graphics command is also only available on newer printers):

require __DIR__ . '/autoload.php';
use Mike42\Escpos\EscposImage;
use Mike42\Escpos\PrintConnectors\FilePrintConnector;
$img = EscposImage::load("test.png"); // Load image
$connector = new FilePrintConnector("/dev/usb/lp0"); // Add connector to your printer here
$printer = new Printer($connector);
$printer -> bitImage($img);
$printer -> feed();
$printer -> text("Code printed from image\n");

$printer -> cut();
$printer -> close();

A more sophisticated way to hack in phpqrcode would be to add this new code as a different implementaton of the qrCode function. Other improvements are:

  • Use temporary files to avoid concurrency issues:
  • Where possible, expand the code on the printer, to send less data
<?php
require __DIR__ . '/autoload.php';
use Mike42\Escpos\Printer;

require_once("phpqrcode/qrlib.php");

class EscposQrImgPrinter extends Printer {
	function qrCode($content, $ec = self::QR_ECLEVEL_L, $size = 3, $model = self::QR_MODEL_2) {
		// Validate inputs
		self::validateString($content, __FUNCTION__);
		self::validateInteger($ec, 0, 3, __FUNCTION__);
		self::validateInteger($size, 1, 16, __FUNCTION__);
		$model = self::QR_MODEL_2; // Only Model 2 supported in phpqrcode, change back to it.
		$sizeMod = 0;
		if($size % 2 == 0) { // Optimisation to enlarge codes on the priner, sending 1/4 of the data.
			$size /= 2;
			$sizeMod = self::IMG_DOUBLE_HEIGHT | self::IMG_DOUBLE_WIDTH;
		}
		// Map error-correction to phpqrcode levels
		$ecMap = array(QR_ECLEVEL_L => 'L',
			QR_ECLEVEL_M => 'M',
			QR_ECLEVEL_Q => 'Q',
			QR_ECLEVEL_H => 'H');
		// Create QR code in temp file, and print it.
		$tmpfname = tempnam(sys_get_temp_dir(), "escpos-php");
		QRcode::png("testing123", $tmpfname, $ecMap[$ec], $size, 0);
		$img = new EscposImage($tmpfname);
		$this -> bitImage($img, $sizeMod);
		unlink($tmpfname);
	}
}

This new class uses phpqrcode in the background instead, and can be accessed with the same function calls as the parent class:


require __DIR__ . '/autoload.php';
use Mike42\Escpos\Printer;
use Mike42\Escpos\PrintConnectors\FilePrintConnector;
$connector = new FilePrintConnector("/dev/usb/lp0");
$printer = new EscposQrImgPrinter($connector);

$testStr = "Testing 123";
$printer -> qrCode($testStr);
$printer -> text("Most simple example\n");
$printer -> feed();
$printer -> cut();

$printer -> close();

The only visible difference between the implementations is a few pixels of spacing below the image.