Deprecated Google API’s: What you need to know

In less than a day, a whole series of old Google API’s are being switched off.

If you are running any of those API’s, then whilst this is bad news, you’ve had several years to upgrade (for example, the Provisioning API features have now been replaced by the Admin SDK). However, one of the API’s not mentioned on the linked page is the old ClientLogin API, which will also stop working on April 20.

ClientLogin involves directly sending a username and password to Google, and then receiving a login token back. There are two main categories of people who use the ClientLogin API which this post is targeted at:

  • People who haven’t figured out OAuth yet.
  • People using client libraries for the Google Data API’s, which are not deprecated, but often use this login.

If your use case involves users actually entering their username and password, then this post wont help (but this page will), but if you have an installed script which runs administrative functions on your domain, then read on, as it’s quite easy to retrofit your scripts with an OAuth2 service account.

Setting up a service account

Service accounts are designed for server-side use (ie, no browser), and replace using ClientLogin to authenticate as a super-admin for the domain.

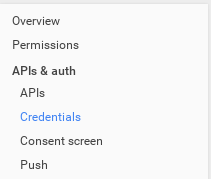
First, log in to the developer console (console.developers.google.com), and create a new project, then jump to the credentials menu. Create and download a p12 private key.

2015-04-01google-cred

2015-04-02google-generate

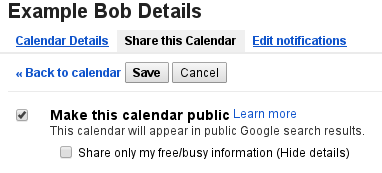
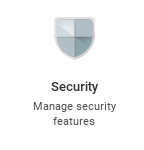
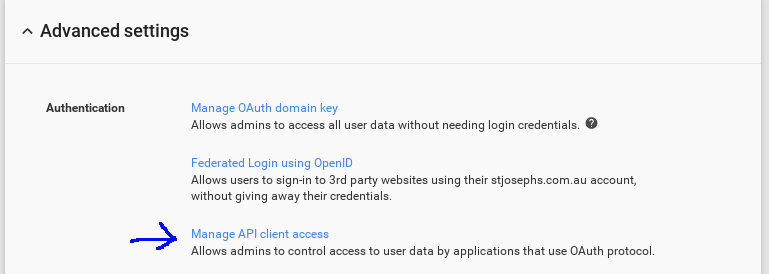
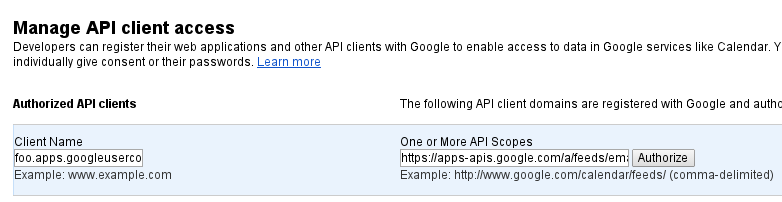
Now under “Manage this Domain”, locate the advanced security options, and add a delegation for your new service account for one or more scopes. This allows the service account to access to a given API and act on behalf of users. As an example, the next section uses the Email Settings API, which has this scope:

https://apps-apis.google.com/a/feeds/emailsettings/2.0/

And it’s added like so:

2015-04-03security

2015-04-04advanced

2015-04-05-api

2015-04-06addscope

Example: How to retro-fit a PHP app with OAuth 2

Assuming you already have code which sends requests to an API, all we need to change is the Authorize: header. A ClientLogin request looks like this:

Authorize: GoogleLogin auth=<ClientLogin token>

But an OAuth2 request looks like this:

Authorize: Bearer <OAuth token>

You can generate a new token for yourself at the OAuth 2.0 Playground from Google to make sure your old API’s work with the new tokens (they will- any issues are probably permission or user problems).

So how do you generate one of these tokens for a service account? The best way is to use client libraries for this. In PHP, this is the google-api-php-client.

This library also has support for newer API’s (not older Google Data API’s), which you can use to replace your implementation where applicable. For this example, we’ll just be getting an access token.

First up, we need to do some structuring. I’ve wrapped old signature code into an abstract EmailSignatureUpdater class so that I can write two versions: The old ClientLoginEmailSignatureUpdater, and the new OAuthEmailSignatureUpdater, differing only by login method and Authorize: header.

So here is some ClientLogin code:

/**
 * Functions dependent on ClientLogin, which will stop working after 2015-04-20.
 */
class ClientLoginEmailSignatureUpdater extends EmailSignatureUpdater {
	/**
	 * @param array $conf Configuration for the Google login.
	 */
	protected function __construct(array $conf) {
		/* Getting account */
		$account = array(
				'accountType' => 'GOOGLE',
				'Email' => $conf['user']."@".$conf['domain'],
				'Passwd' => $conf['password'],
				'service' => 'apps');

		/* Log in */
		$login = $this -> login($account);
		if(!isset($login['Auth'])) {
			if(isset($login['Error'])) {
				throw new Exception("Google returned ".$login['Error']);
			} else {
				throw new Exception("Google login failed");
			}
		}
		$this -> token = $login['Auth'];
	}

	/**
	 * Perform Google ClientLogin authentication
	 *
	 * @param array:string $account Account details (see top for components)
	 * @return string Response, including login token.
	 */
	private function login($account){
		/* Log in to google apps */
		$tk_ch = curl_init();
		curl_setopt($tk_ch, CURLOPT_URL, "https://www.google.com/accounts/ClientLogin");
		curl_setopt($tk_ch, CURLOPT_POST, true);
		curl_setopt($tk_ch, CURLOPT_RETURNTRANSFER, true);
		curl_setopt($tk_ch, CURLOPT_POSTFIELDS, $account);
		$responseTxt = curl_exec($tk_ch);
		curl_close($tk_ch);

		/* Parse response (very hack-y but works) */
		$responseLines = split('=', $responseTxt);
		$lastkey = false;
		for($i = 0; $i < count($responseLines); $i++) {
			$line = $responseLines[$i];
			if($i == 0) {
				/* First line is just a key */
				$lastkey = $line;
			} else {
				$vals = split("\n", $line);
				if($i != count($responseLines) - 1) {
					/* Split into value and next key */
					$nextkey = $vals[count($vals) - 1];
					unset($vals[count($vals) - 1]);
				} else {
					$nextkey = false;
				}
				$response[$lastkey] = implode("\n", $vals);
				$lastkey = $nextkey;
			}
		}
		return $response;
	}
	
	protected function authorize() {
		return 'Authorization: GoogleLogin auth='.trim($this -> token);
	}
}

And the part you’re probably searching for: how to get an access token out of the google-api-php-client:

/**
 * New OAuth2 authentication using google-api-php-client to get us logged in instead.
 */
class OAuthEmailSignatureUpdater extends EmailSignatureUpdater {
	protected function __construct(array $conf) {
		$this -> token = $this -> login($conf);
	}
	
	private function login(array $conf) {
		require_once(dirname(__FILE__) . "/vendor/google-api-php-client/src/Google/autoload.php");

		// Start client
		$client = new Google_Client();
		$client -> setApplicationName("Test Application");
		
		// Load key
		$key = file_get_contents($conf['key_file']);
		if(!$key) {
			throw new Exception("Key could not be loaded from file " .$conf['key_file']);
		}
	
		// Set up auth with scopes
		$gauth = new Google_Auth_AssertionCredentials(
				$conf['service_account'],
				array('https://apps-apis.google.com/a/feeds/emailsettings/2.0/'),
				$key);
		// sub- pretend to be a user
		// Should probably be the same as the user you logged in as with ClientLogin
		if(isset($conf['sub'])) {
			$gauth -> sub = $conf['sub'];
		}
		$client -> setAssertionCredentials($gauth);
		if($client -> getAuth() -> isAccessTokenExpired()) {
			$client -> getAuth() -> refreshTokenWithAssertion($gauth);
		}
		$client -> setClientId($conf['client_id']);
	
		/* Save token for later use */
		$token = $client -> getAccessToken();
		if (!$token) {
			throw new Exception("Google apps login failed!");
		}
		$arr = json_decode($token);
		if(!isset($arr -> access_token)) {
			throw new Exception("Google apps login did not return access token!");
		}
		return $arr -> access_token;
	}
	
	protected function authorize() {
		return 'Authorization: Bearer ' . $this -> token;
	}
}

In the superclass, we provide a getUpdater() function to dish out an old or new updater based on the configuration. In future releases, you could just throw an Exception instead of logging in with ClientLogin, as you know it will fail!

/**
 * Contains email signature updater methods, with no login method
 */
abstract class EmailSignatureUpdater {
	/**
	 * @var string The login token.
	 */
	protected $token;

	/**
	 * @param array $conf The configuration to use.
	 */
	protected abstract function __construct(array $conf);

	/**
	 * Return authorization header
	 */
	protected abstract function authorize();

	// A series of methods which make raw HTTP requests
	// to https://apps-apis.google.com/a/feeds/emailsettings/2.0/ were
	// located here, and are not relevant to this post.
	
	/**
	 * Based on the configuration, return a signature updater which logs in using the correct API.
	 * 
	 * @param array $conf
	 */
	static function getUpdater(array $conf) {
		if(isset($conf['user']) && isset($conf['domain']) && isset($conf['password'])) {
			return new ClientLoginEmailSignatureUpdater($conf);
		} else if(isset($conf['service_account']) && isset($conf['client_id']) && isset($conf['key_file'])) {
			return new OAuthEmailSignatureUpdater($conf);
		}
		throw new Exception("Configuration insufficient for loading email signatures. See config.php.example.");
	}
}

To utilise this, you need to change HTTP methods to care less about where their headers come from. I was using cURL for this, but on any library, you need to set the header using the new authorize() function before you send off the request:

curl_setopt($ch, CURLOPT_HTTPHEADER, array($this -> authorize(), ..., ...);

The idea is that users can simply alter their configuration to pick up the newly supported OAuth, allowing you to shift it from a software problem to an administrative/configuration problem:

/* Google apps domain config */
/* Old style ClientLogin usage (deprecated) */
//$config['google']['user'] = "admin";
//$config['google']['domain'] = "example.com";
//$config['google']['password'] = "...";

/* New login details for OAuth */
$config['google']['service_account'] = '...@developer.gserviceaccount.com';
$config['google']['client_id'] = '....apps.googleusercontent.com';
$config['google']['key_file'] = dirname(__FILE__) . '/google-key.p12';
$config['google']['sub'] = "admin@example.com"; // optional

Within your application, you then construct a new any-authentication object based on the configuration, and call its old methods as normal:

$updater = EmailSignatureUpdater::getUpdater($config['google']);
$updater -> doThing('param1', 'param2', etc);

Good luck!

How to use a Raspberry Pi as a print server

This post is designed for people who want to share a simple USB printer, such as this receipt printer, over the network.

Usually, you just connect up the printer to the computer like this:

2015-04-rpi-printer1

But if you are sending the print jobs from a central server, you would instead follow these steps, and hook up a Raspberry Pi near the printer to pass on the print-outs for you:

2015-04-rpi-printer2

This post will show you a very fuss-free way to do this. Because of its simplicity, if you have multiple computers printing (read: you need a server that can spool), or need two-way communication with the printer, then this setup will not be sufficient for your use case.

One-off setup

If your printer is /dev/usb/lp0, then the command to run is:

nohup nc -klp 9100 > /dev/usb/lp0 2> /dev/null&

There is quite a lot going on in this command, so I’m going to break it down into parts and explain what each one does.

nohup
Lets the command keep running after you log-out.
nc -klp 9100
Listens on port 9100 (-lp), and returns to listening after each connection (-k)
> /dev/usb/lp0
Redirects any incoming data to the printer device
2> /dev/null
Suppresses errors by sending them to /dev/null
&
Runs the command in the background so that you can keep using the terminal.

Run every boot

Simply schedule the command in cron as a @reboot task.

crontab -e

And add the line:

@reboot nohup nc -klp 9100 > /dev/usb/lp0 2> /dev/null&

Note that if you reboot the printer, you will also need to reboot the raspberry pi to get it to reconnect without logging in!

Send some tests

From a computer somewhere else on the network, send a test print-out:

echo "Hello world" | nc 10.x.x.x 9100

If the target printer is a thermal receipt printer, then you could also use escpos-php to send it more elaborate commands:

<?php
$fp = fsockopen("10.x.x.x", 9100);
/* Print a "Hello world" receipt" */
$printer = new Escpos($fp);
$printer -> text("Hello World!\n");
$printer -> cut();
fclose($fp);

How to run Tetris on your Raspberry Pi

This is a simple walkthrough on how to install my Tetris clone, Blocks, on a Raspberry Pi.

On most computers running Debian (or Raspbian in the case of the Raspberry Pi), it’s as simple as clone, compile, run:

sudo apt-get install libncurses5-dev doxygen
git clone https://github.com/mike42/blocks
cd blocks
make
./bin/blocks

If you have any issues running this, then you need to fetch a newer version of GCC, as this needs C++11 support to compule (see last section for instructuins).

But if all goes to plan, you will get something like this in your terminal:

2015-04-tetris

Use the keyboard to control the game:

Move
Right, down, left
Rotate
Up
Drop
Spacebar
Quit
q

Get a screen

Basically any project with graphics can benefit from one of these. Simply add on a TFT shield, such as PiTFT to create a tiny console:

2015-04-tetris

Of course, this is still keyboard-controlled, but with some hacking, I’m sure you could map touch events to keyboard actions.

Troubleshooting: Update GCC

The Raspbian spftware image which many Raspberry Pi’s have is slightly too old to compile Blocks, which requires C++11 support.

Luckily, it’s very easy to upgrade from wheezy to jessie to add it. You know you need to do this if you get this error compiling:

$ git clone https://github.com/mike42/blocks
$ make
mkdir -p bin
g++ src/main.cpp src/blocks_game.cpp src/blocks_shape.cpp -o bin/blocks -lcurses -lrt -std=c++11 -Wall
cc1plus: error: unrecognized command line option ‘-std=c++11’
Makefile:2: recipe for target 'default' failed
make: *** [default] Error 1

Generally this means you don’t have GCC 4.8, which is not available in wheezy edition of Raspian.

$ g++ --version
g++ (Debian 4.6.3-14+rpi1) 4.6.3
Copyright (C) 2011 Free Software Foundation, Inc.
This is free software; see the source for copying conditions.  There is NO
warranty; not even for MERCHANTABILITY or FITNESS FOR A PARTICULAR PURPOSE.

So to summarise this thread, you need to:

nano /etc/apt/sources.list

Find this line:

deb http://mirrordirector.raspbian.org/raspbian/ wheezy main contrib non-free rpi

And change the word “wheezy” to “jessie”:

deb http://mirrordirector.raspbian.org/raspbian/ jessie main contrib non-free rpi

You can then update everything with:

sudo apt-get update && sudo apt-get dist-upgrade

You are now running the newer jessie release, which gives you access to the GCC 4.8 package we need:

apt-get install g++-4.8

So we can pick up where we left off, and compile the game:

make
./bin/blocks

Getting a USB receipt printer working on Windows

Note:This post is a Windows adaptation of an earlier post, Getting a USB receipt printer working on Linux, mainly in response to these questions.

In this post, I’ll step through how to get a USB thermal receipt printer appearing on Windows. The aim of this is to be able to send raw text to the printer, so that we can point a driver such as escpos-php at it. The printer tested here is once again this Epson TM-T20:

2015-03-printer-back
2015-03-printer-top

The directions below are for Windows 7, so your mileage may vary if you are on an older or newer version.

If you have issues following these steps, make sure you can locate your printer in Device Manager, and that it has “USB Print Support”.

Add the printer

Find Devices and Printers and click Add a Printer.
2015-04-windowsusb-01

2015-04-windowsusb-02

Add it as a Local printer, using the USB virtual port, probably USB0001:

2015-04-windowsusb-03
2015-04-windowsusb-04

Use the Generic / Text Only driver.

2015-04-windowsusb-05

Name the printer whatever you like, and then share it under the same name:

2015-04-windowsusb-06
2015-04-windowsusb-07

At this point, it should pop up in the window in the background, and also prompt you to Print a test page.

2015-04-windowsusb-08
2015-04-windowsusb-09

The test print is plain-text, and depending on your printer, will look something like this:

2015-04-windowsusb-10

Finally, you need to verify that your printer can be accessed locally, by typing \\localhost into Windows Explorer. If all goes to plan, you will see the new printer there too:

2015-04-windowsusb-11

Run a command-line test print

We now know that your printer is working, and can be accessed via its share name (even locally).

Test printing from the command-line. Fire up cmd.exe and try to send it some text to verify that it’s working:

echo "Hello World" > testfile
print /D:"\\%COMPUTERNAME%\Receipt Printer" testfile
del testfile

Printing something useful

This is where you start to see real results. Receipt printers are not just for printing plain-text. Many of them support a standard called ESC/POS, which contains formatting commands.

The snippet below, from this earlier post, generates some basic ESC/POS commands.

Install PHP if you don’t have it already, and call the below code foo.php:

<?php
/* ASCII constants */
const ESC = "\x1b";
const GS="\x1d";
const NUL="\x00";

/* Output an example receipt */
echo ESC."@"; // Reset to defaults
echo ESC."E".chr(1); // Bold
echo "FOO CORP Ltd.\n"; // Company
echo ESC."E".chr(0); // Not Bold
echo ESC."d".chr(1); // Blank line
echo "Receipt for whatever\n"; // Print text
echo ESC."d".chr(4); // 4 Blank lines

/* Bar-code at the end */
echo ESC."a".chr(1); // Centered printing
echo GS."k".chr(4)."987654321".NUL; // Print barcode
echo ESC."d".chr(1); // Blank line
echo "987654321\n"; // Print number
echo GS."V\x41".chr(3); // Cut
exit(0);

You would send generated commands to the printer like this:

php foo.php > testfile
print /D:"\\%COMPUTERNAME%\Receipt Printer" testfile
rm testfile

Scaling this up

The correct ESC/POS codes are quite tricky to generate with manually, which is why I put together the escpos-php driver. You can find more information on that at:

A simple “Hello World” receipt to your Windows shared printer would be scripted as (call this one foo2.php):

<?php
require __DIR__ . '/autoload.php';
use Mike42\Escpos\Printer;
use Mike42\Escpos\PrintConnectors\WindowsPrintConnector;

try {
	// Enter the share name for your USB printer here
	$connector = new WindowsPrintConnector("Receipt Printer");
	$printer = new Printer($connector);

	/* Print a "Hello world" receipt" */
	$printer -> text("Hello World!\n");
	$printer -> cut();
	
	/* Close printer */
	$printer -> close();
} catch(Exception $e) {
	echo "Couldn't print to this printer: " . $e -> getMessage() . "\n";
}

This would be sent to the printer by loading it from the web, or running the script on the command-line:

php foo2.php

The full ESC/POS snippet with formatting, coded up with escpos-php, would look like this (call this one foo3.php):

<?php
require __DIR__ . '/autoload.php';
use Mike42\Escpos\Printer;
use Mike42\Escpos\PrintConnectors\WindowsPrintConnector;
try {
	// Enter the share name for your USB printer here
	$connector = new WindowsPrintConnector("Receipt Printer");
	$printer = new Printer($connector);

	/* Print some bold text */
	$printer -> setEmphasis(true);
	$printer -> text("FOO CORP Ltd.\n");
	$printer -> setEmphasis(false);
	$printer -> feed();
	$printer -> text("Receipt for whatever\n");
	$printer -> feed(4);

	/* Bar-code at the end */
	$printer -> setJustification(Printer::JUSTIFY_CENTER);
	$printer -> barcode("987654321");
	
	/* Close printer */
	$printer -> close();
} catch(Exception $e) {
	echo "Couldn't print to this printer: " . $e -> getMessage() . "\n";
}

And again, this could be executed by loading the page through the web, or invoking the command directly:

php foo3.php

How to empty your local user account

If you’re not going to use a user account on your computer again, but can’t delete it for some reason, then emptying it is the next best thing to do.

Note: Save anything you want to keep before you start deleting things. These are destructive commands which delete all of the files and settings in the current user’s profile. If you are at all unsure, consider using a file browser to clear out the profile instead.

Windows:

cd %USERPROFILE%
del /A / F /Q /S .

Linux or Mac:

cd ~
rm -Rf .

This will make sure that the disused account no-longer wastes any disk space.

Getting a USB receipt printer working on Linux

In this post, I’ll step through how to get a thermal receipt printer with USB interface appearing on Linux. The aim of this is to be able to point a driver such as escpos-php at the device. The printer used here is an Epson TM-T20, which is very common in point-of-sale environments.

I have previously written quite a bit about how to use thermal receipt printer protocols, but the previous printer I covered had only a network interface, not USB like this one:

2015-03-printer-back
2015-03-printer-top

The directions below are for Debian, but could be adapted for any other Linux.

Find the device file

Plug in your printer, and check that usblp sees it:

dmesg
[12724.994550] usb 8-4: new full-speed USB device number 5 using ohci-pci
[12725.168956] usb 8-4: New USB device found, idVendor=04b8, idProduct=0e03
[12725.168963] usb 8-4: New USB device strings: Mfr=1, Product=2, SerialNumber=3
[12725.168968] usb 8-4: Product: TM-T20
[12725.168971] usb 8-4: Manufacturer: EPSON
[12725.168975] usb 8-4: SerialNumber: ....
[12725.175114] usblp 8-4:1.0: usblp1: USB Bidirectional printer dev 5 if 0 alt 0 proto 2 vid 0x04B8 pid 0x0E03

This kernel module makes your printer visible as a device file, so that it can be accessed in the old-fashioned way. Find the new device file under /dev/usb:

ls /dev/usb

In my case, this was /dev/usb/lp1. The next step is to see if you can write to it:

echo "Hello" >> /dev/usb/lp1

Chances are, you will get a permission denied error at this point, so find out what group the printer is in:

stat /dev/usb/lp1

Which will show output something like:

File: ‘/dev/usb/lp1’
  Size: 0         	Blocks: 0          IO Block: 4096   character special file
Device: 5h/5d	Inode: 220997      Links: 1     Device type: b4,1
Access: (0660/crw-rw----)  Uid: (    0/    root)   Gid: (    7/      lp)
...

This file is owned by group lp (“line printer”). If your username was bob, you would add yourself to this group using:

sudo usermod -a -G lp bob

If you plan to build a web-based point-of-sale system with this, then also add the www-data user to that group.

Now log out and back in, and the previous test should now be working:

echo "Hello" >> /dev/usb/lp1

Troubleshooting: Check usblp

If these steps don’t work, then your computer ether doesn’t have, or isn’t using usblp You’ll need to check a few things:

  • Install a different linux-image if the driver is not on your computer at all.
  • modprobe or insmod usblp
  • blacklist a vendor driver which has claimed the interface.
    • run lsusb -v and usb-devices (look for driver=)

Printing something useful

As a duplicated section from my earlier post, the printer uses ESC/POS, which means it accepts plaintext with some special commands for formatting.

A simple receipt-generator, foo.php, might look like this:

<?php
/* ASCII constants */
const ESC = "\x1b";
const GS="\x1d";
const NUL="\x00";

/* Output an example receipt */
echo ESC."@"; // Reset to defaults
echo ESC."E".chr(1); // Bold
echo "FOO CORP Ltd.\n"; // Company
echo ESC."E".chr(0); // Not Bold
echo ESC."d".chr(1); // Blank line
echo "Receipt for whatever\n"; // Print text
echo ESC."d".chr(4); // 4 Blank lines

/* Bar-code at the end */
echo ESC."a".chr(1); // Centered printing
echo GS."k".chr(4)."987654321".NUL; // Print barcode
echo ESC."d".chr(1); // Blank line
echo "987654321\n"; // Print number
echo GS."V\x41".chr(3); // Cut
exit(0);

And you would send it to the printer like this:

php foo.php > /dev/usb/lp1

Scaling this up

The codes are quite tricky to work with manually, which is why I put together the escpos-php driver. You can find it at:

The above example would be written using escpos-php as:

<?php
require __DIR__ . '/autoload.php';
use Mike42\Escpos\Printer;
use Mike42\Escpos\PrintConnectors\FilePrintConnector;
$connector = new FilePrintConnector("/dev/usb/lp1");
$printer = new Printer($connector);

/* Print some bold text */
$printer -> setEmphasis(true);
$printer -> text("FOO CORP Ltd.\n");
$printer -> setEmphasis(false);
$printer -> feed();
$printer -> text("Receipt for whatever\n");
$printer -> feed(4);

/* Bar-code at the end */
$printer -> setJustification(Printer::JUSTIFY_CENTER);
$printer -> barcode("987654321");
$printer -> cut();
?>

This would be sent to the printer by loading it from the web, or running the script on the command-line:

php foo2.php

Configure asterisk with wildcard extensions

This post covers a common use case when deploying a phone system: Somebody in the business needs to be able to record voicemail greetings for other people.

This assumes that you are already running asterisk, and that people already have something in your Dialplan (extensions.conf) for people to record a greeting:

; Record voicemail greeting
exten => *,1,AGI(scripts/record-voicemail-greeting.pl);

To run this script as somebody else, in the phone sense, we just need to change the CallerID before we run it. Some things you’ll need to know to do this:

  1. An “X” in the extension matches any digit
  2. EXTEN is a variable holding the current extension
  3. CALLERID(num) is another variable, which holds the CallerID number
  4. ${EXTEN:2} is a “substring”, which cuts the first two letters off the extension

With that in mind, if * records your own voicmail, then **4567 would record 4567’s voicemail using this snippet:

; Record other person's voicemail greeting
exten => **XXXX,1,Set(CALLERID(num)=${EXTEN:2})
exten => **XXXX,2,Goto(*,1)

Of course, it would be a terrible idea to enable this for the whole business, which is why you can also check the CallerID before you change it. This alternative snippet allows you to record any voicemail greeting, but only if you are calling from 1234.

; Record other person's voicemail greeting (if calling from phone 1234)
exten => 1234/**XXXX,1,Set(CALLERID(num)=${EXTEN:2})
exten => 1234/**XXXX,2,Goto(*,1)

Two ways to back up your Google Apps account

If you use Gmail or hosted Google Apps, you might be interested in taking a backup of your data, such as emails, Drive documents, and calendar entries. Thankfully, you can usually export copy of your account data using Google Takeout.

If your hosted Apps account has Takeout disabled, then you can do a backup, it simply has a few extra steps.

Option 1: Google Takeout

This method is nice and simple. Simply go to the Data tools – Download your data page, and select which services you want to export:

2015-01-google-takeout

It can be a bit eye-opening to see the amount of data Google has on you (Files, conversations, location history, etc). At this point, click through to “Prepare Download”. Depending on the size of your account, this may take as a coffee break, a few hours, or even an entire day.

2015-02-google-takeout-prepare

If you check the box for it, you’ll get an email like this when your Download completes:

2015-02-google-archive

And this lets you fetch a single file:

2015-01-download

The .zip file contains a series of folders, one for each service. The defaults seem to be:

Mail
A unix mbox file
Calendar
One iCal file for each calendar
Contacts
One vCard file for each group.
Drive
Exports as PDF, docx, xlsx

Option 2: Export data from each service

Sometimes, Google Takeout isn’t an option.

2015-01-google-takeout-disabled

Luckily, most Google services have some sort of data export built in. This means, if you have a new contact manager, or want to include your Drive in your PC backup, it’s still possible.

The export formats in these examples should match the Google Takeout defaults. Tab through each service t see how to export it:

If you are not a power user, then I would suggest setting up a copy of Mozilla Thunderbird via IMAP, and regularly using it for your email. This is a simple way to keep a clone of your inbox on your desktop computer, so that it can be included in backups.

If you are more tech-savvy, then the rest of this section will focus on helping you generate an mbox file containing a full backup of your email, the same format as Takeout uses. The best tool for that is a Linux program called getmail.

On Debian or Ubuntu Linux, issue this command to install getmail:

sudo apt-get install getmail4

For other package managers, see these directions.

First, you need to enable IMAP for your account, see Google’s article: Get started with IMAP and POP3, for the steps.

Now create a file at ~/.getmail/getmailrc, and configure it to read your email account via IMAP/SSL.

[retriever]
type = SimpleIMAPSSLRetriever
server = imap.gmail.com
port = 993
username = bob@mail.example.com
password = ....

[destination]
type = Mboxrd
path = ~/inbox

[options]
verbose = 1
getmail

After some time, you will end up with a large mbox file at ~/inbox, containing all of your mail.

If, for some reason, you need to use POP3 instead, then see this article on Gmail backup

Go to your contacts, and find a group. Check the box next to each name, and then find the Export button:

2015-02-contacts-export

Select the vCard format here, as it’s the same format which Takeout would have used:

2015-02-contacts-export-group-vcard

Google provides a share-able iCal link, which you can download once, but it is only available if your calendar is public.

So, if your calendar isn’t too sensitive, click “Share” and make the calendar public:2015-02-calendar-01-share

2015-02-calendar-02-public

Go to “Calendar Settings”, find the iCal link. It may take a few minutes for the link to start working, but once it does, download it, and then turn off public sharing.

There is a small risk that somebody else loads your calendar while its public, so if this concerns you, then save the events individually.

Exporting from Google Drive is nice and simple. Select all of your files (Shift+Click):

2015-02-drive-select

And then find the Download button:

2015-02-drive-download

If you apply this to your whole drive, it may take a while, so you may wish to download it in parts if your Internet can be unreliable.

Know how to export a different service? Send it in and I’ll add it to the list.

How do I use these files?

Google Drive’s files are exported in familiar formats. If you haven’t used an mbox, vCard or ics file before, then you will need to find a program which can read these for you.

Google’s support answer “Download your data: Per-service information” contains a list of files types which you’ll run into during this process, and suggests programs which can import them.

How to merge edges in GraphViz

If you are sketching out a node in graphviz which has many ancestors, a dense collection of arrow-heads can become unsightly:

Example 1 - Edges not merged

The code for the above graph is:

digraph G {
    {a, b, c} -> d;
    d -> e;
}

To merge the edges together, we can instead point these three nodes to an intermediate node, using edges without arrow. This example is adapted from the GraphViz FAQ (link).

This gives us:

Example 2 - edges merged

digraph G {
    d1 [shape=point,width=0.01,height=0.01];
    {a, b, c} -> d1 [dir=none];
    d1 -> d;
    d -> e;
}

To compile these examples, you can use an online tool such as Webgraphviz. If you have GraphViz installed, then run dot over them:

dot -Tpdf example.dot > example.pdf

Howto: Tethered photo capture on Linux

Tethered capture diagram

Have you ever wondered how professionals get photos to pop up on their computer as they snap them? Most higher-end cameras have mini USB connection, and software is available to retrieve images as they are taken.

Rather than use a GUI app, in this post I’ll use a command-line program called gphoto2 to drop the images into a folder. With large thumbnails set in your file browser, a desktop program would be redundant.

First, you need to install the program. Depending on your system, one of the following commands should do the trick:

apt-get install gphoto2
yum install gphoto2

Now, plug in the camera. The command to do a “tethered capture” is:

gphoto2 --capture-tethered

Unfortunately, in most desktop environments, your file manager will mount the camera automatically. If this is the case, then the command will give you an error:

mike@mikebox:~$ gphoto2 --capture-tethered
Waiting for events from camera. Press Ctrl-C to abort.                         

*** Error ***              
An error occurred in the io-library ('Could not claim the USB device'): Could not claim interface 0 (Device or resource busy). Make sure no other program (gvfs-gphoto2-volume-monitor) or kernel module (such as sdc2xx, stv680, spca50x) is using the device and you have read/write access to the device.
*** Error (-53: 'Could not claim the USB device') ***       

For debugging messages, please use the --debug option.
Debugging messages may help finding a solution to your problem.
If you intend to send any error or debug messages to the gphoto
developer mailing list , please run
gphoto2 as follows:

    env LANG=C gphoto2 --debug --debug-logfile=my-logfile.txt --capture-tethered

Please make sure there is sufficient quoting around the arguments.

Simply find the camera and unmount it using the eject button:

Eject the camera storage

Now when you type the command, it will block until a photo is taken, and then show you the name of the photo:

mike@mikebox:~$ gphoto2 --capture-tethered
Waiting for events from camera. Press Ctrl-C to abort.                         
UNKNOWN PTP Property 5007 changed
...
Downloading 'DSC_0236.JPG' from folder '/store_00010001/DCIM/100NCD90'...
Saving file as DSC_0236.JPG                                                    
Deleting 'DSC_0236.JPG' from folder '/store_00010001/DCIM/100NCD90'...

Each of the photos is loaded into the working directory after you release the shutter, so you simply close gphoto2 when you’re done — no manual downloading or SD card required.

Extending this method

Ok, so now that I’ve covered this basic use case, the real reason I suggest gphoto2 is that it will let you script just about anything to do with your camera.

Just typing gphoto2 --help shows that it can let you trigger a photo or video on a timer, download and delete folders from the camera, or hook up programs via a pipe for processing the files in realtime.

Endless possibilities.