I recently built a 6502-based computer from scratch, and I’m using it as a platform for testing 6502 assembly code. The software on this computer is currently very limited, and re-programming an EEPROM chip to test changes is a slow process.
This blog post covers changes which I made to implement the XMODEM protocol, allowing me to upload programs over a serial connection.
The protocol itself
I chose XMODEM because it’s the simplest protocol which is compatible with modern terminal software. All I need right now is the ability to place some data (machine code) into RAM, so that I can execute it.
An important note that is that modern file transfer protocols would normally run over TCP/IP, while XMODEM runs over a serial connection. This works for me, since it’s the only interface I’ve got.
For what it’s worth, XMODEM is also era-appropriate technology for this retro computer, since it was first implemented in 1977. The 6502 processor came out in 1975.
Implementation
Implementing XMODEM was the easy part of this process. There are existing 6502 assembly implementations which I could have used, but I decided to work from the description on the Wikipedia article instead. This is partly to make sure I understand it, and partly to keep the software licensing of my ROM as clear as possible.
I have the beginnings of a shell for running commands from ROM, so I implemented two new commands:
rx, to receive a file over XMODEM and load it into memory.runto jump to the program
To start the transfer, I found it useful to write a method for reading a character with a time-out. I already have routines for reading and writing characters from serial.
; Like acia_recv_char, but terminates after a short time if nothing is received
shell_rx_receive_with_timeout:
  ldy #$ff
@y_loop:
  ldx #$ff
@x_loop:
  lda ACIA_STATUS              ; check ACIA status in inner loop
  and #$08                     ; mask rx buffer status flag
  bne @rx_got_char
  dex
  cpx #0
  bne @x_loop
  dey
  cpy #0
  bne @y_loop
  clc                          ; no byte received in time
  rts
@rx_got_char:
  lda ACIA_RX                  ; get byte from ACIA data port
  sec                          ; set carry bit
  rts
The entire receive process is around 60 lines of assembly code. The process involves ASCII NAK character repeatedly until a SOH character is received, which indicates the start of a 128 byte packet. All padding around each packet is discarded, and the payload is written to memory. This process is repeated until the end of transmission (EOT) is received.
; Built-in command: rx
; recives a file over XMODEM protocol, and loads it into memory
USER_PROGRAM_START = $0400   ; Address for start of user programs
USER_PROGRAM_WRITE_PTR = $00 ; ZP address for writing user program

shell_rx_main:
  ; Set pointers
  lda #<USER_PROGRAM_START   ; Low byte first
  sta USER_PROGRAM_WRITE_PTR
  lda #>USER_PROGRAM_START   ; High byte next
  sta USER_PROGRAM_WRITE_PTR + 1
  ; Delay so that we can set up file send
  lda #1                     ; wait ~1 second
  jsr shell_rx_sleep_seconds
  ; NAK, ACK once
@shell_block_nak:
  lda #$15                   ; NAK gets started
  jsr acia_print_char
  lda SPEAKER                ; Click each time we send a NAK or ACK
  jsr shell_rx_receive_with_timeout  ; Check in loop w/ timeout
  bcc @shell_block_nak       ; Not received yet
  cmp #$01                   ; If we do have char, should be SOH
  bne @shell_rx_fail         ; Terminate transfer if we don't get SOH
@shell_rx_block:
  ; Receive one block
  jsr acia_recv_char         ; Block number
  jsr acia_recv_char         ; Inverse block number
  ldy #0                     ; Start at char 0
@shell_rx_char:
  jsr acia_recv_char
  sta (USER_PROGRAM_WRITE_PTR), Y
  iny
  cpy #128
  bne @shell_rx_char
  jsr acia_recv_char         ; Checksum - TODO verify this and jump to shell_block_nak to repeat if not mathing
  lda #$06                   ; ACK the packet
  jsr acia_print_char
  lda SPEAKER                ; Click each time we send a NAK or ACK
  jsr acia_recv_char
  cmp #$04                   ; EOT char, no more blocks
  beq @shell_rx_done
  cmp #$01                   ; SOH char, next block on the way
  bne @shell_block_nak       ; Anything else fail transfer
  lda USER_PROGRAM_WRITE_PTR ; This next part moves write pointer along by 128 bytes
  cmp #$00
  beq @block_half_advance
  lda #$00                   ; If low byte != 0, set to 0 and inc high byte
  sta USER_PROGRAM_WRITE_PTR
  inc USER_PROGRAM_WRITE_PTR + 1
  jmp @shell_rx_block
@block_half_advance:         ; If low byte = 0, set it to 128
  lda #$80
  sta USER_PROGRAM_WRITE_PTR
  jmp @shell_rx_block
@shell_rx_done:
  lda #$6                    ; ACK the EOT as well.
  jsr acia_print_char
  lda SPEAKER                ; Click each time we send a NAK or ACK
  lda #1                     ; wait a moment (printing does not work otherwise..)
  jsr shell_rx_sleep_seconds
  jsr shell_rx_print_user_program
  jsr shell_newline
  lda #0
  jmp sys_exit
@shell_rx_fail:
  lda #1
  jmp sys_exit
This code is the first time that I’ve used the “Zero Page Indirect Indexed with Y” address mode. It uses a pointer to the program’s location, which is incremented 128 each time a packet is accepted.
The index in the current packet is stored in the Y register, allowing each incoming byte to be written to memory with one operation, which is called in a tight loop.
sta (USER_PROGRAM_WRITE_PTR), Y
The other routines mentioned in this source listing are:
shell_rx_sleep_seconds- sleeps for the number of seconds in theAregister.shell_rx_print_user_program- prints the first 256 bytes of the program for verification.
The checksum is entirely ignored. Everything here is running on my desk, so I’m not too worried about transmission errors.
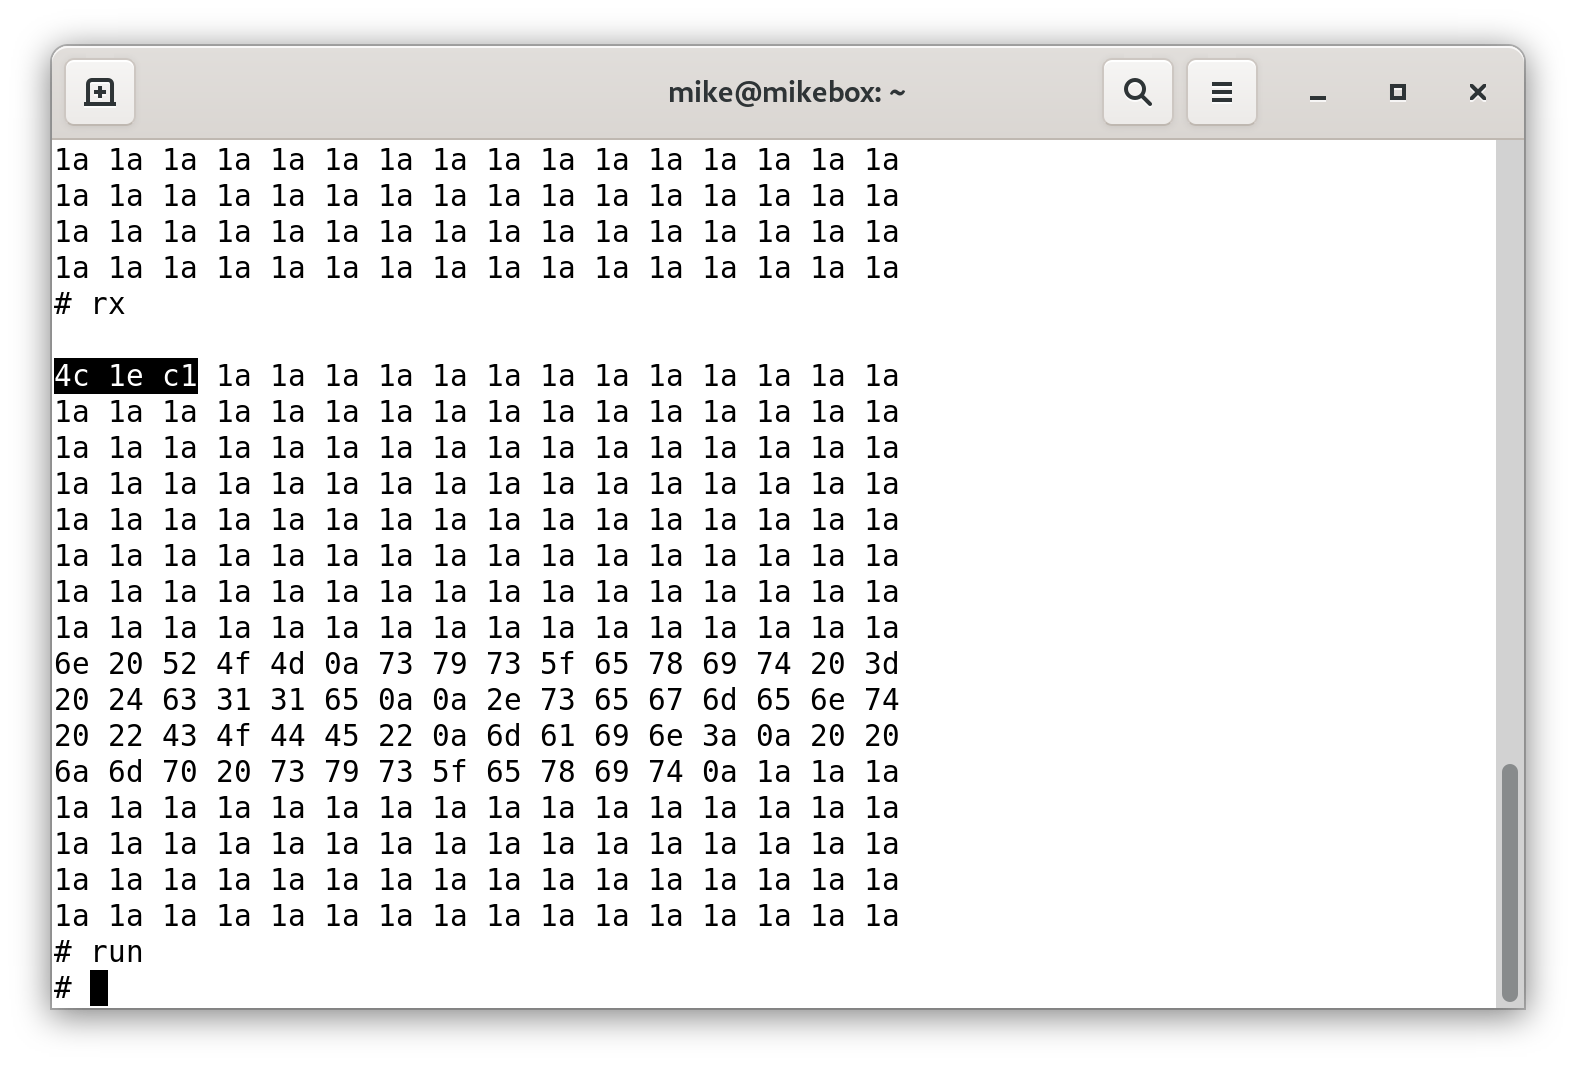
After a few iterations, I was able to upload placeholder text to RAM.
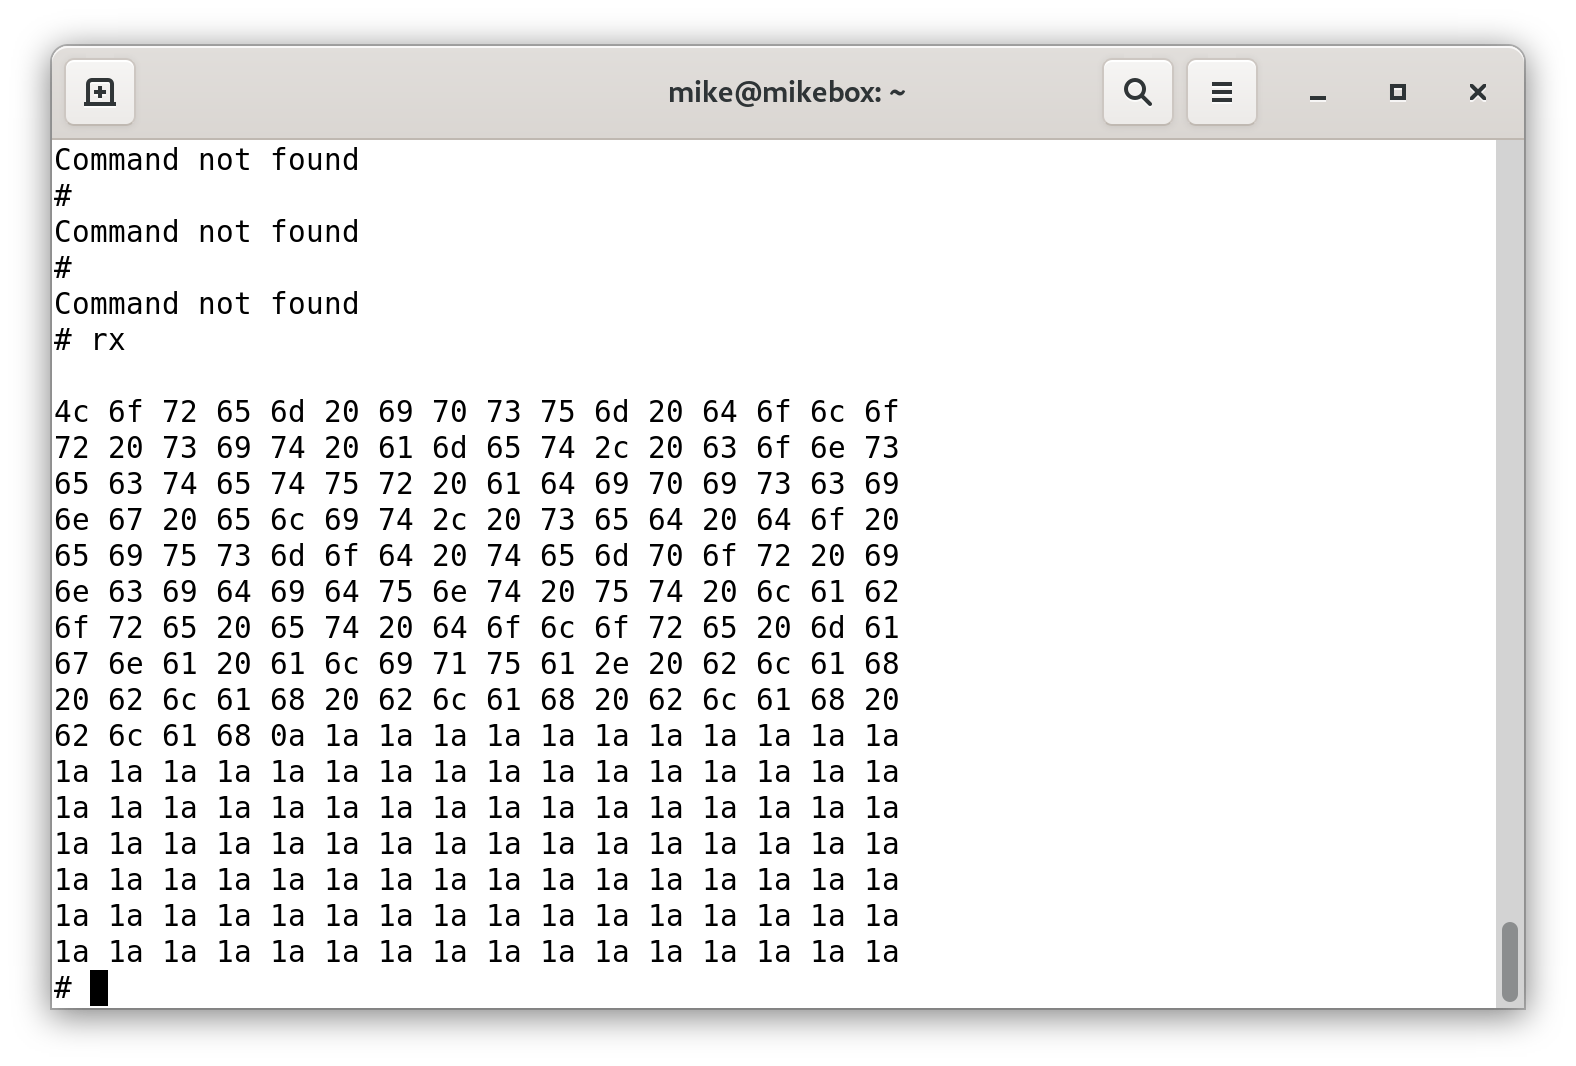
The screen capture shows 256 bytes of memory (2 packets in XMODEM). The ASCII SUB character (1a in hex) fills out unused bytes at the end, since everything sent over XMODEM needs to be a multiple of 128 bytes.
Assembling some programs
I thought I was almost done at this point, but it turns out that writing a “Hello World” test program to run from RAM is easier said than done.
I started by creating a new ld65 linker configuration which links code to run from address $0400 onwards, which is where programs are loaded into RAM. This system does not have a loader for re-locatable code, and absolute addresses are assigned by the linker.
This is the configuration which I used for these tests. It has some flaws, but it’s good enough to place the CODE segment in the right place.
# Test configuration for user programs
MEMORY {
    ZP:     start = $00,    size = $0100, type = rw, file = "";
    RAM:    start = $0100,  size = $0300, type = rw, file = "";
    MAIN:   start = $0400,  size = $1000, type = rw, file = %O;
    ROM:    start = $C000,  size = $4000, type = ro, file = "";
}

SEGMENTS {
    ZEROPAGE: load = ZP,  type = zp;
    BSS:      load = RAM, type = bss;
    CODE:     load = MAIN, type = ro;
    VECTORS:  load = ROM, type = ro,  start = $FFFA, optional=yes;
}
If I wanted my test program to terminate, then I needed to find the address of sys_exit in ROM. This routine hands control back to the shell after a command completes.
To get this, I re-assembled the ROM, but added the flag --debug-info to the ca65 assembler, and --dbgfile boot.dbg to the ld65 linker. This produces a text file, which contains the final address of each symbol.
sym id=45,name="sys_exit",addrsize=absolute,scope=0,def=28,ref=298+192+426+390+157,val=0xC11E,seg=0,type=lab
The simplest test program I could come up with was:
; location in ROM
sys_exit = $c11e

.segment "CODE"
main:
  jmp sys_exit
I was able to assemble this program to 3 bytes of binary and run it. It does absolutely nothing, and simply returns to the shell.
To extend this into a “Hello World” program, I needed to look up the location of two more routines in the ROM.
; locations of some functions in ROM
acia_print_char = $c020
shell_newline = $c113
sys_exit = $c11e
.segment "CODE"
main:
ldx #0
@test_char:
lda test_string, X
beq @test_done
jsr acia_print_char
inx
jmp @test_char
@test_done:
jsr shell_newline
lda #0
jmp sys_exit
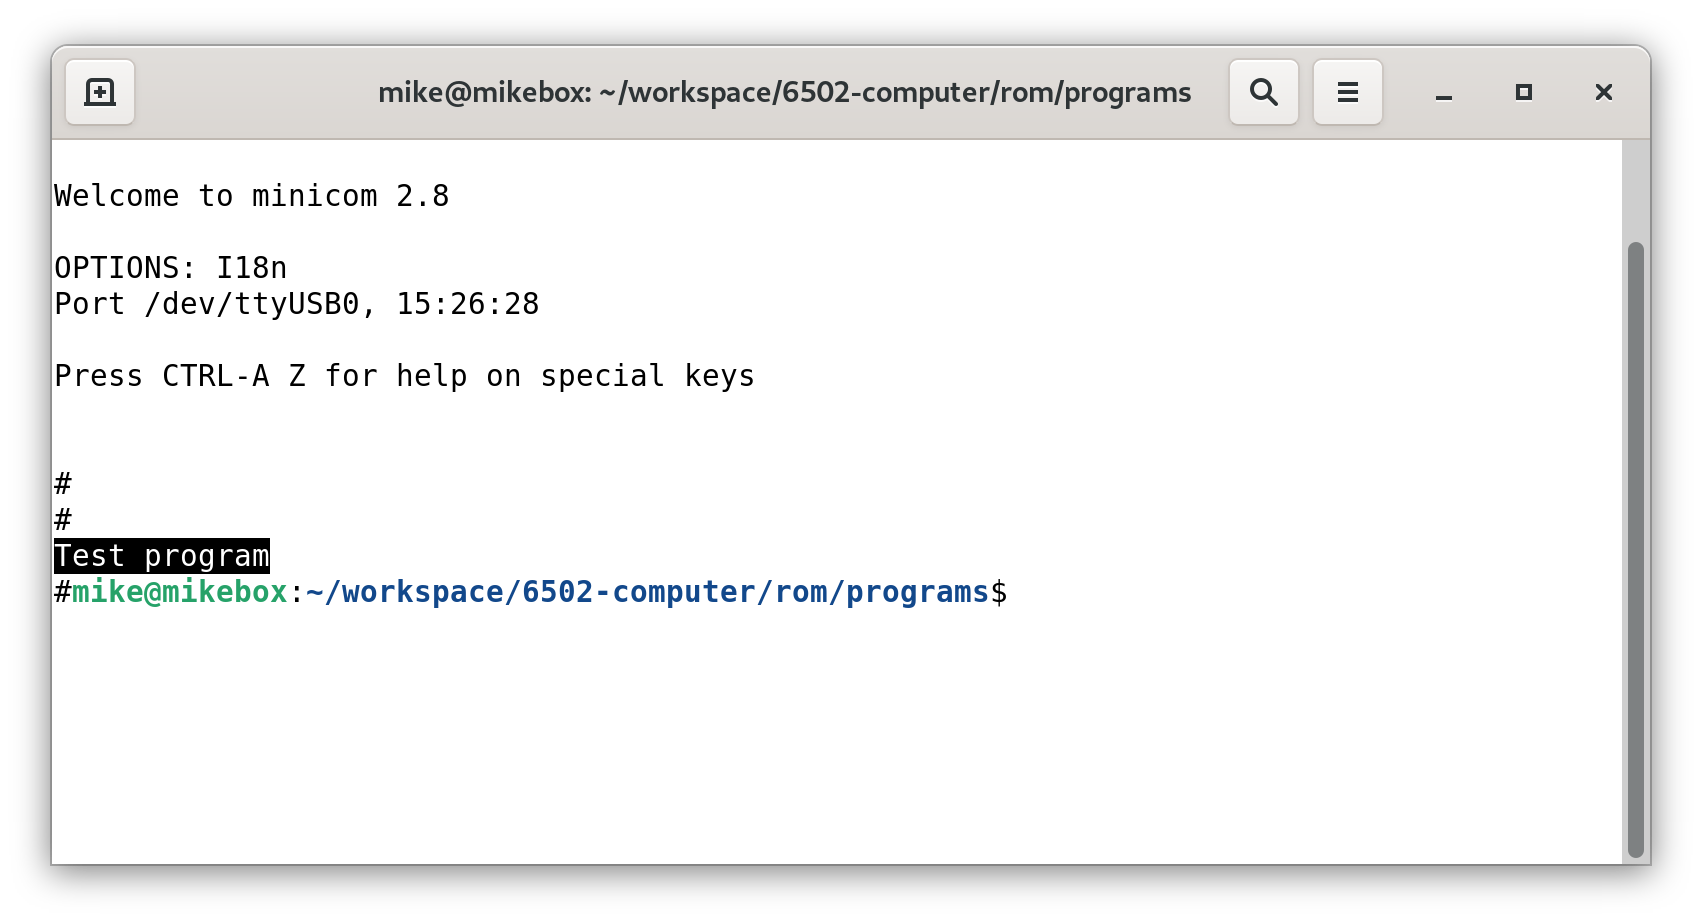
test_string: .asciiz "Test program"
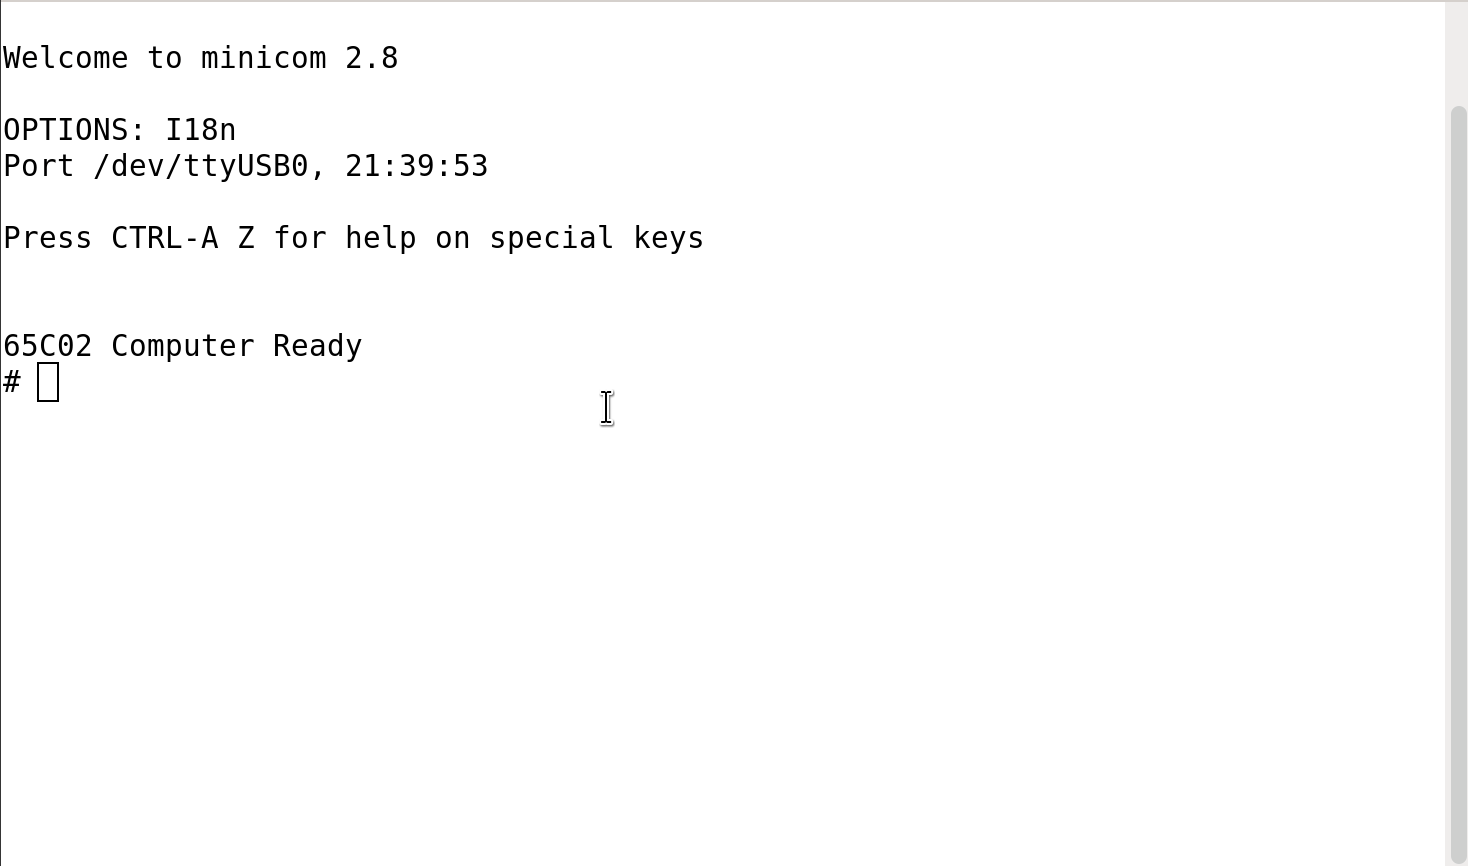
This animation shows the process of uploading the binary and executing it via minicom.
There is nothing special about the invocation for minicom here, it’s just a bit-rate and device name, which in my case is:
minicom -b 19200 -D /dev/ttyUSB0
Automating the boring stuff
This approach is very fragile, because the code is full of hard-coded memory addresses.
Any time I change the ROM, the addresses for these routines could change, and this program will no longer work.
On any real architecture, applications call into the OS via system calls, or maybe a jump table for 8-bit systems. I don’t need a stable binary interface, and there is no userspace/kernel distinction, so I decided not to go down that path.
Instead, I wrote a Python script to generate an assembly source file, using the same debug symbols which I was manually reading. This runs after each ROM build.
The format is:
...
.export VIA_T2C_H                        = $8009
.export VIA_T2C_L                        = $8008
.export acia_delay                       := $c02b
.export acia_print_char                  := $c014
...
When this file is assembled, it doesn’t generate any code, but it does define all of the constants and labels from the ROM. When applications link against this, they can .import anything which would be available to ROM-based code.
The start of the above script is re-written as:
.import acia_print_char, shell_newline, sys_exit
This means that I have source compatibility, just not binary compatibility.
Bringing everything together
With my initial goal achieved, I was still not happy with the development experience. I started to dig into the murky world of minicom scripting to see if I could automate the process of uploading/running programs, and found that it is indeed possible.
The scripting capabilities of minicom do not appear to be widely used, and I needed to read through the source code to find ways to work around the problems I encountered.
For example, the “send” command was sending characters too quickly for the target machine. There are hard-coded delays between commands in the interpreter, but you can’t use multiple “send” commands to slow things down, because it is also hard-coded to append a line ending each time.
The fix was to use !<, which sends the output of a command verbatim. This script uses echo -n command to send each character individually. This is the exact same procedure as the animation in the previous section. First, the script types “rx”, then sends the file, then types “run”.
# confirm we have a shell prompt
send ""
sleep 0.1
# put into receive mode
expect "# "
sleep 0.1
!< echo -n 'r'
!< echo -n 'x'
send ""
sleep 0.1
# send the program and wait for prompt
! sx -q $TEST_PROGRAM 2> /dev/null
expect "# "
# run program
sleep 0.1
!< echo -n 'r'
!< echo -n 'u'
!< echo -n 'n'
send ""
sleep 0.1
# Terminate minicom when program completes (bit crazy..)
expect "# "
sleep 0.1
! killall -9 minicom
It’s also worth talking about the end of this script. When minicom scripts end, the user is returned to an interactive session. I wanted the minicom process to terminate without clearing the screen, so I run killall -9 minicom as the last line of the script.
This is not the safest thing to include in a script, but it’s certainly effective, and I am quite certain that there is no built-in way to achieve this with the current version of minicom. Realistic alternatives include patching minicom, switching to different terminal software.
The minicom invocation includes the name of the minicom script to execute, and the script will use the TEST_PROGRAM environment variable to name the binary file to run.
TEST_PROGRAM=test.bin minicom -b 19200 -S minicom_autorun.txt -D /dev/ttyUSB0
When running this command, the program executes on the 6502 computer seamlessly, though minicom leaves the terminal in a broken state when it is killed, and bash prints the “Killed” text to the screen.
To work around this, I wrapped the minicom invocation in a shell script which builds the program, suppresses all errors, and always returns 0. This avoids constant reporting that killall -9 is a problem, but it does hide any other problems.
#!/bin/bash
set -eu -o pipefail
make $1.bin
(TEST_PROGRAM=$1.bin minicom -b 19200 -S minicom_autorun.txt -D /dev/ttyUSB0 || true) 2> /dev/null
This script is invoked as:
./assemble_and_run.sh test
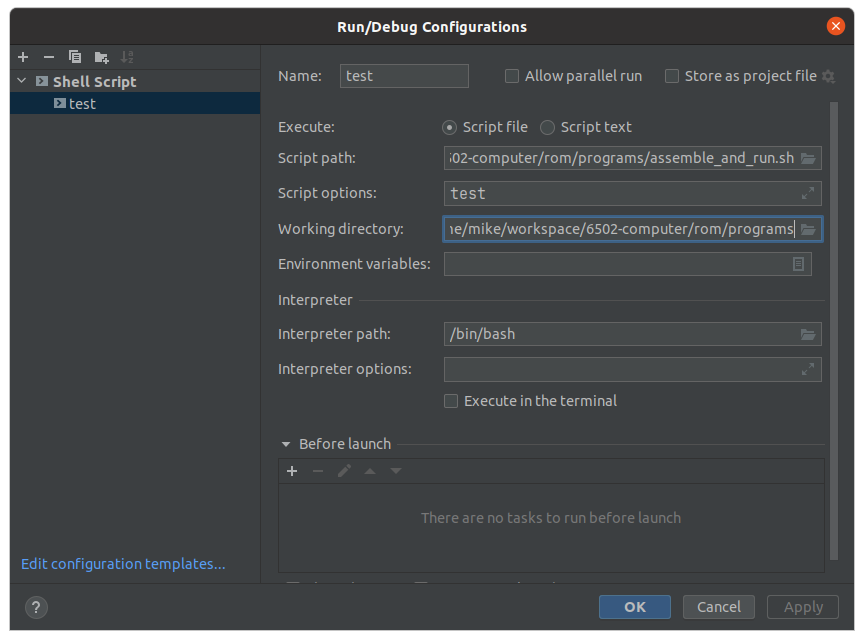
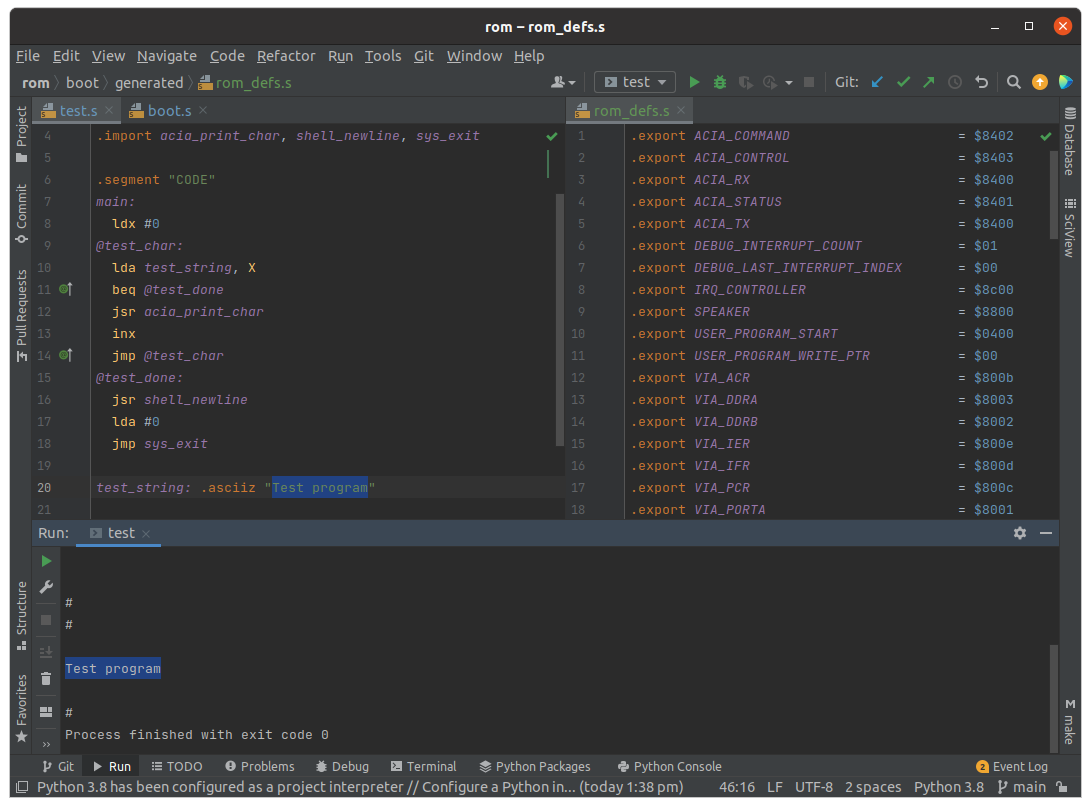
A few months back, I wrote an IntelliJ plugin for 6502 assembly, and I’m writing all of my code in PyCharm. The last step was to get this running from my IDE.
I added a build configuration which invokes the assemble_and_run.sh script. The script is completely generic, and I can use it to run other programs by changing the argument.
I can now write a program, click run, and watch it execute on real hardware, all without leaving my IDE. It took a lot of effort, but this is a huge improvement from where I started.
Wrap-up
A fast compile/test/run cycle is a huge gain for developer productivity on any system. I can now get fast, accurate feedback on whether my 6502 assembly programs work on real hardware. The first program I’m writing involves interfacing with an SD card, which will be a lot more approachable with this improvement.
I was surprised at how tricky it was to assemble and link a small program to run in RAM instead of ROM, and I can see that my linker configuration will need to be improved as I write programs which use more data. My basic plan is to test features by uploading them over XMODEM, then add them to the ROM when they are working.
The full source code for this project, which includes hardware and software, can be found on GitHub at mike42/6502-computer.