Recovering text from a receipt with escpos-tools

I have written previously about how to generate receipts for printers which understand ESC/POS. Today, I thought I would write about the opposite process.

Unlike PostScript, the ESC/POS binary language is not commonly understood by software. I wrote a few utilities last year to help change that, called escpos-tools.

In this post, I’ll step through an example ESC/POS binary file that an escpos-tools user sent to me, and show how we can turn it back into a usable format. The tools we are using are:

You might need this sort of process if you need to email a copy of your receipts, or to archive them for audit use.

Printing the file

Binary print files are generated from drivers. I can feed this one back to my printer like this:

cat receipt.bin > /dev/usb/lp0

My Epson TM-T20 receipt printer understands ESC/POS, and prints this out:

Installing escpos-tools

escpos-tools is not packaged yet, so you need git and composer (from the PHP eco-system) to use it.

$ git clone https://github.com/receipt-print-hq/escpos-tools
$ cd escpos-tools
$ composer install

Inspecting the file

There is text in the file, so the first thing you should try to do is esc2text. In this case, which works like this:

$ php esc2text.php receipt.bin

In this case, I got no output, so I switch to -v to show the commands being found.

$ php esc2text.php receipt.bin  -v
[DEBUG] SetRelativeVerticalPrintPositionCmd 
[DEBUG] GraphicsDataCmd 
[DEBUG] GraphicsDataCmd 
[DEBUG] SetRelativeVerticalPrintPositionCmd 
...

This indicates that there is no text being sent to the receipt, only images. We know from the print-out that the images contain text, so we need a few more utilities.

Recovering images from the receipt

To extract the images, use escimages. It runs like this:

$ php escimages.php --file receipt.bin
[ Image 1: 576x56 ]
[ Image 2: 576x56 ]
[ Image 3: 576x56 ]
[ Image 4: 576x56 ]
[ Image 5: 576x56 ]
[ Image 6: 576x56 ]
[ Image 7: 576x56 ]
[ Image 8: 576x52 ]

This gave us 8 narrow images:

Using ImageMagick’s convert command, these can be combined into one image like this:

convert -append receipt-*.png -density 70 -units PixelsPerInch receipt.png

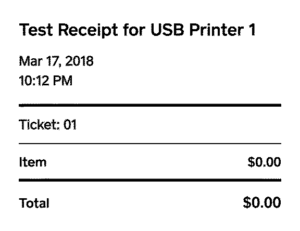
The result is now the same as what our printer would output:

Recovering text from the receipt

Lastly, tesseract is an open source OCR engine which can recover text from images. This image is a lossless copy of what we sent to the printer, which is an “easy” input for OCR.

$ tesseract receipt.png -
Estimating resolution as 279
Test Receipt for USB Printer 1

Mar 17, 2018
10:12 PM


Ticket: 01


Item $0,00

Total $0.00

This quality of output is fairly accurate for an untrained reader.

Conclusion

The escpos-tools family of utilities gives some visibility into the contents of ESC/POS binary files.

If you have a use case which requires working with this type of file, then I would encourage you to consider contributing code or example files to the project, so that the utilities can be improved over time.

Get the code

View on GitHub →

First impressions of the Rust programming language

I needed to write a small command-line utility recently, and thought that it would be a good chance to finally try out the Rust programming language.

I was hoping to learn the basics and implement this program in a few hours, but I found that it wasn’t trivial to just pick up Rust and start writing programs immediately. The compiler is quite strict about how you use variables, so progress is slow if you don’t really know what you are doing. Still, Rust allows you to produce programs with some valuable properties, so I’m planning to set aside some time to learn it properly.

In the meantime, these are a few of the first impressions that I had of Rust, as somebody completely new to this particular software ecosystem.

Initial installation is easy

I needed to install the rustc compiler and cargo dependency manager. I found that the command packages for Debian testing were up-to-date, so I installed directly from apt.

sudo apt-get install rustc cargo

From there, it took all of one minute to create a file called hello.rs, drop the “Hello world” program, and see it run:

fn main() {
  println!("Hello");
}

The rustc compiler has a simple-enough invocation:

$ rustc hello.rs

And the resulting program ran as expected.

$ ./hello 
Hello

There were no surprises here. It seemed to work just like C so-far.

Output files are large

The output binary file was much larger than I expected, at 246K.

$ ls -Ahl hello
-rwxr-xr-x 1 mike mike 246K Apr 13 21:55 hello

For comparison, I wrote out a similar program in C and it was 8K.

#include <stdio.h>

int main() {
  printf("Hello\n");
  return 0;
}
$ gcc hello.c -o hello
$ ./hello 
Hello
$ ls -Ahl hello
-rwxr-xr-x 1 mike mike 8.3K Apr 13 21:57 hello

The FAQ explained a few specific reasons why this was the case.

Compile is slow

Compilation took around a quarter of a second. This does not seem like much, but it certainty slower than I expected for such trivial code.

$ time rustc hello.rs
real    0m0.298s

Compared with the C program:

$ time gcc hello.c -o hello
real    0m0.044s

Again, the FAQ points out that zero-cost abstractions incur a compile-time penalty.

Since compilation is a notoriously time-consuming activity with existing languages, I’m hoping that the compile times for Rust are acceptable for small projects.

Legendary compile errors

I’ve read about rustc being very strict, but printing good errors. So, I deleted a ! character and tried to re-compile.

fn main() {
  println("Hello");
}
$ rustc hello.rs 
error[E0423]: expected function, found macro `println`
 --> hello.rs:2:3
  |
2 |   println("Hello");
  |   ^^^^^^^ did you mean `println!(...)`?

error: aborting due to previous error

This error message suggested the correct code to use. This is better than what you get from most compilers, so I’m pretty happy with that.

Editor support is good

Next, I needed a better Rust editor. Eclipse support for Rust was present, but had a patchy maintenance status.

So I tried adding the Rust plugin for IntelliJ IDEA community edition, which is still a fully open source stack. This was point-and-click. The basic steps follow-

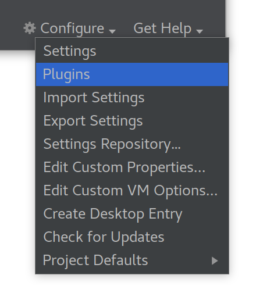
Open IntelliJ and click Configure:

Then Plugins:

Search for “rust”, and click Search in Repositories:

Then click RustInstall, and wait:

Once it installs, restart the IDE.

The New Project dialog now shows Rust as an option.

I needed the rust-src package to fill out these options:

$ sudo apt-get install rust-src
$ apt-file list rust-src
/usr/src/rustc-1.24.1/src/ ..

In the IntelliJ Rust environment, most editor features worked, but the debugger was not supported.

So, IDE support is mostly there, but it’s not easy to start hacking as something like Java.

Dependency management

I noticed that Cargo produces .lock files which contain checksums and exact versions of dependencies.

As a composer and yarn user, this was familiar.

“Clippy”

I couldn’t use the clippy linter to check my code, because it does not work on the stable Rust releases. The ‘nightly’ Rust releases are not available in the Debian archive.

So, for installing rustc, I should have used rustup, not apt-get. Lesson learned!

Documentation

I followed the “Guessing game tutorial” from the official Rust book in the IDE, which taught basic I/O, variable scope and control structures in Rust.

The go-to source reference for Rust is ‘The Rust Book’, which is also collaboratively built and freely licensed.

There is also an immense amount of high-quality discussion taking place between Rust users, which I found to be surprisingly accessible as a novice.

Having never used the language before, I didn’t have to ask any questions to get these basics working, which suggests that the available resources are pretty good.

How to print the characters in an ESC/POS printer code page

I’ve been working on software that interacts with ESC/POS receipt printers for some time, and a constant source of trouble is the archaic character encoding scheme used on these printers.

Most commonly, non-ASCII characters are accessed by swapping the extended range to a different 128-character code page. The main open source drivers (escpos-php and python-escpos) are both capable of auto-selecting an encoding, but they need a good database of known encodings to power this feature for each individual printer.

Today, I’ll share a small utility that can print out the contents of a code page, like this:

A printer’s documentation vaguely labeled this encoding as “[1] Katakana”. By printing it out, I can see that if I map single-byte half-width Katakana from Code Page 932, it will appear correctly in this code page. That’s type of information you need when you’re asked about it on an issue tracker!

Usage

You will generally find a list of code pages with a corresponding number for each one (0-255) in an ESC/POS printer’s documentation.

This command-line tool then takes a list of code pages to inspect, and will output raw binary that generates a table like the one above when sent to the printer:

php escpos-caracter-table.php NUMBER ...

So to print the code pages 1, 2 and 3 to a binary file, the command would be:

php escpos-character-tables.php 1 2 3 > code-page-1.bin

Next, you need to know how to do raw printing. Raw USB printing on Linux typically works like this:

cat code-page-1.bin > /dev/usb/lp0

For other platforms, it will be different! You will need to do a bit of research on raw printing for your platform if you haven’t tried it before.

The code: escpos-character-tables.php

<?php
/**
 * This standalone script can be used to print the contents of a code page
 * for troubleshooting.
 *
 * Usage: php escpos-caracter-table.php NUMBER ...
 *
 * Code pages are numbered 0-255.
 *
 * The ESC/POS binary will be send to stdout, and should be redirected to a
 * file or printer:
 *
 *   php escpos-caracter-table.php 20 > /dev/usb/lp0
 *
 * @author Michael Billington < michael.billington@gmail.com >
 * @license MIT
 */

/* Sanity check */
if(php_sapi_name() !== "cli") {
    die("This is a command-line script, invoke via php.exen");
}
if(count($argv) < 2) {
    die("At least one code page number must be specifiedn");
}
array_shift($argv);
foreach($argv as $codePage) {
    if(!is_numeric($codePage) || $codePage < 0 || $codePage > 255) {
        die("Code pages must be numbered 0-255");
    }
}

/* Reset */
$str = "\x1b@";
foreach($argv as $codePage) {
    /* Print header, switch code page */
    $str .= "\x1bt" . chr($codePage);
    $str .= "\x1bE\x01Code page $codePage\x1bE\x00\n";
    $str .= "\x1bE\x01  0123456789ABCDEF0123456789ABCDEF\x1bE\x00\n";
    $chars = str_repeat(' ', 128);
    for ($i = 0; $i < 128; $i++) {
        $chars[$i] = chr($i + 128);
    }
    for ($y = 0; $y < 4; $y++) {
        $row = "" . " ";
        $rowHeader = "\x1bE\x01" . strtoupper(dechex($y + 8)) . "\x1bE\x00";
        $row = substr($chars, $y * 32, 32);
        $str .= "$rowHeader $row\n";
    }
}

/* Cut */
$str .= "\x1dV\x41\x03";

/* Output to STDOUT */
file_put_contents("php://stdout", $str);

Optimization: How I made my PHP code run 100 times faster

I’ve had a PHP wikitext parser as a dependency of some of my projects since 2012. It has always been a minor performance bottleneck, and I recently decided to do something about it.

I prepared an update to the code over the course of a month, and achieved a speedup of 142 times over the original code.

Before: 20.65 seconds, After: 0.145 seconds

A lot of the information that I could find online about PHP performance was very outdated, so I decided to write a bit about what I’ve learned. This post walks through the process I used, and the things which were were slowing down my code.

This is a long read — I’ve included examples which show slow code, and what I replaced them with. If you’re a serious PHP programmer, then read on!

Lesson 1: Know when to optimize

Conventional wisdom seems to dictate that making your code faster is a waste of developer time.

I think it makes you a better programmer to occasionally optimize something in a language that you normally work with. Having a well-calibrated intuition about how your code will run is part of becoming proficient in a language, and you will tend to create fewer performance problems if you’ve got that intuition.

But you do need to be selective about it. This code has survived in the wild for over five years, and I think I will still be using it in another five. This code is also a good candidate because it does not access external resources, so there is only one component to examine.

Lesson 2: Write tests

In the spirit of MakeItWorkMakeItRightMakeItFast, I started by checking my test suite so that I could refactor the code with confidence.

In my case, I haven’t got good unit tests, but I have input files that I can feed through the parser to compare with known-good HTML output, which serves the same purpose:

php example.php > out.txt
diff good.txt out.txt

I ran this after every change to the code, so that I could be sure that the changes were not affecting the output.

Lesson 3: Profile your code & Question your assumptions

Code profiling allows you see how each part of your program is contributing to its overall run-time. This helps you to target your optimization efforts.

The two main debuggers for PHP are Zend and Xdebug, which can both profile your code. I have xdebug installed, which is the free debugger, and I use the Eclipse IDE, which is the free IDE. Unfortunately, the built-in profiling tool in Eclipse seems to only support the Zend debugger, so I have to profile my scripts on the command-line.

The best sources of information for this are:

On Debian or Ubuntu, xdebug is installed via apt-get:

sudo apt-get install php-cli php-xdebug

On Fedora, the package is called php-pecl-xdebug, and is installed as:

sudo dnf install php-pecl-xdebug

Next, I executed a slow-running example script with profiling enabled:

php -dxdebug.profiler_enable=1 -dxdebug.profiler_output_dir=. example.php

This produces a profile file, which you can use any valgrind-compatible tools to inspect. I used kcachegrind

sudo apt-get install kcachegrind

And for fedora:

sudo dnf install kcachegrind

You can locate and open the profile on the command-line like so:

ls
kcachegrind cachegrind.out.13385

Before profiling, I had guessed that the best way to speed up the code would be to reduce the amount of string concatenation. I have lots of tight loops which append characters one-at-a-time:

$buffer .= "$c"

Xdebug showed me that my guess was wrong, and I would have wasted a lot of time if I tried to remove string concatenation.
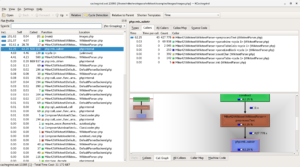
kcachegrind screen capture

Instead, it was clear that I was

  • Calculating the same thing hundreds of times over.
  • Doing it inefficiently.

Lesson 4: Avoid multibyte string functions

I had used functions from the mbstring extension (mb_strlen, mb_substr) to replace strlen and substr throughout my code. This is the simplest way to add UTF-8 support when iterating strings, is commonly suggested, and is a bad idea.

What people do

If you have an ASCII string in PHP and want to iterate over each byte, the idiomatic way to do it is with a for loop which indexes into the string, something like this:

<?php
// Make a test string
$testString = str_repeat('a', 60000);
// Loop through test string
$len = strlen($testString);
for($i = 0; $i < $len; $i++) {
  $c = substr($testString, $i, 1);
  // Do work on $c
  // ...
}

I’ve used substr here so that I can show that it has the same usage as mb_substr, which generally operates on UTF-8 characters. The idiomatic PHP for iterating over a multi-byte string one character at a time would be:

<?php
// Make a test string
$testString = str_repeat('a', 60000);
// Loop through test string
$len = mb_strlen($testString);
for($i = 0; $i < $len; $i++) {
  $c = mb_substr($testString, $i, 1);
  // Do work on $c
  // ...
}

Since mb_substr needs to parse UTF-8 from the start of the string each time it is called, the second snippet runs in polynomial time, where the snippet that calls substr in a loop is linear.

With a few kilobytes of input, this makes mb_substr unacceptably slow.

substr: 0.03 seconds, mb_substr: 4.23 seconds

Averaging over 10 runs, the mb_substr snippet takes 4.23 seconds, while the snippet using substr takes 0.03 seconds.

What people should do

Split your strings into bytes or characters before you iterate, and write methods which operate on arrays rather than strings.

You can use str_split to iterate over bytes:

<?php
// Make a test string
$testString = str_repeat('a', 60000);
// Loop through test string
$testArray = str_split($testString);
$len = count($testArray);
for($i = 0; $i < $len; $i++) {
  $c = $testArray[$i];
  // Do work on $c
  // ...
}

And for unicode strings, use preg_split. I learned about this trick from StackOverflow, but it might not be the fastest way. Please leave a comment if you have an alternative!

<?php
// Make a test string
$testString = str_repeat('a', 60000);
// Loop through test string
$testArray = preg_split('//u', $testString, -1, PREG_SPLIT_NO_EMPTY);
$len = count($testArray);
for($i = 0; $i < $len; $i++) {
  $c = $testArray[$i];
  // Do work on $c
  // ...
}

By converting the string to an array, you can pay the penalty of decoding the UTF-8 up-front. This is a few milliseconds at the start of the script, rather than a few milliseconds each time you need to read a character.
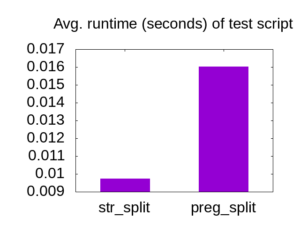
str_split: 0.0097s, preg_split: 0.0160s

After discovering this faster alternative to mb_substr, I systematically removed every mb_substr and mb_strlen from the code I was working on.

Lesson 5: Optimize for the most common case

Around 50% of the remaining runtime was spent in a method which expanded templates.

To parse wikitext, you first need to expand templates, which involves detecting tags like {{ template-name | foo=bar }} and <noinclude></noinclude>.

My 40 kilobyte test file had fewer than 100 instances of { and <, | and =, so I added a short-circuit to the code to skip most of the processing, for most of the characters.

<?php
self::$preprocessorChars = [
    '<' => true,
    '=' => true,
    '|' => true,
    '{' => true
];

// ...
for ($i = 0; $i < $len; $i++) {
    $c = $textChars[$i];
    if (!isset(self::$preprocessorChars[$c])) {
        /* Fast exit for characters that do not start a tag. */
        $parsed .= $c;
        continue;
    }
   // ... Slower processing 
}

The slower processing is now avoided 99.75% of the time.

Checking for the presence of a key in a map is very fast. To illustrate, here are two examples which each branch on { and <, | and =.

This one uses a map to check each character:

<?php
// Make a test string
$testString = str_repeat('a', 600000);
$chars = [
    '<' => true,
    '=' => true,
    '|' => true,
    '{' => true
];
// Loop through test string
$testArray = preg_split('//u', $testString, -1, PREG_SPLIT_NO_EMPTY);
$len = count($testArray);
$parsed = "";
for($i = 0; $i < $len; $i++) {
  $c = $testArray[$i];
  if(!isset($chars[$c])) {
    $parsed .= $c;
    continue;
  }
  // Never executed
}

While one uses no map, and has four !== checks instead:

<?php
// Make a test string
$testString = str_repeat('a', 600000);
// Loop through test string
$testArray = preg_split('//u', $testString, -1, PREG_SPLIT_NO_EMPTY);
$len = count($testArray);
$parsed = "";
for($i = 0; $i < $len; $i++) {
  $c = $testArray[$i];
  if($c !== "<" && $c !== "=" && $c !== "|" && $c !== "{") {
    $parsed .= $c;
    continue;
  }
  // Never executed
}

Even though the run time of each script includes the generation of a 600kB test string, the difference is still visible:
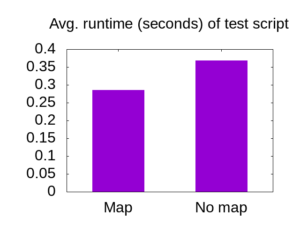
0.29 seconds with map, 0.37 seconds without map

Averaging over 10 runs, the code took 0.29 seconds when using a map, while it took 0.37 seconds to run the example with used four !== statements.

I was a little surprised by this result, but I’ll let the data speak for itself rather than try to explain why this is the case.

Lesson 6: Share data between functions

The next item to appear in the profiler was the copious use of array_slice.
My code uses recursive descent, and was constantly slicing up the input to pass around information. The array slicing had replaced earlier string slicing, which was even slower.

I refactored the code to pass around the entire string with indices rather than actually cutting it up.

As a contrived example, these scripts each use a (very unnecessary) recursive-descent parser to take words from the dictionary and transform them like this:

example --> (example!)

The first example slices up the input array at each recursion step:

<?php
function handleWord(string $word) {
  return "($word!)\n";
}

/**
 * Parse a word up to the next newline.
 */
function parseWord(array $textChars) {
  $parsed = "";
  $len = count($textChars);
  for($i = 0; $i < $len; $i++) {
    $c = $textChars[$i];
    if($c === "\n") {
      // Word is finished because we hit a newline
      $start = $i + 1; // Past the newline
      $remainderChars = array_slice($textChars, $start , $len - $start);
      return array('parsed' => handleWord($parsed), 'remainderChars' => $remainderChars);
    }
    $parsed .= $c;
  }
  // Word is finished because we hit the end of the input
  return array('parsed' => handleWord($parsed), 'remainderChars' => []);
}

/**
 * Accept newline-delimited dictionary
 */
function parseDictionary(array $textChars) {
  $parsed = "";
  $len = count($textChars);
  for($i = 0; $i < $len; $i++) {
    $c = $textChars[$i];
    if($c === "\n") {
      // Not a word...
      continue;
    }
    // This is part of a word
    $start = $i;
    $remainderChars = array_slice($textChars, $start, $len - $start);
    $result = parseWord($remainderChars);
    $textChars = $result['remainderChars'];
    $len = count($textChars);
    $i = -1;
    $parsed .= $result['parsed'];
  }
  return array('parsed' => $parsed, 'remainderChars' => []);
}

// Load file, split into characters, parse, print result
$testString = file_get_contents("words");
$testArray = preg_split('//u', $testString, -1, PREG_SPLIT_NO_EMPTY);
$ret = parseDictionary($testArray);
file_put_contents("words2", $ret['parsed']);

While the second one always takes an index into the input array:

<?php
function handleWord(string $word) {
  return "($word!)\n";
}

/**
 * Parse a word up to the next newline.
 */
function parseWord(array $textChars, int $idxFrom = 0) {
  $parsed = "";
  $len = count($textChars);
  for($i = $idxFrom; $i < $len; $i++) {
    $c = $textChars[$i];
    if($c === "\n") {
      // Word is finished because we hit a newline
      $start = $i + 1; // Past the newline
      return array('parsed' => handleWord($parsed), 'remainderIdx' => $start);
    }
    $parsed .= $c;
  }
  // Word is finished because we hit the end of the input
  return array('parsed' => handleWord($parsed), $i);
}

/**
 * Accept newline-delimited dictionary
 */
function parseDictionary(array $textChars, int $idxFrom = 0) {
  $parsed = "";
  $len = count($textChars);
  for($i = $idxFrom; $i < $len; $i++) {
    $c = $textChars[$i];
    if($c === "\n") {
      // Not a word...
      continue;
    }
    // This is part of a word
    $start = $i;
    $result = parseWord($textChars, $start);
    $i = $result['remainderIdx'] - 1;
    $parsed .= $result['parsed'];
  }
  return array('parsed' => $parsed, 'remainderChars' => []);
}

// Load file, split into characters, parse, print result
$testString = file_get_contents("words");
$testArray = preg_split('//u', $testString, -1, PREG_SPLIT_NO_EMPTY);
$ret = parseDictionary($testArray);
file_put_contents("words2", $ret['parsed']);

The run-time difference between these examples is again very pronounced:
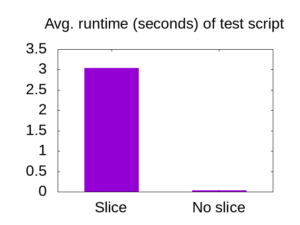
3.04s with slicing, 0.0302s with no slicing

Averaging over 10 runs, the code snippet which extracts sub-arrays took 3.04 seconds, while the code that passes around the entire array ran in 0.0302 seconds.

It’s amazing that such an obvious inefficiency in my code had been hiding behind larger problems before.

Lesson 7: Use scalar type hinting

Scalar type hinting looks like this:

function foo(int bar, string $baz) {
...
}

This is the secret PHP performance feature that they don’t tell you about. It does not actually change the speed of your code, but does ensure that it can’t be run on the slower PHP releases before 7.0.

PHP 7.0 was released in 2015, and it’s been established that it is twice as fast as PHP 5.6 in many cases.

I think it’s reasonable to have a dependency on a supported version of your platform, and performance improvements like this are a good reason to update your minimum supported version of PHP.

By breaking compatibility with scalar type hints, you ensure that your software does not appear to “work” in a degraded state.

Simplifying the compatibility landscape will also make performance a more tractable problem.

Lesson 8: Ignore advice that isn’t backed up by (relevant) data

While I was updating this code, I found a lot of out-dated claims about PHP performance, which did not hold true for the versions that I support.

To call out a few myths that still seem to be alive:

  • Style of quotes impacts performance.
  • Use of by-val is slower than by-ref for variable passing.
  • String concatenation is bad for performance.

I attempted to implement each of these, and wasted a lot of time. Thankfully, I was measuring the run-time and using version control, so it was easy for me to identify and discard changes which had a negligible or negative performance impact.

If somebody makes a claim about something being fast or slow in PHP, best assume that it doesn’t apply to you, unless you see some example code with timings on a recent PHP version.

Conclusion

If you’ve read this far, then I hope you’ve seen that modern PHP is not an intrinsically slow language. A significant speed-up is probably achievable on any real-world code-base with such endemic performance issues.

Before: 20.65 seconds, After: 0.145 seconds

To repeat the graphic from the introduction: the test file could be parsed in 20.65 seconds on the old code, and 0.145 seconds on the improved code (averaging over 10 runs, as before).

At this point I declared my efforts “good enough” and moved on. The job is done: although another pass could speed it up further, this code is no longer slow enough to justify the effort.

Since I’ve closed the book on PHP 5, I would be interested in knowing whether there is a faster way to parse UTF-8 with the new IntlChar functions, but I’ll have to save that for the next project.

Now that you’ve seen some very inefficient ways to write PHP, I also hope that you will be able to avoid introducing similar problems in your own projects!

Using a receipt printer with the Amazon Echo

Today, I’m going to share this write-up by fellow developer Chris, who used the escpos-php thermal printing library as part of a setup which printed shopping lists via voice commands, using the Alexa Voice Service API to send the lists back to a Raspberry Pi.

Naturally, the easiest solution […] is to print it in thermal paper… Now, combine this with a voice interface, such as ALEXA, and you made yourself a voice controlled list printer.

I found out about this one through a blog comment, and it’s a recommended read for anybody who is interested in how all of these parts integrate.

When I first uploaded this printing library four years ago, the Amazon Echo did not exist yet, and I was solving a very specific problem. For an old technology, it’s interesting to see that new applications for thermal printers are still appearing, and I’m certainly glad to see my software popping up in cool projects like this.

Raster to vector conversion tips

I have recently been working with some low-resolution bitmap fonts for a few projects, which needed to be re-sized for different uses.

I’ll share here a few tricks that I use to get the detail out of each letter as a vector, so that it can be rendered at a higher resolution.

Example

A good example might be this picture of a hieroglyph from the WikiHiero MediaWiki extension, which is 28 pixels wide:

Scaled up, it looks like this:

So small images become very pixellated when you resize them. The good news is that even from a small image, there is quite a lot of detail which we can use. If we’re smart about it, the glyph can be rendered like this:

You can still see some artifacts because of the low resolution of the input, but it’s clearly an improvement.

You will need

  • ImageMagick for raster operations.
  • potrace to trace the image.
  • Inkscape to produce a high-quality raster.

Steps

Prepare

The tracing program will convert the image to pure black & white as its first step. These transformations make sure that the detail is preserved for tracing.

  • Padding by 10px on every side to reduce distortion around the edges.
  • Scaling by 10x with interpolation
  • Convert transparency to white
convert hiero_A1.png -bordercolor white -border 10x10 \
    -resize 1000% -flatten hiero_A1.pnm

The 29×38 grey+alpha input becomes a blurry 490 x 580 greymap surrounded by whitespace.

This preparation is important, because a large blurry graymap will retain a lot more detail than the original image when a threshold is applied to convert it pure black and white:

Trace

The potrace program will threshold and trace the input image. Here, we will produce an SVG so that we can make it transparent.

The k value affects the threshold operation. It can be increased for a bolder, darker glyph, or reduced for a finer one.

potrace hiero_A1.pnm -k 0.30 --svg

This gives you an SVG with padding:

If you only want a vector, then you can stop here. The next steps will reproduce a smaller PNG with transparency and the correct padding.

I couldn’t find a reliable way to programmatically crop the image back to its original padding as an SVG, but in my case I needed to convert it back to a bitmap anyway, so I cropped it later.

Render

Use Inkscape to convert the SVG back to a large PNG. The output size here is twice as large as the file we traced, just to leave plenty of pixels to work with.

inkscape -z -e hiero_A1_big.png hiero_A1.svg -w 980

Like the SVG, there is still a lot of whitespace here. The image is now a PNG with a transparent background, and unlike the file we traced, the edges of the curves are now anti-aliased.

Crop

Everything is 20x its original size, to get the image, we need to drop 200px of padding from the left and top, then read 580×760 pixels (20 times the 29×38 start).

convert hiero_A1_big.png -crop 580x760+200+200 hiero_A1_cropped.png

This produces a 580×760 image in the same aspect ratio as the original input file.

Scale down

In my case, I only needed to double the resolution of the input file, so I scaled this file down from there.

hiero_A1_cropped.png -resize 58x76 hiero_A1_outp1.png

Success!

As a script

I got these steps from a script that I wrote for doubling the size of a PNG image so that it can be re-used on newer displays.

Usage:

./tracepng.sh foo.png

Where tracepng.sh is:

#!/bin/bash
# A script to upscale small bitmaps in PNG format.
# Pad, upscale, trace, render, crop then downscale.
if [ $# != 1 ]; then
  echo "Usage $0 input.png"
  exit
fi
set -exu
# Names of all the files we will produce
INP_FILE=$1
SVG_FILE="${INP_FILE%.*}.svg"
PNM_FILE="${INP_FILE%.*}.pnm"
LARGE_FILE="${INP_FILE%.*}_big.png"
LARGE_FILE_CROPPED="${INP_FILE%.*}_cropped.png"
OUTP_FILE="${INP_FILE%.*}_outp1.png"
COMPARISON_FILE="${INP_FILE%.*}_outp2.png"

# Width originally
# https://stackoverflow.com/questions/4670013/fast-way-to-get-image-dimensions-not-filesize
IMG_WIDTH=$(identify -format "%w" "$INP_FILE")
IMG_HEIGHT=$(identify -format "%h" "$INP_FILE")
TARGET_WIDTH=$((IMG_WIDTH * 2))
TARGET_HEIGHT=$((IMG_HEIGHT * 2))

# Make huge raster w/ border (whitespace is your friend for black/white interpolation and tracing), then convert to SVG
convert ${INP_FILE} -bordercolor white -border 10x10 -resize 1000% -flatten ${PNM_FILE}

# https://en.wikipedia.org/wiki/Potrace
potrace ${PNM_FILE} -k 0.30 --svg > ${SVG_FILE}

# Target width for intermediate file
EXPANDED_WIDTH=$(((IMG_WIDTH + 20) * 20))
EXPANDED_HEIGHT=$(((IMG_HEIGHT + 20) * 20))
INNER_WIDTH=$((IMG_WIDTH * 20))
INNER_HEIGHT=$((IMG_HEIGHT * 20))
# https://stackoverflow.com/questions/9853325/how-to-convert-a-svg-to-a-png-with-image-magick
inkscape -z -e ${LARGE_FILE} ${SVG_FILE} -w ${EXPANDED_WIDTH}

# Cut new edges off
# http://www.imagemagick.org/Usage/crop/
convert ${LARGE_FILE} -crop ${INNER_WIDTH}x${INNER_HEIGHT}+200+200 ${LARGE_FILE_CROPPED}
convert ${LARGE_FILE_CROPPED} -resize ${TARGET_WIDTH}x${TARGET_HEIGHT} ${OUTP_FILE}

Acknowledgment

The images here are from WikiHiero, and can be remixed under the GNU General Public License 2.0.

Git Introductory Material – Tips for Users, Admins and Git Champions

This is a collection of tips that I have found useful for introducing software developers to the Git version control system.

Bookmarks for reference

For users

When you say that you use Git, most developers will assume that you are familiar with the Git CLI. Regardless of whether you plan to use the CLI long-term, when you do a web search to find out something about Git, you should be prepared to read answers that apply to the Git CLI.

Since you will be asking a lot of questions in the first few weeks, you will have less work to do if you use the same interface as everybody else. Rest assured that there are plenty of graphical tools and IDE plugins that you can try out later.

Takeaway: Use the Git CLI while you are learning

If you have more than one person working with the code, then you will want to share your repository between them.

You need product that meets your budget, workflow, security and licensing needs: As of 2018, you really only need to consider GitHub, Bitbucket, Phabricator or GitLab to make a thorough comparison.

Takeaway: Demand a collaborative environment that supports ‘pull requests’

Repository admins

Aim to make your setup both beginner-friendly, and beginner-proof.

Git is not very opinionated, and has features which will support many advanced workflows. I would suggest that you save these features until you have a critical mass of experienced users who are comfortable using them. The feature-branch workflow is beginner-friendly, as long as the shared branch is never changed.

Ensure that your whole team has mastered the basics before you try to get creative.

Takeaway: Just use the feature branch workflow initially

There are a few switches that you should set in your system to prevent mistakes from disrupting users who do the right thing:

  • disable forced-push on the master branch
  • require a pull request and one approval to modify the master branch

The name of these settings will depend on the software you are hosting on, but for example, on GitHub, this is known as a “protected branch”:

These settings prevent people from re-writing history on the main branch, which is bad Git etiquette. Usually people are trying to re-write history with good intentions, such as trying to scrub credentials, huge files, or other extras that were accidentally included.

Good software process aside, a lightweight code review process will make accidental changes more visible, so that you can give developers a chance to fix their mistakes without propagating them to other developers.

Takeaway: Don’t allow direct access to master

Git champions

There are a few setup steps that users may not discover on their own, which avoid common frustrations.

A classic newbie complaint about Git is that it makes you enter passwords “all the time”. This is not really true, but to give users less things to complain about, ensure that they do the initial clones over SSH.

This involves generating a key and uploading it to your hosting software. Subsequently, you will never be prompted for credentials.

Takeaway: Show users how to clone with SSH

Immediately after you make your first commit, Git will point out that the author name has not been set, suggesting that you should amend the commit. I think that the experience is far better when this is configured pro-actively:

git config --global user.name "Example Bob"
git config --global user.email "bob@example.com"

The first time that this user finds a merge conflict, they will appreciate having a graphical, point-and-click merge like meld.

Follow OS-specific instructions, then run:

git config --global difftool meld

Takeaway: Step new users through the author and difftool settings.

Conclusion

The dominance of Git as a software revision control tool means that it’s worth investing some time to learn it properly.

If you get one thing out of this post, though, it’s that you shouldn’t attempt to be creative about your use of Git until you know what you are doing.

I’ve tried to avoid mentioning intermediate or advanced features in this post. As you become more comfortable with the basics, you can use the flight rules and simulator at the top of the post to discover some of the things git can do, and the situations where you might want to use each feature.

How to communicate with USB and networked devices from in-browser Javascript

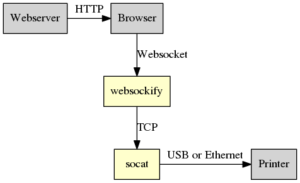
I recently combined a few tools on Linux to create a local Websocket listener, which could forward raw data to a USB printer, so that it could be accessed using Javascript in a web browser.

Why would you want this? I have point of sale applications (POS) in mind, which need to send raw data to a printer. For these applications, the browser and operating system print systems are not appropriate, since they prompt, spool, and badly render pages by converting them to low-fidelity raster images.

Web interfaces are becoming common for point-of-sale applications. The web page could be served from somewhere outside your local network, which is why we need to get the client-side Javascript involved.

The tools

To run on the client computer:

And to generate the print data on the webserver:

We will use these tools to provide some plumbing, so that we can retrieve the print data, and send it off to the printer from client-side Javascript.

Client computer

The client computer was a Linux desktop system. Both of the tools we need are available in the Debian repositories:

sudo apt-get install websockify socat

Listen for websocket connections on port 5555 and pass them to localhost:7000:

websockify 5555 localhost:7000

Listen for TCP connections on localhost port 7000 and pass them to the USB device (more advanced version of this previous post):

socat -u TCP-LISTEN:7000,fork,reuseaddr,bind=127.0.0.1 OPEN:/dev/usb/lp0

Web page

I made a self-contained web-page to provide a button which requested a print file from the network and passed it to the local websocket.

This is slightly modified from a similar example that I used for a previous project.

<html>
<head>
    <meta charset="UTF-8">
    <title>Web-based raw printing example</title>
</head>
<body>
<h1>Web-based raw printing example</h1>

<p>This snippet forwards raw data to a local websocket.</p>

<form>
  <input type="button" onclick="directPrintBytes(printSocket, [0x1b, 0x40, 0x48, 0x65, 0x6c, 0x6c, 0x6f, 0x20, 0x77, 0x6f, 0x72, 0x6c, 0x64, 0x0a, 0x1d, 0x56, 0x41, 0x03]);" value="Print test string"/>
  <input type="button" onclick="directPrintFile(printSocket, 'receipt-with-logo.bin');" value="Load and print 'receipt-with-logo'" />
</form>

<script type="text/javascript">
/**
 * Retrieve binary data via XMLHttpRequest and print it.
 */
function directPrintFile(socket, path) {
  // Get binary data
  var req = new XMLHttpRequest();
  req.open("GET", path, true);
  req.responseType = "arraybuffer";
  console.log("directPrintFile(): Making request for binary file");
  req.onload = function (oEvent) {
    console.log("directPrintFile(): Response received");
    var arrayBuffer = req.response; // Note: not req.responseText
    if (arrayBuffer) {
      var result = directPrint(socket, arrayBuffer);
      if(!result) {
        alert('Failed, check the console for more info.');
      }
    }
  };
  req.send(null);
}

/**
 * Extract binary data from a byte array print it.
 */
function directPrintBytes(socket, bytes) {
  var result = directPrint(socket, new Uint8Array(bytes).buffer);
  if(!result) {
    alert('Failed, check the console for more info.');
  }
}

/**
 * Send ArrayBuffer of binary data.
 */
function directPrint(socket, printData) {
  // Type check
  if (!(printData instanceof ArrayBuffer)) {
    console.log("directPrint(): Argument type must be ArrayBuffer.")
    return false;
  }
  if(printSocket.readyState !== printSocket.OPEN) {
    console.log("directPrint(): Socket is not open!");
    return false;
  }
  // Serialise, send.
  console.log("Sending " + printData.byteLength + " bytes of print data.");
  printSocket.send(printData);
  return true;
}

/**
 * Connect to print server on startup.
 */
var printSocket = new WebSocket("ws://localhost:5555", ["binary"]);
printSocket.binaryType = 'arraybuffer';
printSocket.onopen = function (event) {
  console.log("Socket is connected.");
}
printSocket.onerror = function(event) {
  console.log('Socket error', event);
};
printSocket.onclose = function(event) {
  console.log('Socket is closed');
}
</script>
</body>
</html>

Webserver

On a Apache HTTP webserver, I uploaded the above webpage, and a file with some raw print data, called receipt-with-logo.bin. This file was generated with escpos-php and is available in the repository:

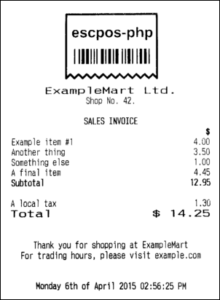
For reference, the test file receipt-with-logo.bin contains this content:

Test

I opened up the web page on the client computer with socat, websockify and an Epson TM-T20II connected. After clicking the “Print” button, the file was sent to my printer. Success!

Because I wasn’t closing the websocket connection, only one browser window could access the printer at a time. Still, it’s a good demo of the basic idea.

To take this from an example to something you might deploy, you would basically just need to keep socat and websockify running in the background as a service (via systemd), close the socket when it’s not being used, and integrate it into a real app.

Different printers, different forwarding

The socat tool can connect to USB, Serial, or Ethernet printers fairly easily.

USB

Forward TCP connections from port 7000 to the receipt printer at /dev/usb/lp0:

socat TCP4-LISTEN:7000,fork /dev/usb/lp0

You can also access the device files directly under /sys/bus/usb/devices/

Serial

Forward TCP connections from port 7000 to the receipt printer at /dev/usb/ttyS0:

socat TCP4-LISTEN:7000,fork /dev/usb/ttyS0

Network

Forward TCP connections from port 7000 to the receipt printer at 10.1.2.3:9100:

socat -u TCP-LISTEN:7000,fork,reuseaddr,bind=127.0.0.1 TCP4-CONNECT:10.1.2.3:9100

You can forward websocket connections directly to an Ethernet printer with websockify:

socat -u TCP-LISTEN:7000,fork,reuseaddr,bind=127.0.0.1 localhost:7000

Other types of printer

If you have another type of printer, such as one accessible only via smbclient or lpr, then you will need to write a helper script.

Direct printing is faster, so I don’t use this method. Check the socat EXEC documentation or man socat if you want to try this.

Future

I’ve had a lot of questions on the escpos-php bug tracker from users who are attempting to print from cloud-hosted apps, which is why I tried this setup.

The browser is a moving target. I have previously written receipt-print-hq/chrome-raw-print, a dedicated app for forwarding WebSocket connections to USB, but that will stop working in a few months when Chrome apps are discontinued. Some time later, WebUSB should become available to make this type of printer available in the browser, which should be infinitely useful for connecting to accessories in point-of-sale setups.

The available tools for generating ESC/POS (receipt printer) binary from the browser are a long way off reaching feature parity with the likes of escpos-php and python-escpos. If you are looking for a side-project, then this a good choice.

Lastly, the socat -u flag makes this all unidirectional, but many types of devices (not just printers) can respond to commands. I couldn’t the end-to-end path to work without this flag, so don’t expect to be able to read from the printer without doing some extra work.

Useful links

Some links that I found while setting this up-

Get the code

View on GitHub →

Automating LXC container creation with Ansible

LXC is a Linux container technology that I use for both development and production setups hosted on Debian.

This type of container acts a lot like a lightweight virtual machine, and can be administered with standard linux tools. When configured over SSH, you should be able to use the same scripts against either an LXC container or VM without noticing the difference.

This setup will provision “privileged” containers behind a NAT, which is a setup that is most useful for a developer workstation. A setup in a server rack would be more likely to use “unprivileged” containers on a host bridge, which is slightly more complex to set up. The good news is that the guest container will behave very similarly once it’s provisioned, so developers shouldn’t need to adapt their code to those details either.

Manual setup of an LXC container

You need to know how to do something manually before you can automate it.

The best reference guide for this is the current Debian documentation. This is a shorter version of those instructions, with only the parts we need.

Packages

Everything you need for LXC is in the lxc Debian package:

$ sudo apt-get install lxc
...
The following additional packages will be installed:
  bridge-utils debootstrap liblxc1 libpam-cgfs lxcfs python3-lxc uidmap
Suggested packages:
  btrfs-progs lvm2
The following NEW packages will be installed:
  bridge-utils debootstrap liblxc1 libpam-cgfs lxc lxcfs python3-lxc uidmap
0 upgraded, 8 newly installed, 0 to remove and 0 not upgraded.
Need to get 1,367 kB of archives.
After this operation, 3,762 kB of additional disk space will be used.
Do you want to continue? [Y/n] y
...

Network

Enable the LXC bridge, and start it up:

echo 'USE_LXC_BRIDGE="true"' | sudo tee -a /etc/default/lxc-net
$ sudo systemctl start lxc-net

This gives you an internal network for your containers to connect to. From there, they can connect out to the Internet, or communicate with each-other:

$ ip addr show
...
3: lxcbr0:  mtu 1500 qdisc noqueue state DOWN group default qlen 1000
    link/ether 00:16:3e:00:00:00 brd ff:ff:ff:ff:ff:ff
    inet 10.0.3.1/24 scope global lxcbr0
       valid_lft forever preferred_lft forever

Defaults

Instruct LXC to attach a NIC to this network each time you make a containers:

$ sudo vi /etc/lxc/default.conf

Replace that file with:

lxc.network.type = veth
lxc.network.link = lxcbr0
lxc.network.flags = up
lxc.network.hwaddr = 00:16:3e:xx:xx:xx

You can then create a ‘test1’ box, using the Debian image online. Note the output here indicates that the container has no SSH server or root password.

$ sudo lxc-create --name test1 --template=download -- --dist=debian --release=stretch --arch=amd64
Setting up the GPG keyring
Downloading the image index
Downloading the rootfs
Downloading the metadata
The image cache is now ready
Unpacking the rootfs

---
You just created a Debian container (release=stretch, arch=amd64, variant=default)

To enable sshd, run: apt-get install openssh-server

For security reason, container images ship without user accounts
and without a root password.

Use lxc-attach or chroot directly into the rootfs to set a root password
or create user accounts.

The container is created in a stopped state. Start it up now:

$ sudo lxc-start --name test1 

It now appears with an automatically assigned IP.

$ sudo lxc-ls --fancy
NAME  STATE   AUTOSTART GROUPS IPV4       IPV6 
test1 RUNNING 0         -      10.0.3.250 -    

Set up login access

Start by getting your SSH public key ready. You can locate at ~/.ssh/id_rsa.pub. You can use ssh-keygen to create this if it doesn’t exist.

To SSH in, you need to install an SSH server, and get this public key into the /root/authorized_keys file in the container.

$ sudo lxc-attach --name test1
root@test1:/# apt-get update
root@test1:/# apt-get -y install openssh-server
root@test1:/# mkdir -p ~/.ssh
root@test1:/# echo "ssh-rsa (public key) user@host" >> ~/.ssh/authorized_keys

Type exit or press Ctrl+D to quit, and try to log in from your regular account over SSH:

$ ssh root@10.0.3.250
The authenticity of host '10.0.3.250 (10.0.3.250)' can't be established.
ECDSA key fingerprint is SHA256:EWH1zUW4BEZUzfkrFL1K+24gTzpd8q8JRVc5grKaZfg.
Are you sure you want to continue connecting (yes/no)? yes
Warning: Permanently added '10.0.3.250' (ECDSA) to the list of known hosts.
Linux test1 4.14.0-3-amd64 #1 SMP Debian 4.14.13-1 (2018-01-14) x86_64

The programs included with the Debian GNU/Linux system are free software;
the exact distribution terms for each program are described in the
individual files in /usr/share/doc/*/copyright.

Debian GNU/Linux comes with ABSOLUTELY NO WARRANTY, to the extent
permitted by applicable law.
root@test1:~# 

Any you’re in. You may be surprised how minimal the LXC images are by default, but the full power of Debian is available from apt-get.

This container is not configured to start on boot. For that, you would add this line to /var/lib/lxc/test1/config:

lxc.start.auto = 1

Teardown

To stop the test1 container and then delete it permanently, run:

sudo lxc-stop --name test1
sudo lxc-destroy --name test1

Automated setup of LXC containers with Ansible

Now that the basic steps have been done manually, I’ll show you how to Ansible to create a set of LXC containers. If you haven’t used it before, Ansible is an automation tool for managing computers. At its heart, it just logs into machines and runs things. These scripts are an approximate automation of the steps above, so that you can create 10 or 100 containers at once if you need to.

I use this method on a small project that I maintain on GitHub called ansible-live, which bootstraps a containerized training environment for Ansible.

Host setup

You need a few packages and config files on the host. In addition to the lxc package, we need lxc-dev and the lxc-python2 python package to manage the containers from Ansible:

- hosts: localhost
  connection: local
  become: true
  vars:
  - interface: lxcbr0

  tasks:
  - name: apt lxc packages are installed on host
    apt: name={{ item }}
    with_items:
    - lxc
    - lxc-dev
    - python-pip

  - copy:
      dest: /etc/default/lxc-net
      content: |
        USE_LXC_BRIDGE="true"

  - copy:
      dest: /etc/lxc/default.conf
      content: |
        lxc.network.type = veth
        lxc.network.link = {{ interface }}
        lxc.network.flags = up
        lxc.network.hwaddr = 00:16:3e:xx:xx:xx

  - service:
      name: lxc-net
      state: started

  - name: pip lxc packages are installed on host
    pip:
      name: "{{ item }}"
    with_items:
    - lxc-python2
    run_once: true

This can be executed with this command:

ansible-playbook setup.yml --ask-become-pass --diff

Container creation

Add a file called inventory to specify the containers to use. These are two IP addresses in the range of the LXC network.

deb1 ansible_host=10.0.3.100
deb2 ansible_host=10.0.3.101

For local work, I find it easier to set an IP address with Ansible and use the /etc/hosts file, which is why IP addresses are included here. Without it, you need to wait for each container to boot, then detect its IP address before you can log in.

Add this to setup.yml

- hosts: all
  connection: local
  become: true
  vars:
  - interface: lxcbr0
  tasks:
  - name: Load in local SSH key path
    set_fact:
      my_ssh_key: "{{ lookup('env','HOME') }}/.ssh/id_rsa.pub"

  - name: interface device exists
    command: ip addr show {{ interface }}
    changed_when: false
    run_once: true

  - name: Local user has an SSH key
    command: stat {{ my_ssh_key }}
    changed_when: false
    run_once: true

  - name: containers exist and have local SSH key
    delegate_to: localhost
    lxc_container:
      name: "{{ inventory_hostname }}"
      container_log: true
      template: debian
      state: started
      template_options: --release stretch
      container_config:
        - "lxc.network.type = veth"
        - "lxc.network.flags = up"
        - "lxc.network.link = {{ interface }}"
        - "lxc.network.ipv4 = {{ ansible_host }}/24"
        - "lxc.network.ipv4.gateway = auto"
      container_command: |
        if [ ! -d ~/.ssh ]; then
          mkdir ~/.ssh
          echo "{{ lookup('file', my_ssh_key) }}" | tee -a ~/.ssh/authorized_keys
          sed -i 's/dhcp/manual/' /etc/network/interfaces && systemctl restart network
        fi

In the next block of setup.yml, use keyscan to get the SSH keys of each machine as it becomes available.

- hosts: all
  connection: local
  become: false
  serial: 1
  tasks:
  - wait_for: host={{ ansible_host }} port=22

  - name: container key is up-to-date locally
    shell: ssh-keygen -R {{ ansible_host }}; (ssh-keyscan {{ ansible_host }} >> ~/.ssh/known_hosts)

Lastly, jump in via SSH and install python. This is required for any follow-up configuration that uses Ansible.

- hosts: all
  gather_facts: no
  vars:
  - ansible_user: root
  tasks:
  - name: install python on target machines
    raw: which python || (apt-get -y update && apt-get install -y python)

Next, you can execute the whole script to create the two containers.

ansible-playbook setup.yml --ask-become-pass --diff

Scaling to hundreds of containers

Now that you have created two containers, it is easy enough to see how you would make 20 containers by adding a new inventory:

for i in {1..20}; do echo deb$(printf "%03d" $i).example.com ansible_host=10.0.3.$((i+1)); done | tee inventory
deb001.example.com ansible_host=10.0.3.2
deb002.example.com ansible_host=10.0.3.3
deb003.example.com ansible_host=10.0.3.4
...

And then run the script again:

ansible-playbook -i inventory setup.yml --ask-become-pass

This produces 20 machines after a few minutes.

The processes running during this setup were mostly rync (copying the container contents), plus the network waiting to retrieve python many times. If you need to optimise to frequent container spin-ups, LXC supports
storage back-ends that have copy-on-write, and you can cache package installs with a local webserver, or build some packages into the template.

Running these 20 containers plus a Debian desktop, I found that my computer was using just 2.9GB of RAM, so I figured I would test 200 empty containers at once.

for i in {1..200}; do echo deb$(printf "%03d" $i).example.com ansible_host=10.0.3.$((i+1)); done > inventory
ansible -i inventory setup.yml

It took truly a very long time to add Python to each install, but the result is as you would expect:

$ sudo lxc-ls --fancy
NAME               STATE   AUTOSTART GROUPS IPV4       IPV6 
deb001.example.com RUNNING 0         -      10.0.3.2   -    
deb002.example.com RUNNING 0         -      10.0.3.3   -    
deb003.example.com RUNNING 0         -      10.0.3.4   -    
...
deb198.example.com RUNNING 0         -      10.0.3.199 -    
deb199.example.com RUNNING 0         -      10.0.3.200 -    
deb200.example.com RUNNING 0         -      10.0.3.201 -    

The base resource usage of an idle container is absolutely tiny, around 13 megabytes — the system moved from 2.9GB to 5.4GB of RAM used when I added 180 containers. Containers clearly have a lower overhead than VM’s, since no RAM has been reserved here.

Software updates

The containers are updated just like regular VM’s-

apt-get update
apt-get dist-upgrade

Backups

In this setup, the container’s contents is stored under /var/lib/lxc/. As long as the container is stopped, you get at it safely with tar or rsync to make a full copy:

$ sudo tar -czf deb001.20180209.tar.gz /var/lib/lxc/deb001.example.com/
$ rsync -avz /var/lib/lxc/deb001.example.com/ remote-computer@example.com:/backups/deb001.example.com/

Full-machine snapshots are also available on the Ceph or LVM back-ends, if you use those.

Teardown

The same Ansible module can be used to delete all of these machines in a few seconds.

- hosts: all
  connection: local
  become: true
  tasks:
  - name: Containers do not exist
    delegate_to: localhost
    lxc_container:
      name: "{{ inventory_hostname }}"
      state: absent
ansible-playbook -i inventory teardown.yml --ask-become-pass

Conclusion

Hopefully this post has given you some insight into one way that Linux containers can be used. I have found LXC to be a great technology to work with for standalone setups, and regularly use the same scripts to configure either an LXC container or a VM’s depending on the target environment.

The low resource usage also means that I can run fairly complex setups on a laptop, where the overhead of large VM’s would be prohibitive.

I don’t think that LXC is directly comparable to full container ecosystems like Docker, since they are geared towards different use cases. These are both useful tools to know, and have complementary strengths.

Using custom fonts to add new glyphs to an Epson printer

I develop a printer driver for ESC/POS receipt printers, and we regularly get feature requests for encoding text in the Chinese, Japanese and Korean languages (“CJK”).

I have recently been looking for a way to add support for these on receipt printers that have no native ability to render them, and thought I would write a bit about some progress so far.

I previously wrote a bit about printing individual bitmaps for each character, where here I am aiming to print entire scripts.

Background

Programmers usually deal with text in UTF-8, but receipt printers don’t. Instead, they still use a series of legacy code pages to represent non-ASCII text. Mapping arbitrary text to something understood by these printers is a huge challenge.

The escpos-php driver will automatically map a lot of western scripts to these code pages. However, if you attempt to send an example string like “日本語” to escpos-php currently, the driver will substitute it with “???”, since it doesn’t know how to convert them to ESC/POS.

On some printers, there are native commands to print Japanese, but for a driver project, we need something with broad compatibility. So, I decided to try to get this working on an Epson TM-T20 variant which has no CJK fonts.

I started by making a new standalone test script, which converts text input into ESC/POS using a cut-down version of the escpos-php printer driver.

$text = file_get_contents("php://stdin");
$connector = new FilePrintConnector("php://stdout");
$printer = new Printer($connector);
$printer -> text($text);
$printer -> cut();
$printer -> close();

I then modified this to print arbitrary UTF-8 text with a local bitmap font. These next sections go through some of the things I had to write to get it all working.

Character representation

I decided to start with the GNU Unifont project, because it ships fixed-width binary fonts in a text format that can be parsed without a font library, is freely licensed, and has excellent coverage.

So the first issue to solve was to do with font sizes:

  • Unifont contains characters that are 8 or 16 pixels wide, that cover the entire Unicode Basic Multilingual Plane (BMP), at 16 characters tall.
  • ESC/POS supports a fixed 12×24 or a smaller 9×17 font.
  • ESC/POS fonts are submitted in a 24 pixel tall format regardless of print area.

Since the characters would be surrounded by too much whitespace in the “Font A” (12×24) representation, I settled on printing in “Font B” (9×17), leaving a one-pixel space underneath, and to the right of each character. These pictures show how the glpyhs (grey) are laid out in the available print area (unused print area in white), in the available memory (unused memory in red).

Note that wider characters have a two-pixel dead-zone on the right. The non-printable 7 pixels at the bottom of the images are ignored by the printer.

The format on the printer for each character stores bits in a column-major format, while most raster formats are row-major, so I wrote a quick converter to rotate the bits. The converter code is not very concise, so I’ll just share a screen capture here. The full code is linked at the end of this post.

Lastly, the output size on paper was tiny, so I set the printer to double the size, which results in text that is around 50% larger than the default output.

Storage of fonts

There is only space for 95 single-width characters in an ESC/POS font, but the scripts are much larger than this.

I treated the font as a queue in this implementation. During the print-out, new characters are added to the font as necessary, and the font is re-written from the front as space runs out. This is also known as a FIFO cache eviction policy.

Input

I converted the string input to an array of Unicode code points to avoid canonicalisaton issues.

$chrArray = preg_split('//u', $text, -1, PREG_SPLIT_NO_EMPTY);
$codePoints = array_map("IntlChar::ord", $chrArray);
foreach($codePoints as $char) {
  $this -> writeChar($char);
}

The IntlChar class is provided by an extension which is very useful but not widespread, which limits the portability of this code.

Result

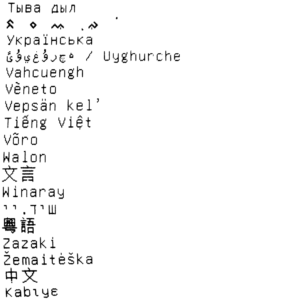
I got the list of languages from the sidebar of a Wikipedia article to use as a test string, since it contains short strings in a large number of scripts.

cat test.txt | php unifont-example.php > /dev/usb/lp0

The output contains a large number of correctly rendered scripts, including the CJK output, which was not previously possible on my printer.

Success!

Advantages

Previously, I have tried generating small images from system fonts to send text to the printer. This is quite costly in terms of processing and data transfer, and the printer is unable to format or wrap the text for you.

Storing glyphs in the custom font area involves transferring less raster data, and allows most text formatting commands to be used.

Limits

These characters are a different size to the native printer fonts, so we can’t mix them on the same line. This means that we can’t use this code to implement an automatic fallback in escpos-php. However, it may appear in a future version as an alternative “PrintBuffer”, which can be explicitly enabled by developers who are not interested in using the native fonts.

The esc2html utility is not able to emulate custom fonts, so the output cannot currently be rendered without an Epson printer.

Also, we simply printed a stream of characters, which is not really how text works. To implement Unicode, we need to be able to join and compose characters, and respect bi-directional text. Unicode text layout is not trivial at all.

Get the code

The full script is available in the escpos-snippets repo on GitHub, where I store prototypes of new functionality that is not yet ready for prime-time.