QJoyPad update

As of April, there is now a qjoypad package available in the official Debian repository, see https://packages.debian.org/unstable/main/qjoypad. This program allows you to map joystick events to keyboard and mouse actions. This means that you could use, for example, a USB gamepad to browse the web.

I have previously blogged about the lack of usable, packaged programs to do this, and highly recommend getting your hands on a USB gamepad and giving this a shot. Depending on your distribution, you will soon be able to just run:

sudo apt-get install qjoypad

Then connect the gamepad and type:

qjoypad

You then get a window which shows you what buttons you can map:


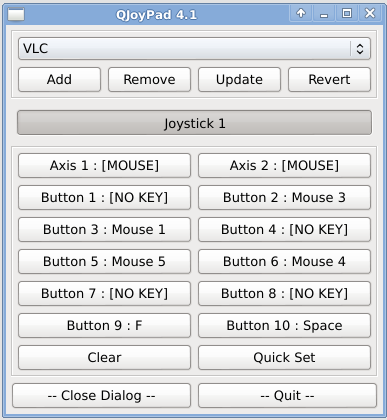
Clicking a button prompts you to press a key on your keyboard or select a mouse button, and each profile can be saved and named for later use.

As far as small utility programs go, I now rely on this about as much as the Gnome calculator.

An alternative: AntiMicro

I’ll also give a mention to AntiMicro, which has similar goals, and looks very promising.

As a bit of background, there is a limitation in QJoyPad around adding modifier keys: For example, you simply can’t map a joystick button to <Ctrl>+Q, making it inefficient to use with most applications. The author of AntiMicro, Travis, sent me an email back in September to point out that his program both solves this issue, and has a Debian package available for download.

Whilst I was quite impressed with the functionality in AntiMicro, I found it a whole lot more complex to set up. I think this would be more useful for gamers, as mouse acceleration and key repeats are overkill for my use case (browsing the web and controlling VLC, MythTV, etc).

So, if you are a power user, then I suggest you give it a shot. Power users with apt-get may also consider joy2key, which is the best non-GUI tool for this, and is available in the Debian repositories.

Winning 2048 game with key-mashing?

This new, simple, addictive game is out, called 2048. You need to slide two numbers together, resulting in a bigger number, in ever-increasing powers of two. You get 2048, and you win.

2014-03-2048-1

I noticed that somebody already wrote neat AI for it, although it does run quite slowly. But then I also noticed a friend mashing keys in a simple pattern, and thought I should test whether this was more effective. The answer: it kinda is.

2014-03-2048-2

At least in the first half of the game, a simple key-mashing pattern is a much faster way to build high numbers. The PHP script below will usually get to 512 without much trouble, but rarely to 1024. I would suggest running it for a while, and then taking over with some strategy.

The script

This script spits out commands which can be piped to xte for some automatic key-mashing on GNU / Linux. Save as 2048.php

#!/usr/bin/env php
mouseclick 1
<?php
for($i = 0; $i < 10; $i++) {
	move("Left", 1);
	move("Right", 1);
}

while(1) {
	move("Down", 1);
	move("Left", 1);
	move("Down", 1);
	move("Right", 1);
}

function move($dir, $count) {
	for($i = 0; $i < $count; $i++) {
		echo "key $dir\nsleep 0.025\n";
		usleep(25000);
	}
}

And then in a terminal, run this then click over to a 2048 game:

sleep 3; php 2048.php | xte

Good luck!

Importing myki data into GnuCash

GnuCash, despite all its bugs, is one of the best open source accounting programs going around.

Since it is not hard to export the history from a myki (public transport) card, I figured that it would be nice to track it as an account in Gnucash.

myki logo Gnucash logo

The data on the statements is not quite suitable for an accounting program. Some changes that need to be done are:

  • Conversion of date format to YYYY-MM-DD.
  • Single-field descriptions for each transaction (“Top up myki money”, “Travel zone 2”), rather than multiple fields.
  • Entries which have a 0.00 cost need to be removed.

Once you have a CSV of your data, the script below will filter it to be ready for import:

#!/usr/bin/env php
<?php
/* Dump Myki CSV file to a file suitable for gnucash
	(c) Michael Billington < michael.billington@gmail.com >
	MIT Licence */
$in = fopen("php://stdin", "r");
$out = fopen("php://stdout", "w");
$err = fopen("php://stdout", "w");
$lc = 0;

while($line = fgets($in)) {
	$lc++;
	$a = str_getcsv($line, ',', '"');
	if(count($a) == 8) {
		$date = implode("-", array_reverse(explode("/", substr($a[0], 0, strpos($a[0], " ")))));
		$credit = $a[5] == "-" ? "" : $a[5];
		if($credit != "") { // Probably a top-up or reimbursement
			$description = $a[1];
		} else if($a[3] == "-") { // Probably buying myki pass
			$description = trim($a[1], "*");
		} else { // Probably travel charges
			$description = "Travel: " . $a[2] . ", Zone " . $a[3];
		}
		$debit = $a[6] == "-" ? "" : $a[6];
		$balance = $a[7] == "-" ? "" : $a[7];
		if($balance != "") { // Ignore non-charge entries
			fputcsv($out, array($date, $description, $credit, $debit, $balance));
		}
	}
}
fclose($in);
fclose($out);
fclose($err);

Why would you track it as an account?

There are lots of reasons why a public transport card is account-like enough to put into GnuCash:

  • Money is not spent until you touch on and off — note that no GST is payable until the card balance is used. This means that if you record a top-up under Expenses, it’s not quite correct.
  • You can cancel a myki and have its balance moved to another card.
  • A card can be handed in, and the balance paid back to you as cash.

Update 2014-05-04: All of these myki-related scripts are now available on github.

Successful migration to WordPress in 3 easy steps

We made the decision in January to migrate our website to a WordPress installation, which is the CMS of choice for most blogs.

This posed a big challenge, mainly because we had been using our in-house CMS to publish content for the past 2 years, meaning our content was tied up in a difficult-to-export format.

Still, it allowed me to dig into the nifty and well-developed world of WordPress. My magic formula for a WordPress migration, in a nutshell:

  1. Export your old blog as something WordPress can understand.
  2. Hack at the theme until your site is beautiful.
  3. Don’t break your URL’s.

1. Export your blog

Depending on how you are blogging already, you may be able to save an export which can be loaded into WordPress with a plugin (see Importing Content on the WordPress wiki).

We were not in this lucky category, so I delved into the WXR (WordPress eXtended RSS) format. This example file was a big help, and I wrote up a short PHP script to create a similar-looking file from my blog.

2. Hack at the theme

We adapted our site from the ‘Skittlish’ theme, which has also been ported to WordPress. Every theme carries some baggage, so I highly suggest rolling up your sleeves and opening wp-content/themes on your blog.

All non-feature modifications are done in WordPress via themes, so keep tweaking it until you’re happy, or get a designer to put together a theme that suits your needs.

3. Don’t break your URL’s

I link between blog posts a lot, and breaking these links would be mind-numbing to clean up after (and a SEO sin). Using the import method above, I used article titles which matched the old permalinks.

WordPress then lets you configure permalinks to use this field, replicating the old behavior and keeping everybody happy.

Wrap-up

If you run WordPress on your site, then it makes sense to have somebody on your team who really knows how it works.

If your initial setup is not handled with care, then you could end up wasting several days of work checking old content for errors.

Good luck!

Rolling your own cloud storage with Unison

Cloud storage is a very cool way to back up files, but it has two major drawbacks:

  1. If you back up everything, it will cost you a bit for the space.
  2. You need to trust that the company wont lose, tamper with, or leak your files.

I’ve recently discovered a little program called Unison, which provides a bandwidth-efficient way to synchronise folders on two computers, solving both of those problems. It has clients for just about every platform, it’s open source, and it’s been around for over a decade.

I’ve set up a copy of my laptop’s home directory on my desktop computer, so if it ever explodes, I can just sync it back:

With most ISP’s offering static addresses, you could even put a NAS on the internet to sync with, which would basically be a home DropBox.

Laptop and desktop example

Unison is in most Linux distributions. On Debian or Ubuntu, you can install it with:

apt-get install unison

mikebook has a profile called mikebox.prf, located in /home/mike/.unison/, which tells it to keep a copy of its home directory on mikebox.

root = /home/mike
root = ssh://mike@mikebox//home/mike/Remote/mikebook/
ignore = Name .*
ignore = Name *.iso
ignore = Name *.img
ignore = Name unison.log
ignore = BelowPath Downloads
ignore = BelowPath workspace

Everything can be brought up to speed with:

unison -batch mikebox

If mikeboox is running out of space, then I can drag files out of Remote/mikebook to somewhere else, and they simply vanish from the laptop next time it is synchronised.

Notes

  • Remote paths require that extra / in the filename.
  • Hidden folders seem to be skipped, so keep a copy of your .prf file in case you blow up your computer.

A tour of ReactOS 0.3.15

ReactOS is a project which aims to create an open source operating system which is binary-compatible with Windows. Although it is still cautiously labelled “alpha”, its basic use is about as reliable as Windows once was.

This post runs through the steps to install ReactOS 0.3.15 as a KVM guest on Linux.

Preparation

Before attempting anything, check that you a CPU supports Intel VT or AMD-V. This command will return the number of CPU cores with svm or vmx flags:

cat /proc/cpuinfo | grep -E 'svm|vmx' | wc -l

Now download the ReactOS 0.3.15 disk from reactos.org, extract it to get the .iso, and fetch some packages if you don’t have them installed:

apt-get install libvirt-bin kvm qemu-utils

Prepare a disk image to install to. If your hardware is slower, then a raw image is a better idea than the qcow2:

qemu-img --help
qemu-img create -f qcow2 reactos.img 4G

The working directory now has:

mike@mikebox:~/vm/reactos$ ls -Ahl
total 77M
-rw-r--r-- 1 mike mike  77M May 19  2013 ReactOS-BootCD.iso
-rw-r--r-- 1 mike mike 193K Jan 30 21:05 reactos.img

Installation and first boot

The kvm command will pop up a window with the guest operating system. To boot from the install disk, run:

kvm -hda reactos.img --cdrom ReactOS-BootCD.iso -vga std -localtime -net nic,model=ne2k_pci -net user

The meaning of each of these options is:

-hda reactos.img
Sets the HDD image file.
--cdrom ReactOS-BootCD.iso
Sets the CDROM image file. Because reactos.img is blank, this will boot.
-vga std
Sets the VGA card.
-localtime
Emulates a system clock in local time, rather than UTC.
-net nic,model=ne2k_pci
Sets the network card to something ReactOS will recognise.
-net user
Enables user-mode networking. Your computer will emulate a network and pass on TCP and UDP connections. This is the easiest mode to use, but ICMP packets (such as pings) will not work, and the VM will not be accessible from other computers.

Installation was fast, error-free, and did not require a network connection. The first screen capture below was taken at 16:04:49, and the desktop was captured at 16:06:07 (1 minute 18 seconds later). Most of that time would have been wasted waiting for user input.

ReactOS installer language select
ReactOS install or repair
ReactOS installer disclaimer
Confirm install settings
Select partition
Formatting options for new partition
Formatting confirmation dialog
ReactOS install directory
ReactOS installer copying files
Bootloader options (freeloader)

After copying files, the installer reboots to a more user-friendly mode (similar to the Windows installer):

ReactOS boot menu
ReactOS loading NTOSKRNL.EXE
ReactOS boot screen
ReactOS Install - Installing devices
ReactOS Install - Welcome to the ReactOS Setup Wizard
ReactOS Install - Acknowledgements
ReactOS Install - Personalize your Software
ReactOS Install - Computer name and Administrative Password
ReactOS Install - Regional settings
ReactOS Install - Date and Time
ReactOS Install - Registering Components
ReactOS Install - Completing the ReactOS Setup Wizard
ReactOS desktop after installation

The installed system

After installation, the --cdrom option can be dropped:

kvm -hda reactos.img -vga std -localtime -net nic,model=ne2k_pci -net user

The first thing I did was correct the colour depth, and then attempt to install VLC. This did not turn out well (the console screen is QEMU-monitor):

Reactos display properties
VLC installation in ReactOS Applications Manager
Ctrl+Alt+Del from QEMU monitor
BSOD during VLC installation

I used command prompt to verify that networking was fine (note the lack of ICMP in user-mode networking):

Ping from command prompt with user-mode networking as KVM guest
Testing network on ReactOS

The Firefox 22 install worked, but it went awry after that. Several reboots later I gave up:

Firefox installer on ReactOS
Firefox frozen on startup
BSOD while running firefox on ReactOS

The built-in programs were much more usable:

ReactOS paint
ReactOS paint Save As dialog
ReactOS Explorer
ReactOS Start Menu showing Administrative Tools
ReactOS Device Manager

PuTTY installed flawlessly, and I was able to SSH to the host computer:

PuTTY installation on ReactOS
PuTTY readme in ReactOS notepad
Main PuTTY window after installation
Using command prompt to find host computer address:
PuTTY with host computer address
PuTTY connected to host computer, showing 'uname -a' output

An example of a frozen program causing graphics glitches (Windows up to XP does this as well):


Frozen Application Manager in ReactOS

And an obligatory screenshot of the “Properties for System” dialog, showing the build as 20130518-r59037:


Reactos 'Properties of System' dialog 20130518-r59037

Conclusion

ReactOS is a cool idea and project, but the OS is still very glitchy. The built-in apps are stable and familiar-looking, but you would require a lot of patience (and a lot of rebooting) to use a ReactOS system for more than a few minutes.

Being open source is a big plus, as there is no need to activate the installation or enter software keys. GNU/Linux users will already be accustomed to this.

Recovering auto-saved files in MySQL Workbench

MySQL workbench is an open source tool for designing databases. As version 6.0.8, it is one of those programs where you need to save often, because the window you are working in will vanish every couple of hours.

Bug #1: Can’t recover files that weren’t saved

I was unlucky enough to have forgotten to save my work when it crashed today, and found this nasty flaw in the auto-recover feature:

Auto-save model interval: An open model that has not been saved will automatically be saved after this period. On loading a model file, MySQL Workbench will notify the user if the file was not previously saved correctly, due to a crash or power failure. MySQL Workbench can then attempt to recover the last auto-saved version. For automatic recovery to be available for a new file, it will have to have been saved at least once by the user.

Uh oh! The file hadn’t been saved yet, so it’s gone right? According to wb_model_file.cpp, this is not the case. The auto-save file is always written, but the recovery process wont be started until you try to use it again (which will never happen if you don’t have an old saved version):

/* Auto-saving
 *
 * Auto-saving works by saving the model document file (the XML) to the expanded document folder
 * from time to time, named as document-autosave.mwb.xml. The expanded document folder is
 * automatically deleted when it is closed normally.
 * When a document is opened, it will check if there already is a document folder for that file
 * and if so, the recovery function will kick in, using the autosave XML file.
 */

So under ~/.mysql/workbench/, I found a newmodel.mwbd folder. Workbench files are .zip files in disguise, so I compared it to a test file. It had all the same content, but with a document-autosave.xml, rather than a document.xml (see test file below):

Test archive

Cool, so I’d just rename the file, compress the whole lot and make it a .mwb? No such luck.

Bug #2: File Roller can’t compress ‘@’ files

Possibly because of the -@ command-line option in the zip command, File Roller refused to work with these files.

File Roller bug

Luckily, the document.mwb.xml file alone is enough for the file to be recognised and recovered from the auto-saved files:

File is recovered

The take-away from this? Save your work. In 2014, you still can’t count on auto-save to do this!

Scripted screen captures

This is a script I put together for capturing a window’s contents as it changes, because “Print Screen and crop” gets old very quickly!

It saves me a lot of time when working in virtual machines or creating user docs, as it means that every step (and error message) is captured.

The commands used are in the x11-utils and netpbm and x11-apps packages on Debian.

sudo apt-get install x11-utils netpbm x11-apps

capture.sh

#!/bin/bash
echo "Click a window to start capturing it."
window=`xwininfo -int | grep 'Window id:' | cut -d' ' -f4`
echo -n "Capturing window $window"
prev=""
i=1
empty=`echo -n "" | md5sum | cut -d' ' -f1`
captured="captured.txt"
echo -n "" > $captured
while [ "$prev" != "$empty" ]; do
	md5sum=`xwd -id $window 2> /dev/null | xwdtopnm 2> /dev/null | md5sum | cut -d' ' -f1`
	if grep -Fxq "$md5sum" "$captured"
	then
		echo -n "."
	else
		if [ "$md5sum" != "$empty" ]
		then
			echo $md5sum >> $captured
			echo ""
			echo -n $md5sum
			file=`date --iso`-capture-`printf "%03d" $i`.png
			xwd -id $window | xwdtopnm 2> /dev/null | pnmtopng 2> /dev/null > $file
			i=$[i+1]
		fi
	fi
	sleep 1
	prev=$md5sum
done
echo ""
echo "Empty screen capture received. Quitting. (did you close the window?)"

Example

If you wanted to document a “Malformed Expression” error in Gnome Calculator, you can run capture.sh and then demonstrate it:

$ ./capture.sh
Click a window to start capturing it.
Capturing window 31457283
3bbe32ef05f49ae65922fcfedc842828
c0cef7d3108263fbb1beaa7b52492e6a
fd6df04c4ad844bb4a2f27be29dffb29
6ba0fb7ee1ca85640998013c6a258520.
bb061cc56fa3822f9764c0f6af2156df
5f788568c7f34cda55a1680ac72e1cf0
dca714e6691a3a239914106996905047
0bf916ba3f96f3def57191174e55dea0.
2a4a2589662901d9a55d1e170ffbd322....
Empty screen capture received. Quitting. (did you close the window?)

The lines are checksums of PNM data, and the dots are times when no screenshot was saved. This guarantees that each file in the output is unique:


Example of captured files

The captured.txt file simply contains the list of checksums, and is useless after the script terminates.

Brother HL-2270DW on Linux

The Brother HL-2270DW is one of the best budget laser printers around, with third party consumables readily available on eBay.

The printer has a network port on the back of it, which is great news for GNU/Linux users, because networked printers tend to speak standard protocols.

The fastest way to get this printer working without Windows is to plug it in and log in via the web. The default settings have DHCP enabled. Here are a few pieces of crytic voodoo magic that helped me:

  1. To reset the print server settings, hold “GO” on startup, then let go and press it 6 times.
  2. The default admin login is admin / access
  3. On my printer (Firmware 1.10), printing network settings by holding “GO” for 10 seconds caused the network card (Brother NC-7800w) activity lights to go off, requiring a reboot.

On Debian, there is no “Brother HL-220DW” CUPS driver on the list, but I found the following driver to work fine (and allow duplex):

Brother HL-2170W Foomatic/hpijs-pcl5e (recommended)

To use this driver, you will need to install the HP Linux Printing and Imaging printer driver:

apt-get install printer-driver-hpijs

Crash course in handling web traffic spikes

So yesterday, there was a small earthquake in Melbourne. Within a few minutes, the Geoscience Australia web-page was delivering 503 Errors due to the load.

Why websites crash

Websites stop working under heavy load because the server doesn’t have enough resources to process everything. This is usually one of:

  1. Bandwidth saturation, indicated by timeouts and super slow load times.
  2. Webserver or cache overload, indicated by refused connections or server (5XX) errors.
  3. Database server overload, indicated by server errors.

A simple database-driven website might process a request like this:

Simple web-site setup

Set up a squid cache

For sites like the example above, a good cache setup is essential. This is another server (or server process), which serves pages that aren’t changing. A page only needs to be generated as often as it changes:

A webserver behind a cache to reduce load

squid is a good open source starting point if you are administering a server which struggles under load.

Round-robin DNS

Without running a hardware load-balancer (read: spending money), you can have clients connect to different servers by using round-robin DNS.

Each time a DNS lookup is issued, a different address can be returned, allowing you to have several caches at work.

Example of Round-Robin DNS