Missile Launcher on Raspberry Pi

This post covers a few setups to experiment with if you have a DreamCheeky USB missile launcher and a Raspberry Pi.

A newer version is being sold on ThinkGeek, but the one I used was:

DreamCheeky USB Missile Launcher

Setup 1: Direct to PC

The launcher comes with some software to let you connect it straight to a computer. Of course, USB can only go 5 metres, which is not much fun for cubicle warfare:

USB Missile Launcher setup with PC

I included this setup because it is the easiest way for Debian/Ubuntu users to test that they can use this driver, which is needed for the other setups.

Setup 2: Networked with Raspberry Pi

So for this setup, you need a Raspberry Pi Model B. They look like this:

Raspberry Pi Model B

Running Raspbian, upgrade to Debian Jessie, and compile the code:

apt-get install git libusb-1.0-0-dev libncurses-dev gcc g++
git clone --recursive https://github.com/mike42/missile
cd missile
make

You can then place the pi anywhere with network and power:

USB Missile launcher setup with Raspberry Pi

To operate the launcher remotely, use SSH to log in, and run missile/bin/keyboard-ctl.

Setup 3: Wireless with Raspberry Pi and Battery

Of course, network and power can be provided with a power bank and wifi adapter:

Power Bank for mobile phone
USB WiFi Adapter

The wifi adapter will take some work to set up (see Debian Wiki), so I wont document that here. You will need a power bank that has enough power for the Raspberry Pi with launcher and wifi. Mine had to be close to fully charged to work.

An obligatory diagram of this setup:

USB Missile launcher setup with Raspberry Pi (WiFi and Battery)

Wrap-up

The reason this helps with cubicle warfare is simple: The launcher, Raspberry Pi and battery can be fitted into a tissue box or other small space. Proof:

Box interior

On a desk you would see this as:

Box exterior
Box open

And a quick demo for completeness:

In the above, the Pi is connected to DC power, because the battery didn’t have enough juice to power the unit.

Enabling graphical boot on Debian GNU/Linux

Unlike most desktop Linuxes around today, Debian’s default boot screen is still text:

Debian's text-mode booting

I imagine that this is because there is no distinction between “Desktop” and “Server” editions in the Debian world (see tasksel), so a text-mode boot will work on every type of installation.

Luckily, if you want a graphical boot screen, you can simply apt-get install a package called plymouth and configure it according to these instructions.

The result looks more suited to a desktop PC (screen capture from here):

Debian's plymouth boot screen

Plymouth install notes

There is a comment in /etc/default/grub which suggests checking supported graphics modes, which is a Good Idea(TM):

# The resolution used on graphical terminal
# note that you can use only modes which your graphic card supports via VBE
# you can see them in real GRUB with the command `vbeinfo'
#GRUB_GFXMODE=640x480

The theme for “wheezy” was called Joy, so if you have desktop-base installed, you should:

/usr/sbin/plymouth-set-default-theme joy

I tried to get this working in a virtual machine to get an actual screen capture, but on KVM this appears to be quite tricky, due to emulated graphics.

USB Missile Launcher

Back in February I coded up a userspace driver to control a USB missile launcher manufactured by DreamCheeky. The video below shows one of the example programs in action.


The code being executed in the video is from basic-sync.cpp, the simplest demonstration I could think of:

Missile *launcher = new Missile(launcherHandle);

launcher -> async = false;
launcher -> move(ML_DOWN, 1000);
launcher -> move(ML_UP, 1000);
launcher -> move(ML_LEFT, 1000);
launcher -> move(ML_RIGHT, 1000);
launcher -> fire();

delete launcher;

The USB driver uses libusb, and was coded in response to this trivial bug not being fixed in the Ubuntu repositories for over a year.

How to graph ASX data with gnuplot

This post is not about economics, it’s about scripting. People who follow stocks love to see historic prices. Here I’ll show you how to get historic ASX data and do a simple plot with the wonderful open-source tool gnuplot.

Getting the data

I couldn’t figure out who runs it, but this site offers .zip files containing basic daily data, updated each weekend. The archives have CSV files in them:

ASX source data

To make these useful, I joined them together and imported them into sqlite. On Debian this is in the sqlite3 package.

To turn the .zip files into a sqlite file:

  1. Download the files for the time period you need, and put them in a folder called “data
  2. Save the script below as “import.sh” and run it.
#!/bin/sh

# Unzip all the data files and leave the text files in the "txt" folder.
rm -f asx-historic.db
rm -Rf txt
mkdir -p txt
for i in data/*;
do
	echo -n "Extracting $i .. "
	unzip -q $i -d txt
	echo "done"
done
mv txt/*/*.txt txt/
find . -empty -delete

# Combine the text files
echo -n "Combining files .. "
cat txt/*.txt > txt/asx-historic.csv
echo "done"

# Import the text files into an sqlite db
echo -n "Creating database .. "
sqlite3 asx-historic.db -batch <<EOF
create table price (code CHAR(3), date DATE, open DECIMAL(10,3), close DECIMAL(10,3), low DECIMAL(10,3), high DECIMAL(10,3), vol);
.separator ,
.import txt/asx-historic.csv price
EOF
echo "done"

After running import.sh, the data is in a file called “asx-historic.db“. You should re-run this script with extra data when it comes out.

Querying a sqlite database

That file is a database, so you can query it with SQL like so:

mike@mikebox$ sqlite3 asx-historic.db
SQLite version 3.8.1 2013-10-17 12:57:35
Enter ".help" for instructions
Enter SQL statements terminated with a ";"
sqlite> select date, close from price where code='ASX' order by date;
20130603|37.68
20130604|37.1
20130605|36.64
20130606|36.4
...

Graphing closing prices

Line graphs in gnuplot are very simple. Save this file as line.gnuplot:

set terminal pdf
set output fout
set key left
plot fin using 2 w lines title code

Note: “fout” (file out) “fin” (file in) and “code” are variables.

This bash script lists closing prices for a code and saves them to a .dat file under a folder called “plot”.

#!/bin/bash
sqlite3 -separator $'t' asx-historic.db "select date, close from price where code='$1' order by date;" > plot/$1.dat
gnuplot -e "code='$1'" -e "fin='plot/$1.dat'" -e "fout='plot/$1.pdf'" line.gnuplot

An example usage would be:

./line.sh CSL

Which (given a few months of data) looked like this:

ASX chart example

File list

If you follow this from start-to-finish, then you should have the following files:

  • data/
    • (Lots of zip files)
  • plot/
    • CSL.dat
    • CSL.pdf
  • txt/
    • (Lots of text files)
  • asx-historic.db
  • import.sh
  • line.sh
  • line.gnuplot

Installing Debian on a HP dm-1

Getting Debian working on different hardware is always a challenge. This week I am using a HP Pavilion dm1 4306AU.

lspci shows that it has the following hardware:

00:00.0 Host bridge: Advanced Micro Devices, Inc. [AMD] Family 14h Processor Root Complex
00:01.0 VGA compatible controller: Advanced Micro Devices, Inc. [AMD/ATI] Wrestler [Radeon HD 7310]
00:01.1 Audio device: Advanced Micro Devices, Inc. [AMD/ATI] Wrestler HDMI Audio
00:10.0 USB controller: Advanced Micro Devices, Inc. [AMD] FCH USB XHCI Controller (rev 03)
00:11.0 SATA controller: Advanced Micro Devices, Inc. [AMD] FCH SATA Controller [AHCI mode]
00:12.0 USB controller: Advanced Micro Devices, Inc. [AMD] FCH USB OHCI Controller (rev 11)
00:12.2 USB controller: Advanced Micro Devices, Inc. [AMD] FCH USB EHCI Controller (rev 11)
00:13.0 USB controller: Advanced Micro Devices, Inc. [AMD] FCH USB OHCI Controller (rev 11)
00:13.2 USB controller: Advanced Micro Devices, Inc. [AMD] FCH USB EHCI Controller (rev 11)
00:14.0 SMBus: Advanced Micro Devices, Inc. [AMD] FCH SMBus Controller (rev 14)
00:14.2 Audio device: Advanced Micro Devices, Inc. [AMD] FCH Azalia Controller (rev 01)
00:14.3 ISA bridge: Advanced Micro Devices, Inc. [AMD] FCH LPC Bridge (rev 11)
00:14.4 PCI bridge: Advanced Micro Devices, Inc. [AMD] FCH PCI Bridge (rev 40)
00:15.0 PCI bridge: Advanced Micro Devices, Inc. [AMD] Hudson PCI to PCI bridge (PCIE port 0)
00:15.1 PCI bridge: Advanced Micro Devices, Inc. [AMD] Hudson PCI to PCI bridge (PCIE port 1)
00:18.0 Host bridge: Advanced Micro Devices, Inc. [AMD] Family 12h/14h Processor Function 0 (rev 43)
00:18.1 Host bridge: Advanced Micro Devices, Inc. [AMD] Family 12h/14h Processor Function 1
00:18.2 Host bridge: Advanced Micro Devices, Inc. [AMD] Family 12h/14h Processor Function 2
00:18.3 Host bridge: Advanced Micro Devices, Inc. [AMD] Family 12h/14h Processor Function 3
00:18.4 Host bridge: Advanced Micro Devices, Inc. [AMD] Family 12h/14h Processor Function 4
00:18.5 Host bridge: Advanced Micro Devices, Inc. [AMD] Family 12h/14h Processor Function 6
00:18.6 Host bridge: Advanced Micro Devices, Inc. [AMD] Family 12h/14h Processor Function 5
00:18.7 Host bridge: Advanced Micro Devices, Inc. [AMD] Family 12h/14h Processor Function 7
02:00.0 Network controller: Ralink corp. RT3290 Wireless 802.11n 1T/1R PCIe
02:00.1 Bluetooth: Ralink corp. RT3290 Bluetooth
06:00.0 Ethernet controller: Realtek Semiconductor Co., Ltd. RTL8111/8168/8411 PCI Express Gigabit Ethernet Controller (rev 06)

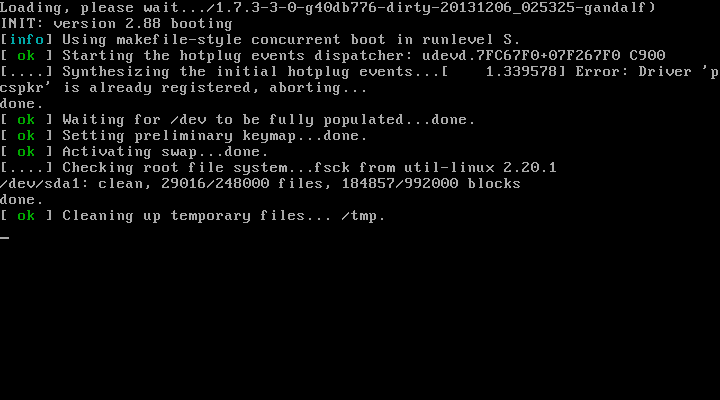
The Debian installer worked fine, but it booted to a blank screen with a blinking underscore. Steps below to get a working machine.

Fix graphics and wifi

Debian 7 running on a HP dm-1

You need the nonfree firmware in firmware-linux-nonfree. First select ‘recovery mode’ from the boot menu.

From the root terminal, nano /etc/apt/sources.list, and add non-free. Plug in a network cable, then:

apt-get update && apt-get install firmware-linux-nonfree firmware-ralink

After a reboot, you can now get a working desktop and use wifi.

The beep problem

On shutdown, my computer gave a loud PC speaker beep, which could not be muted. The GNOME sound control doesn’t provide a volume bar for the PC speaker, so I installed the gnome-alsamixer package, which has it:

Muting the PC speaker with gnome-alsa-mixer

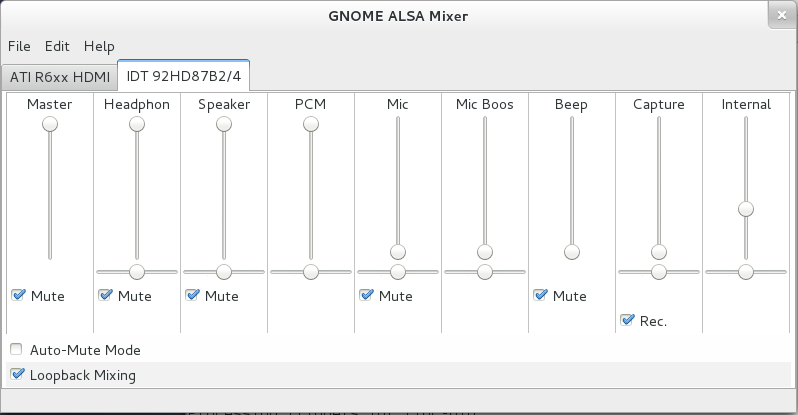
Strangely, the beep returned after a few reboots, but was no longer as loud.

Brightness keys

The brightness keys did not work originally, but upgrading to “testing” (jessie) fixed this.

Overall

This laptop requires two non-free packages to run, both of which are just firmware blobs.

Writing in Ancient Egyptian with HieroTeX

When I started learning Ancient Egyptian, I wanted to be able to type hieroglyphs alongside regular text, for printing translations. There is a package for the typesetting system LaTeX which does this, called “HieroTeX“. It took me a while to figure out how to use it, but the results are top-notch:

Example of HieroTex output

Because I’ve installed this on quite a few computers, I’m writing up this blog post to make it easier for other GNU/Linux users who are trying to figure it out.

Installation

This is tricky, because:

  • There is no Debian package! Uh oh.
  • Debian is phasing out tetex in favour of texlive
  • The variables.mk file needs to be edited for the install to work (diff to apply / how to apply it). This is because the default installation target is the user’s home directory.

I put togethter this script, hierotex-install-3.5.sh, which will get a working HieroTeX install on any recent version of Debian.

#!/bin/sh
# Script to download and install HieroTeX on a Debian computer.
# Use at your own risk.
#
# Some packages you should install first:
# 	apt-get install texlive make gcc

# Get and extract the files
wget -c "http://webperso.iut.univ-paris8.fr/~rosmord/archives/HieroTeX-3.5.tgz" && 
tar xvzf "HieroTeX-3.5.tgz" && 
cd HieroTeX && 
wget -c "http://webperso.iut.univ-paris8.fr/~rosmord/archives/HieroType1-3.1.4.tgz" && 
tar xvzf "HieroType1-3.1.4.tgz"

# Patch variable.mk to install for the whole system
wget http://mike42.me/blog/files/variable.patch && 
patch variable.mk < variable.patch

# Run the installer
sudo make tetex-install

Note: This page is great, but the variables.mk suggested for Debian/Ubuntu does not include the documentation folder, which will cause the installer to crash. It also suggests using tetex, which will not exist in future Debian releases! This is probably fine if you are on a .rpm-flavoured distro.

How to use

Firstly, you will need to know a little bit about the LaTeX typesetting system. See wikibooks.

HieroTeX accepts markup in Manuel de Codage format, which you will either need to learn, or get a tool which helps you mark up text in it. This Linux for Egyptologists page has some excellent suggestions.

The block of LaTeX code below is from my tex-examples repo, and was used to generate the image of Tutankhamun’s cartouche above.

\documentclass[a4paper]{article}
\usepackage{hiero}
\usepackage{egypto}
\begin{document}
	\section*{Egyptian hieroglyph example}

	\begin{hieroglyph}zA ra < i-mn:n-t-G43-t-S34 HqA-iwn-Sma >\end{hieroglyph} \\
	{\em Tutankhamun Hekaiunushema} \\
	Living Image of Amun, ruler of Upper Heliopolis
\end{document}

To build the file, you need to filter it through sesh command. Something like this would work:

cat hierotex-example.tex | sesh > hierotex-example-2.tex
latex hierotex-example-2.tex

The actual example uses a Makefile to do this.

Update May 2016: The original website for HieroTeX has gone offline, but is available via the Internet Archive: webperso.iut.univ-paris8.fr/~rosmord/archives/

Transforming between SQL dialects

I recently found myself Googling for some data voodoo. I have a web app which I want to work with locally, and the RDBMS requirements are a little bit incompatible.

Unfortunately, neither this impressive sed script nor this eloquent mix of sed, ruby and perl could do this with <100 syntax errors in the output, so I had to get creative. Here is what I have learned:

  • Simplify the problem. I decided to convert the structure to SQLite manually, as it is not likely to change. The parts you will need to convert often (thousands of INSERT statements) are the parts which are more important to have a script for. The extra mysqldump options for getting the data only, without nasty `backticks` were:
    --compatible=ansi --skip-extended-insert --compact --no-create-info
  • Use sed to fix the escaping. MySQL escapes single quotes with ‘, and double quotes with ” but SQLite uses ” and “. This one-liner made the conversion:
    sed -e "s/\'/''/g" -e 's/\"/"/g' db.sql > db.sqlite

The resulting file could have the structure cat‘d on to the start and imported into SQLite.

Patton CLI commands

Patton SN4114 and SN4120

Patton makes a bunch of gateways to connect computer networks to telephone networks. They are some of the most amazingly configurable boxes in the world (once you figure out how the damn things work!)

Setting the admin password via the web interface has never worked on any of the 5 SmartNodes which I use, but rather than try a firmware upgrade, I thought I’d try the CLI.

Whilst I was logged in, I noticed that they all support SNMP, which I also can’t find out how to enable via the web interface.

enable
    configure
        administrator <username> password <password>
        snmp community <public> ro
        copy running-config startup-config
        exit
    exit
exit

Why SNMP?

SNMP lets you check just about anything. In my case, I use it to find out if the ISDN lines are down, via the check_snmp plugin for Icinga.

Loading Asterisk CDR into a database

In the interests of accurate accounting, Asterisk creates a Master.csv, logging all calls and a few things about them.

This page on wiki.asterisk.org has a good breakdown of what all the fields mean.

I put together this MySQL table so that the data can be processed for data-analysis, accounting, or whatever it is that the data is needed for.

-- Code to create MySQL table for Asterisk CDR data
-- Field descriptions from:
--   https://wiki.asterisk.org/wiki/display/AST/CDR+Fields
CREATE TABLE cdr (
    accountcode VARCHAR(256) COMMENT 'What account number to use, (string, 20 characters)',
    src VARCHAR(80) COMMENT 'CallerID number',
    dst VARCHAR(80) COMMENT 'Destination extension',
    dcontext VARCHAR(80) COMMENT 'Destination context',
    clid VARCHAR(80) COMMENT 'CallerID with text',
    channel VARCHAR(80) COMMENT 'Channel used',
    dstchannel VARCHAR(80) COMMENT 'Destination channel if appropriate',
    lastapp VARCHAR(80) COMMENT 'Last application if appropriate',
    lastdata VARCHAR(80) COMMENT 'Last application data (arguments)',
    tsstart DATETIME COMMENT 'Start of call (date/time)',
    tsanswer DATETIME COMMENT 'Answer of call (date/time)',
    tsend DATETIME COMMENT 'End of call (date/time)',
    duration INT(11) COMMENT 'Total time in system, in seconds (integer), from dial to hangup',
    billsec INT(11) COMMENT 'Total time call is up, in seconds (integer), from answer to hangup',
    disposition ENUM('ANSWERED', 'NO ANSWER', 'BUSY') COMMENT 'What happened to the call',
    amaflags ENUM('DOCUMENTATION', 'BILL', 'IGNORE') COMMENT 'What flags to use, specified on a per channel basis like accountcode.',
    uniqueid VARCHAR(32) COMMENT 'Unique Channel Identifier',
    userfield VARCHAR(256) COMMENT 'user field: A user-defined field, maximum 255 characters'
) ;

The second-last field is not present on all installations, but it is on mine. The version I’m on is:

asterisk:~# asterisk -V
Asterisk 1.8.10.1~dfsg-1ubuntu1

Infinite loop in a Makefile

I had to kick myself for writing this bug into a Makefile today. I am writing it down so that I remember to use &&, and not ; next time.

The Makefile had this target in it:

clean:
	cd folder; \
		make clean
	rm -f file

The problem here is that the statement cd folder; make clean counts as one "line", and make wont notice a problem (and stop) until that line has executed.

Unfortunately, the folder name had a typo, so this script had a chance to call make clean without changing directory, calling itself and becoming stuck in an infinite loop.

So long story short, this is why Makefiles should be littered with the "and" operator.

clean:
	cd folder && \
		make clean
	rm -f file